Prerequisites
- An active TechWolf contract with SkillEngine API credentials.
- A working SAP SuccessFactors tenant.
- An SAP SuccessFactors administrator user with permissions:
- Manage Permission Roles
- Manage Permission Groups
- Manage OAuth 2 Client Applications.
- A working SAP BTP tenant with:
- SAP Integration Suite provisioned including the Build Integration Scenarios capability.
- Your user must have the following roles:
PI_AdministratorPI_Integration_Developer
- The Content Package for this connector, which can be found below.
- The Integration User Definition file for setting up an API user in SAP SF.
Content Package
Content Package for the SAP BTP Datasource Integration
Integration User Definition
Integration user definition for import
Install the BTP package
These steps import the connector’s Content Package into your BTP tenant and create the inbound authentication TechWolf uses to call the iFlow.1
Create a User Role for the integration
In SAP Integration Suite, go to Monitor > Integrations and APIs > Manage
Security > User Roles, then click Add. Enter a Name that you will
remember in the next step and when configuring the iFlows later (e.g.
TechWolfBTPIntegration.send) and click Add.2
Create a Process Integration Runtime instance
In SAP BTP Cockpit, create a new instance of the Process Integration Runtime
service with the 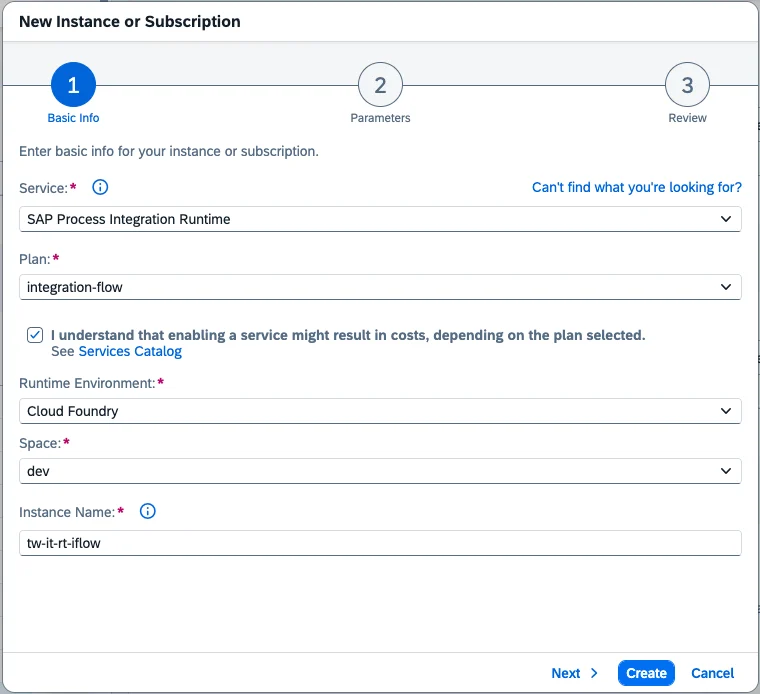
integration-flow plan.- Check “I understand that enabling a service might result in costs, depending on the plan selected.”
- Runtime Environment: Cloud Foundry.
- Space: the Cloud Foundry space you’re deploying in.
- Instance Name: a CLI-friendly name (e.g.
tw-it-rt-iflow). - Click Next to continue to the Parameters step.
- In Parameters, set the role to the one created in the previous step (e.g.
TechWolfBTPIntegration.send). - Grant-types:
Client Credentials. - Leave all other fields on their default values.
3
Create a Service Key on the instance
Find the newly created Process Integration Runtime instance. Click the three
dots on the right, then click Create Service Key.
- Service Key Name: any value (e.g.
TechWolfBTPDatasourceIntegration). - Key Type:
ClientId/Secret. - Leave all other fields on their default values.
4
Import the Content Package
In SAP Integration Suite, go to Design > Integrations and APIs and click
Import.In the file picker, select the Content Package zip file provided by your
TechWolf representative.Additionally, Under Discover > Integrations, search for
Amazon Web Services Adapter for SAP Integration Suite. Press Copy to add
the adapter to your Integration Suite integrations.After import, the package and its iFlows are available under Design >
Integrations and APIs, but are not yet deployed. The iFlows are configured and
deployed later in this guide.Set up BTP ↔ SuccessFactors authentication
These steps let the Worker iFlow call SuccessFactors on TechWolf’s behalf. The authentication uses an OAuth 2 SAML Bearer Assertion flow, backed by a customer-managed X.509 certificate in the BTP Keystore. The same certificate’s Common Name is used in three places: the certificate itself, the SuccessFactors technical user, and the SuccessFactors OAuth 2 Client Application. The flow only succeeds if all three values match exactly. If you choose a different name thanTechWolf_BTP_Datasource, be sure to update
it in all the locations it is used, especially the user import definition.
1
Create a key pair in the BTP Keystore
- In SAP Integration Suite, go to Monitor > Integrations and APIs > Manage Security > Keystore, then click Create > Key Pair.
- Set Alias to a value you will remember when configuring the SAML Bearer
credential later (e.g.
techwolf_btp_datasource_successfactors). - Set Common Name to
TechWolf_BTP_Datasource(or a different choice). - Set Country to the two-letter ISO 3166-1 alpha-2 code for your country
(e.g.
BEfor Belgium,USfor the United States). List of ISO 3166-1 alpha-2 codes . - (Optional) Change Valid Until to a date of your choice.
- Leave all other fields on their default values.
- Click Create. The new key pair appears in the Keystore overview.
- Click the new key pair, then click Download > Certificate. Keep the downloaded certificate file available; you will paste its contents into SuccessFactors when registering the OAuth 2 Client Application below.
2
Create the TechWolf technical user in SuccessFactors
In SuccessFactors, create a technical user with User ID
TechWolf_BTP_Datasource (matching the Common Name set in the key pair step) by
importing the provided Integration user definition CSV via Admin Center >
Import Employee Data. Use Basic Import under Select an entity. Assign
the user to a Permission Group that holds the permissions listed in
Grant SuccessFactors permissions below.For SAP’s reference on importing a user definition, see
Managing Basic User Data by Using a Data File .3
Register the SuccessFactors OAuth 2 Client Application
- In SuccessFactors, in the search bar at the top right, enter
Manage OAuth 2 Client Applicationsand press enter. - Click Register Client Application.
- Fill in the following fields:
- Application Name: any value (e.g.
techwolf_btp_datasource). - Application URL: any valid URL (e.g.
https://www.techwolf.ai). - Bind to Users: check the checkbox.
- User IDs:
TechWolf_BTP_Datasource(matching the Common Name and technical user ID from the previous steps). - X.509 Certificate: paste the contents of the certificate downloaded in
the key pair step. Remove the
-----BEGIN CERTIFICATE-----and-----END CERTIFICATE-----guards if present, and strip any line breaks so the value is a single continuous string.
- Application Name: any value (e.g.
- Click Register. The Client Application appears in the overview.
- Click View on the new Client Application and copy the API Key. You will need it in the next step.
4
Configure the SAML Bearer credential in BTP Security Material
- In SAP Integration Suite, go to Monitor > Integrations and APIs > Manage Security > Security Material and click Create > OAuth 2 SAML Bearer Assertion.
- Set Name to a value you will remember when configuring the Worker iFlow’s
SF_credential_namelater (e.g.techwolf_btp_datasource_assertion). - Set Audience to
www.successfactors.com. - Set Client Key to the API Key copied in the previous step.
- Set Token Service URL to your SuccessFactors API URL with
/oauth/tokenappended. See How to find the SAP SuccessFactors Company ID and API URL to locate both values. - Set User ID to Key pair Common Name (CN).
- Set Key Pair Alias to the alias of the key pair created earlier (see Create a key pair in the BTP Keystore).
- Click Deploy.
Grant SuccessFactors permissions
The SuccessFactors technical user created during authentication setup needs permission to read the OData V2 EntitySets used by this connector. Grant a Permission Role to the technical user through a Permission Group that includes the View permissions below. Every employee data type also needs Manage User > Employee Export; only enable the data types you plan to use. The job-architecture data types (Job Families, Job Roles, Job Profiles) are organization-wide Job Profile Builder objects — they need only the grants shown below, with no Employee Export and no Target Population. Expand a data type to see the exact permission path to grant in Manage Permission Roles.Employee Basic Info
Employee Basic Info
OData V2 EntitySet:
UserAccountManage User
Employee Export
User Account OData entity
Employee Data
Employee Profile
Department: View
Employee Certificates
Employee Certificates
OData V2 EntitySet:
Background_CertificatesManage User
Employee Export
Employee Data
Background
Certifications/Licenses: View
Employee Courses
Employee Courses
OData V2 EntitySet:
Background_CoursesManage User
Employee Export
Employee Data
Background
Courses/Workshops/Seminars: View
Employee Education
Employee Education
OData V2 EntitySet:
Background_EducationManage User
Employee Export
Employee Data
Background
Formal Education: View
External Work Experience
External Work Experience
OData V2 EntitySet:
Background_OutsideWorkExperienceManage User
Employee Export
Employee Data
Background
Previous Employment: View
Internal Work Experience
Internal Work Experience
OData V2 EntitySet:
EmpJobManage User
Employee Export
Employee Central Effective Dated Entities
Job Information
Job Information Actions: View Current | View History
Job Classification: View Current | View History
Job Title: View Current | View History
Job Families
Job Families
OData V2 EntitySet: If
FamilyEntityManage Job & Skill Profile Visibility
Family: View
Family is not visible under Manage Job & Skill Profile
Visibility, enable separate security permissions for the FamilyEntity
object definition:- In the search bar at the top, enter
Configure Object Definitionsand open it. - Search for
Object Definition→Family. - Use
Take Action→Make Correction. - In the
Securitysection, click the+button if the fields are missing, then set:Secured:YesPermission Category:Manage Job & Skill Profile VisibilityRBP Subject User Field: leave blankCREATE Respects Target Criteria:NoBase Date Field For Blocking: leave blank
- Scroll to the bottom of the page and click
Save. - Return to Manage Permission Roles and grant
Family: View.
Job Roles
Job Roles
OData V2 EntitySet: This single grant also covers the role’s job-code mappings, from which
the canonical
RoleEntityManage Job & Skill Profile Visibility
Role: View
job_code is resolved.Job Profiles
Job Profiles
OData V2 EntitySet: This grant covers the profile and its section content (header, footer,
long and short description) reached via the profile’s localized data.
JobProfileManage Job Profile Builder
Manage Job Profiles
Exact label paths can vary slightly between SuccessFactors releases. If a
permission is not found at the path above, search for the permission name
itself in Manage Permission Roles.
Configure and deploy the iFlows
Each iFlow is configured through its own Configure dialog. The SuccessFactors connection, the S3 destination, and the inbound settings are set as externalized parameters on theSF_Worker and SF_Frontend iFlows.
1
Add the S3 access key and secret to Security Material
Both iFlows reach the TechWolf-managed S3 bucket with an access key and secret
key provided by TechWolf. Store each as a secure parameter first, then
reference their names when configuring the iFlows.
- In SAP Integration Suite, go to Monitor > Integrations and APIs > Manage Security > Security Material, then click Create > Secure Parameter.
- Create the access key parameter:
- Name: a value you will remember (e.g.
techwolf_s3_access_key). This is theS3_access_key_aliasyou enter when configuring the iFlows. - Secure Parameter: the S3 access key provided by TechWolf.
- Click Deploy.
- Name: a value you will remember (e.g.
- Click Create > Secure Parameter again for the secret key:
- Name: a value you will remember (e.g.
techwolf_s3_secret_key). This is theS3_secret_key_aliasyou enter when configuring the iFlows. - Secure Parameter: the S3 secret key provided by TechWolf.
- Click Deploy.
- Name: a value you will remember (e.g.
2
Configure and deploy the Worker iFlow
Open the imported package in Design > Integrations and APIs and go to
Artifacts. Locate the SF_Worker iFlow, click the three dots, and select
Configure. Set the values provided by TechWolf and the SAML Bearer
credential name created during the BTP ↔ SuccessFactors authentication setup.On the
SuccessFactors receiver, set:The Receiver dropdown defaults to
SuccessFactors; switch it to
AWS_S3 to reach the S3 fields, then set:The TechWolf-managed S3 bucket is provisioned and owned by TechWolf; the access
key and secret key are provided by TechWolf and stored in your BTP Security
Material as secure parameters under the aliases above.Click Save, then Deploy.
3
Configure and deploy the Frontend iFlow
In the package’s Artifacts tab, locate the SF_Frontend iFlow. Click the
three dots and select Configure.On the S3 receiver, set the same S3 variable values you used on the Worker
(they must be identical to the Worker’s), then set:
Leave
Address and Body Size (in MB) at their defaults (/techwolf/v3/sf/*
and 40).Click Save, then Deploy.Share with TechWolf
Once the configuration is complete, share the following with your TechWolf representative through a secure channel agreed with them:
TechWolf will validate the end-to-end connection and configure the ingestion
side. No further action is required from your side unless permission or
connectivity issues are reported.