> ## Documentation Index
> Fetch the complete documentation index at: https://developers.techwolf.ai/llms.txt
> Use this file to discover all available pages before exploring further.
# Installation
export const scopes_0 = "'Jobs & Positions'"
## System Requirements
The Job Description Sync makes use of existing Workday functionality. The
customer will need a TechWolf contract with a live TechWolf tenant, populated
with (a subset of) the Job entities in Workday, and job descriptions authored in
the TechWolf Console.
This integration authenticates with OAuth only.
## Workday Configuration
A Workday integration user must be configured in the Workday tenant with an
implementation security group.
If you already have a Job Skill Sync integration configured, the same ISU,
security group, and API Client can be reused: steps 1–3 and 5–7 are already
in place, and the `Job Information` domain policy from that setup is already
sufficient for this integration's read access. The **only new step is the
business process permission in step 4** — after granting it, run `Activate
Pending Security Policy Changes` and continue to the Console Configuration
section.
### 1. Create Integration System User (ISU)
* `Create Integration System User` business process.
* Do not allow UI sessions as this user will only be used for automations.
* Please securely store the username and password of this user.
### 2. Update password expiration rules for ISU
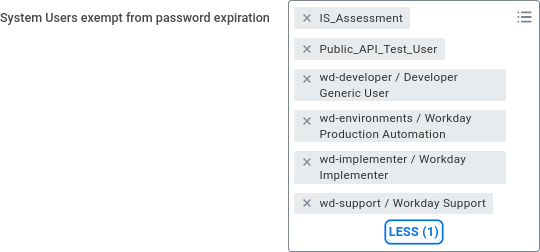
* In the `Maintain Password Rules` business process under "System Users exempt
from password expiration" add the newly created ISU to the list.
* **Note:** This ensures the integrations will keep running without
interruptions due to password expiration.
 ### 3. Set up security permissions for the ISU through security policies
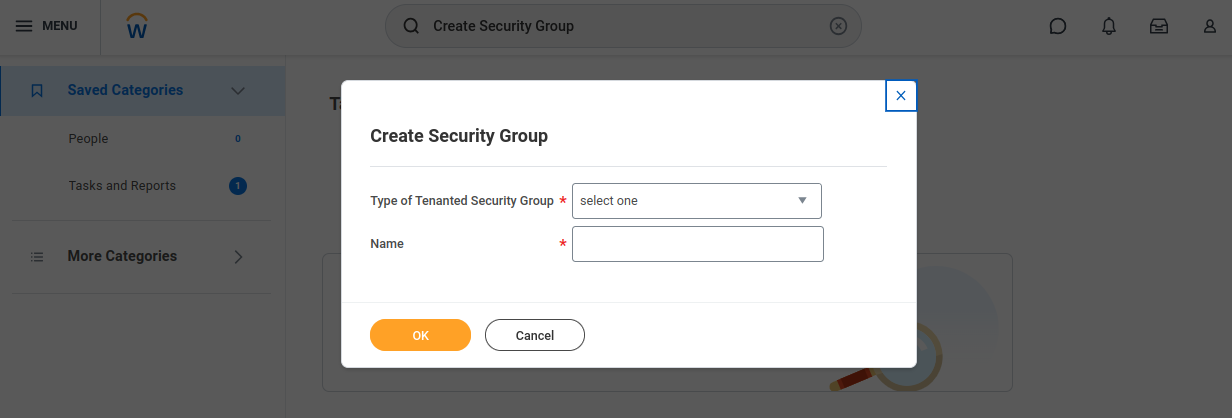
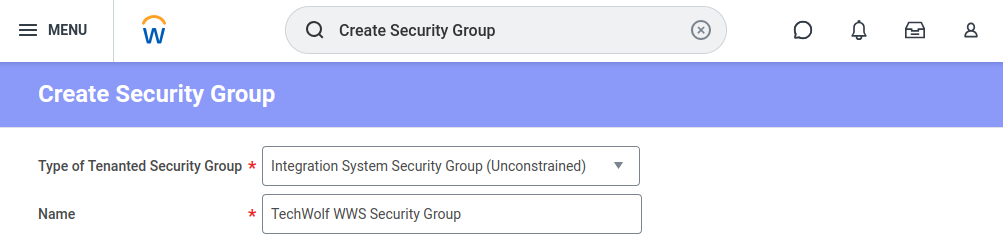
* Go to `Create Security Group`, choose "Integration System Security Group
(Unconstrained)".
* **Note on acceptance testing:** Consider using two different security groups,
one Unconstrained and one Constrained. This way, the test-set is scoped while
the correct permissions are applied for other Web Services.
### 3. Set up security permissions for the ISU through security policies
* Go to `Create Security Group`, choose "Integration System Security Group
(Unconstrained)".
* **Note on acceptance testing:** Consider using two different security groups,
one Unconstrained and one Constrained. This way, the test-set is scoped while
the correct permissions are applied for other Web Services.
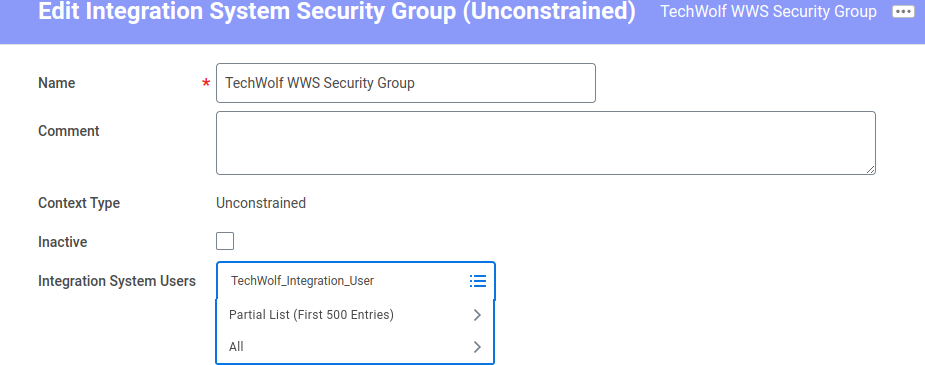
 * The next screen presents you with an Edit form to add additional information.
Add your ISU to the list. This can be changed later too. Do not check
"Inactive".
* The next screen presents you with an Edit form to add additional information.
Add your ISU to the list. This can be changed later too. Do not check
"Inactive".
 ### 4. Set up the Security Group's permissions
Job descriptions live on the Workday Job Profile, and Workday manages changes to
job profiles through the **Manage Job Profile business process** — the same
process that runs when an admin edits a job profile in the Workday UI. The
integration therefore needs two kinds of permissions: domain access to *read*
job profiles, and permission to *start* the business process that updates them.
#### Domain security policies (read access)
* Search for "View Security Group" and select your created security group.
* Select the option menu next to the Security Group's name, go to "Security
Group" and select "Maintain Domain Permissions for Security Group".
* Under Integration Permissions add the following Domain Security Policy:
| Domain Security Policy | Access |
| ---------------------- | :----: |
| Job Information | Put |
#### Business process permission (update access)
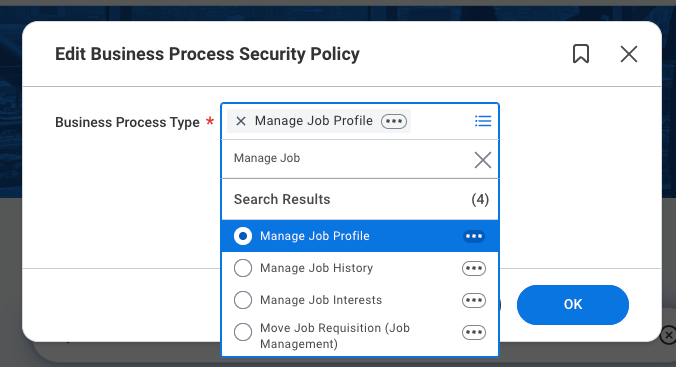
* Search for "Edit Business Process Security Policy" and select the **Manage Job
Profile** business process.
### 4. Set up the Security Group's permissions
Job descriptions live on the Workday Job Profile, and Workday manages changes to
job profiles through the **Manage Job Profile business process** — the same
process that runs when an admin edits a job profile in the Workday UI. The
integration therefore needs two kinds of permissions: domain access to *read*
job profiles, and permission to *start* the business process that updates them.
#### Domain security policies (read access)
* Search for "View Security Group" and select your created security group.
* Select the option menu next to the Security Group's name, go to "Security
Group" and select "Maintain Domain Permissions for Security Group".
* Under Integration Permissions add the following Domain Security Policy:
| Domain Security Policy | Access |
| ---------------------- | :----: |
| Job Information | Put |
#### Business process permission (update access)
* Search for "Edit Business Process Security Policy" and select the **Manage Job
Profile** business process.
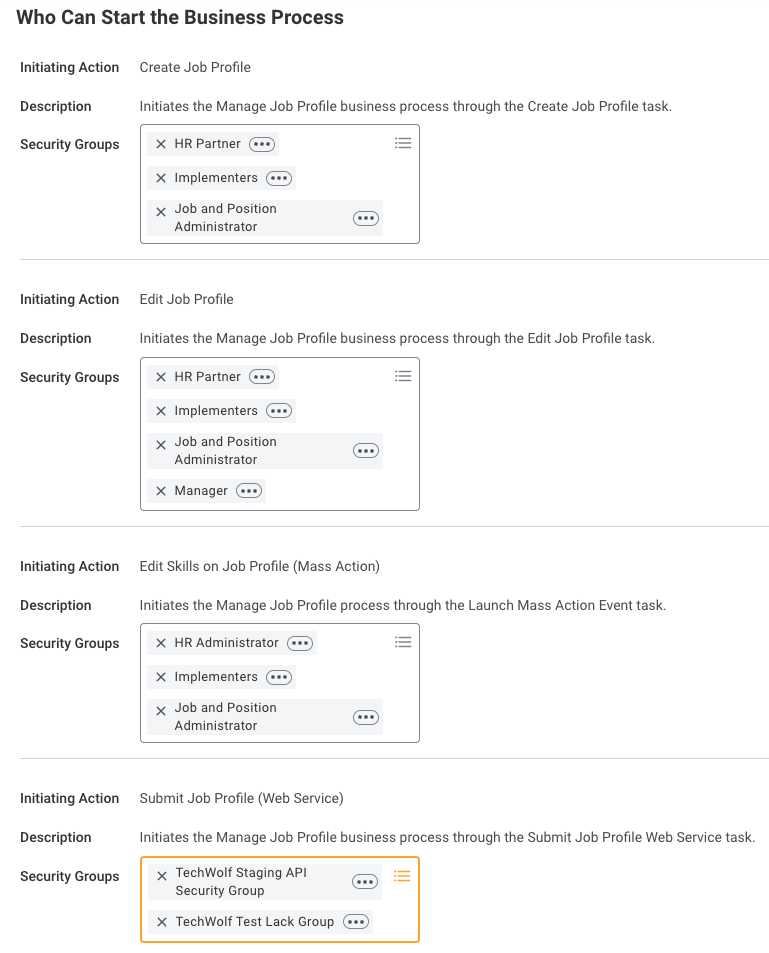
 * Under "Who Can Start the Business Process", find the Initiating Action
**Submit Job Profile (Web Service)** and add your security group to its
Security Groups.
* Under "Who Can Start the Business Process", find the Initiating Action
**Submit Job Profile (Web Service)** and add your security group to its
Security Groups.
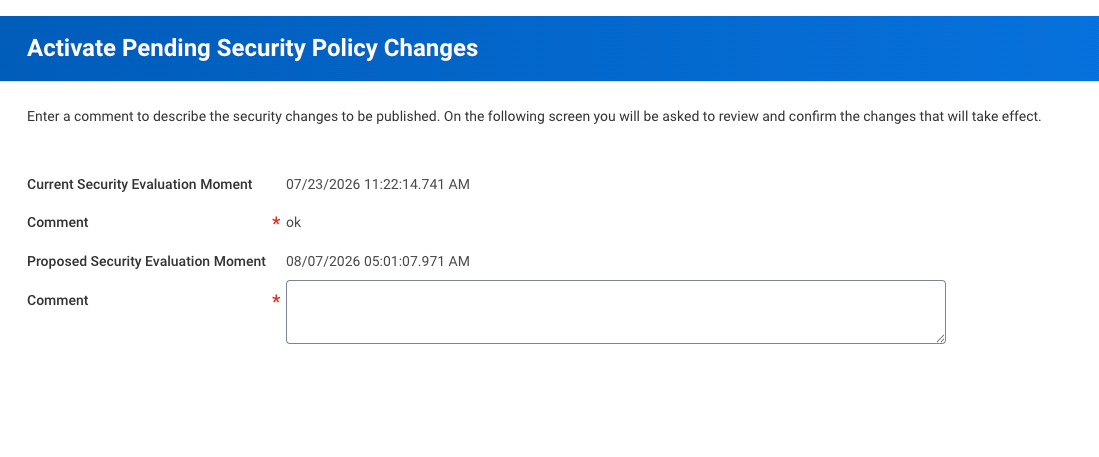
 * Run the `Activate Pending Security Policy Changes` task to apply both changes.
 This business process permission is the entire update-side key: with it, the
integration's updates complete automatically and are recorded as regular,
auditable Manage Job Profile events in your tenant's history. The
integration only ever submits the job description field — skills and all
other profile fields are never part of its payload. If your security team
wants Workday itself to enforce description-only updates as well, an opt-in
server-side restriction is available — ask your TechWolf contact.
### 5. Find out the correct Workday API URL
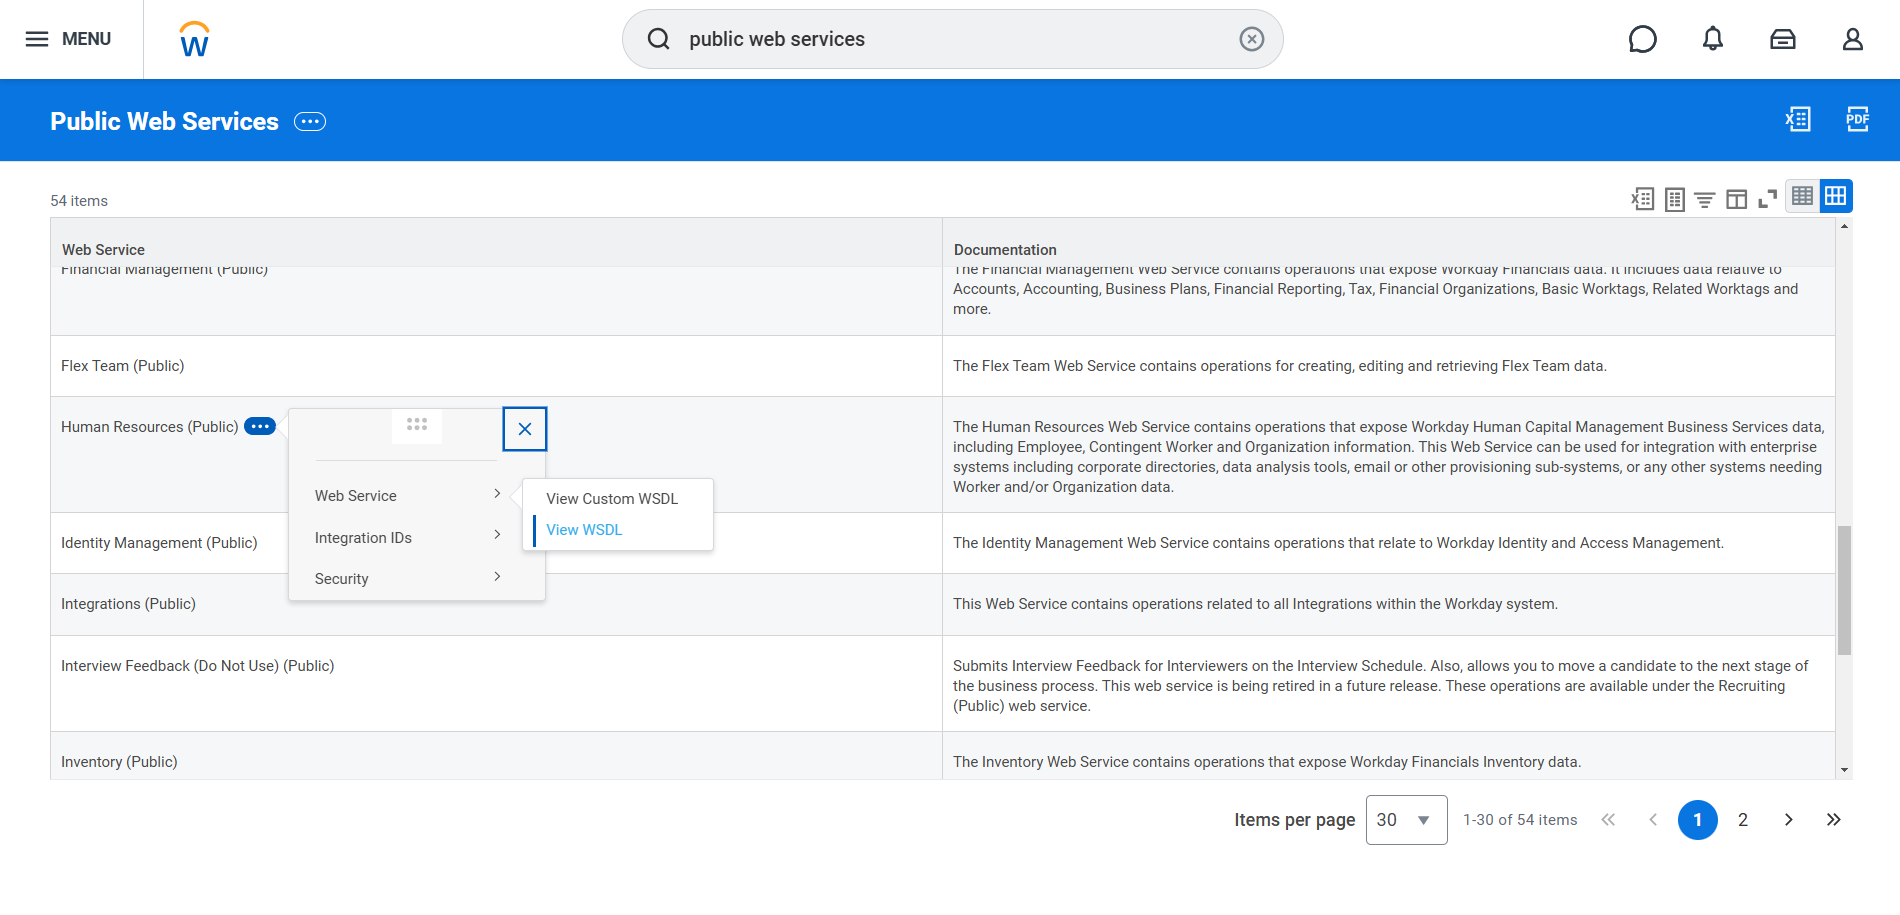
* Search for `Public Web Services` in the search bar at the top of the Workday
home page.
* In the list, click the three dots next to the `Human Resources (public)`
entry. Select `View WSDL` under `Web Service`.
This business process permission is the entire update-side key: with it, the
integration's updates complete automatically and are recorded as regular,
auditable Manage Job Profile events in your tenant's history. The
integration only ever submits the job description field — skills and all
other profile fields are never part of its payload. If your security team
wants Workday itself to enforce description-only updates as well, an opt-in
server-side restriction is available — ask your TechWolf contact.
### 5. Find out the correct Workday API URL
* Search for `Public Web Services` in the search bar at the top of the Workday
home page.
* In the list, click the three dots next to the `Human Resources (public)`
entry. Select `View WSDL` under `Web Service`.
 * The resulting page will take some time to load. Once it is loaded, look for
"soapbind:address location" near the bottom of the page. You will see a
section like this:
```xml theme={null}
```
* Copy the base tenant URL up to and including your tenant name. The service
name and version should be excluded from the URL.
* Note that the API URL can differ between implementation tenants and production
tenants, so the steps described above need to be repeated for each tenant
individually.
If you are using **OAuth Authentication** (recommended), continue with the
OAuth setup steps below before connecting the integration.
If you have arranged **Basic Authentication**, this is the final Workday
configuration step. Proceed to the
[TechWolf Configuration](#techwolf-configuration) section.
### 6. Create API Client for Integrations
* Search for "Register API Client for Integrations" business process
* Enable non-expiring refresh tokens to ensure continuity of service
* Add the appropriate scopes: {scopes_0}
* The resulting page will take some time to load. Once it is loaded, look for
"soapbind:address location" near the bottom of the page. You will see a
section like this:
```xml theme={null}
```
* Copy the base tenant URL up to and including your tenant name. The service
name and version should be excluded from the URL.
* Note that the API URL can differ between implementation tenants and production
tenants, so the steps described above need to be repeated for each tenant
individually.
If you are using **OAuth Authentication** (recommended), continue with the
OAuth setup steps below before connecting the integration.
If you have arranged **Basic Authentication**, this is the final Workday
configuration step. Proceed to the
[TechWolf Configuration](#techwolf-configuration) section.
### 6. Create API Client for Integrations
* Search for "Register API Client for Integrations" business process
* Enable non-expiring refresh tokens to ensure continuity of service
* Add the appropriate scopes: {scopes_0}
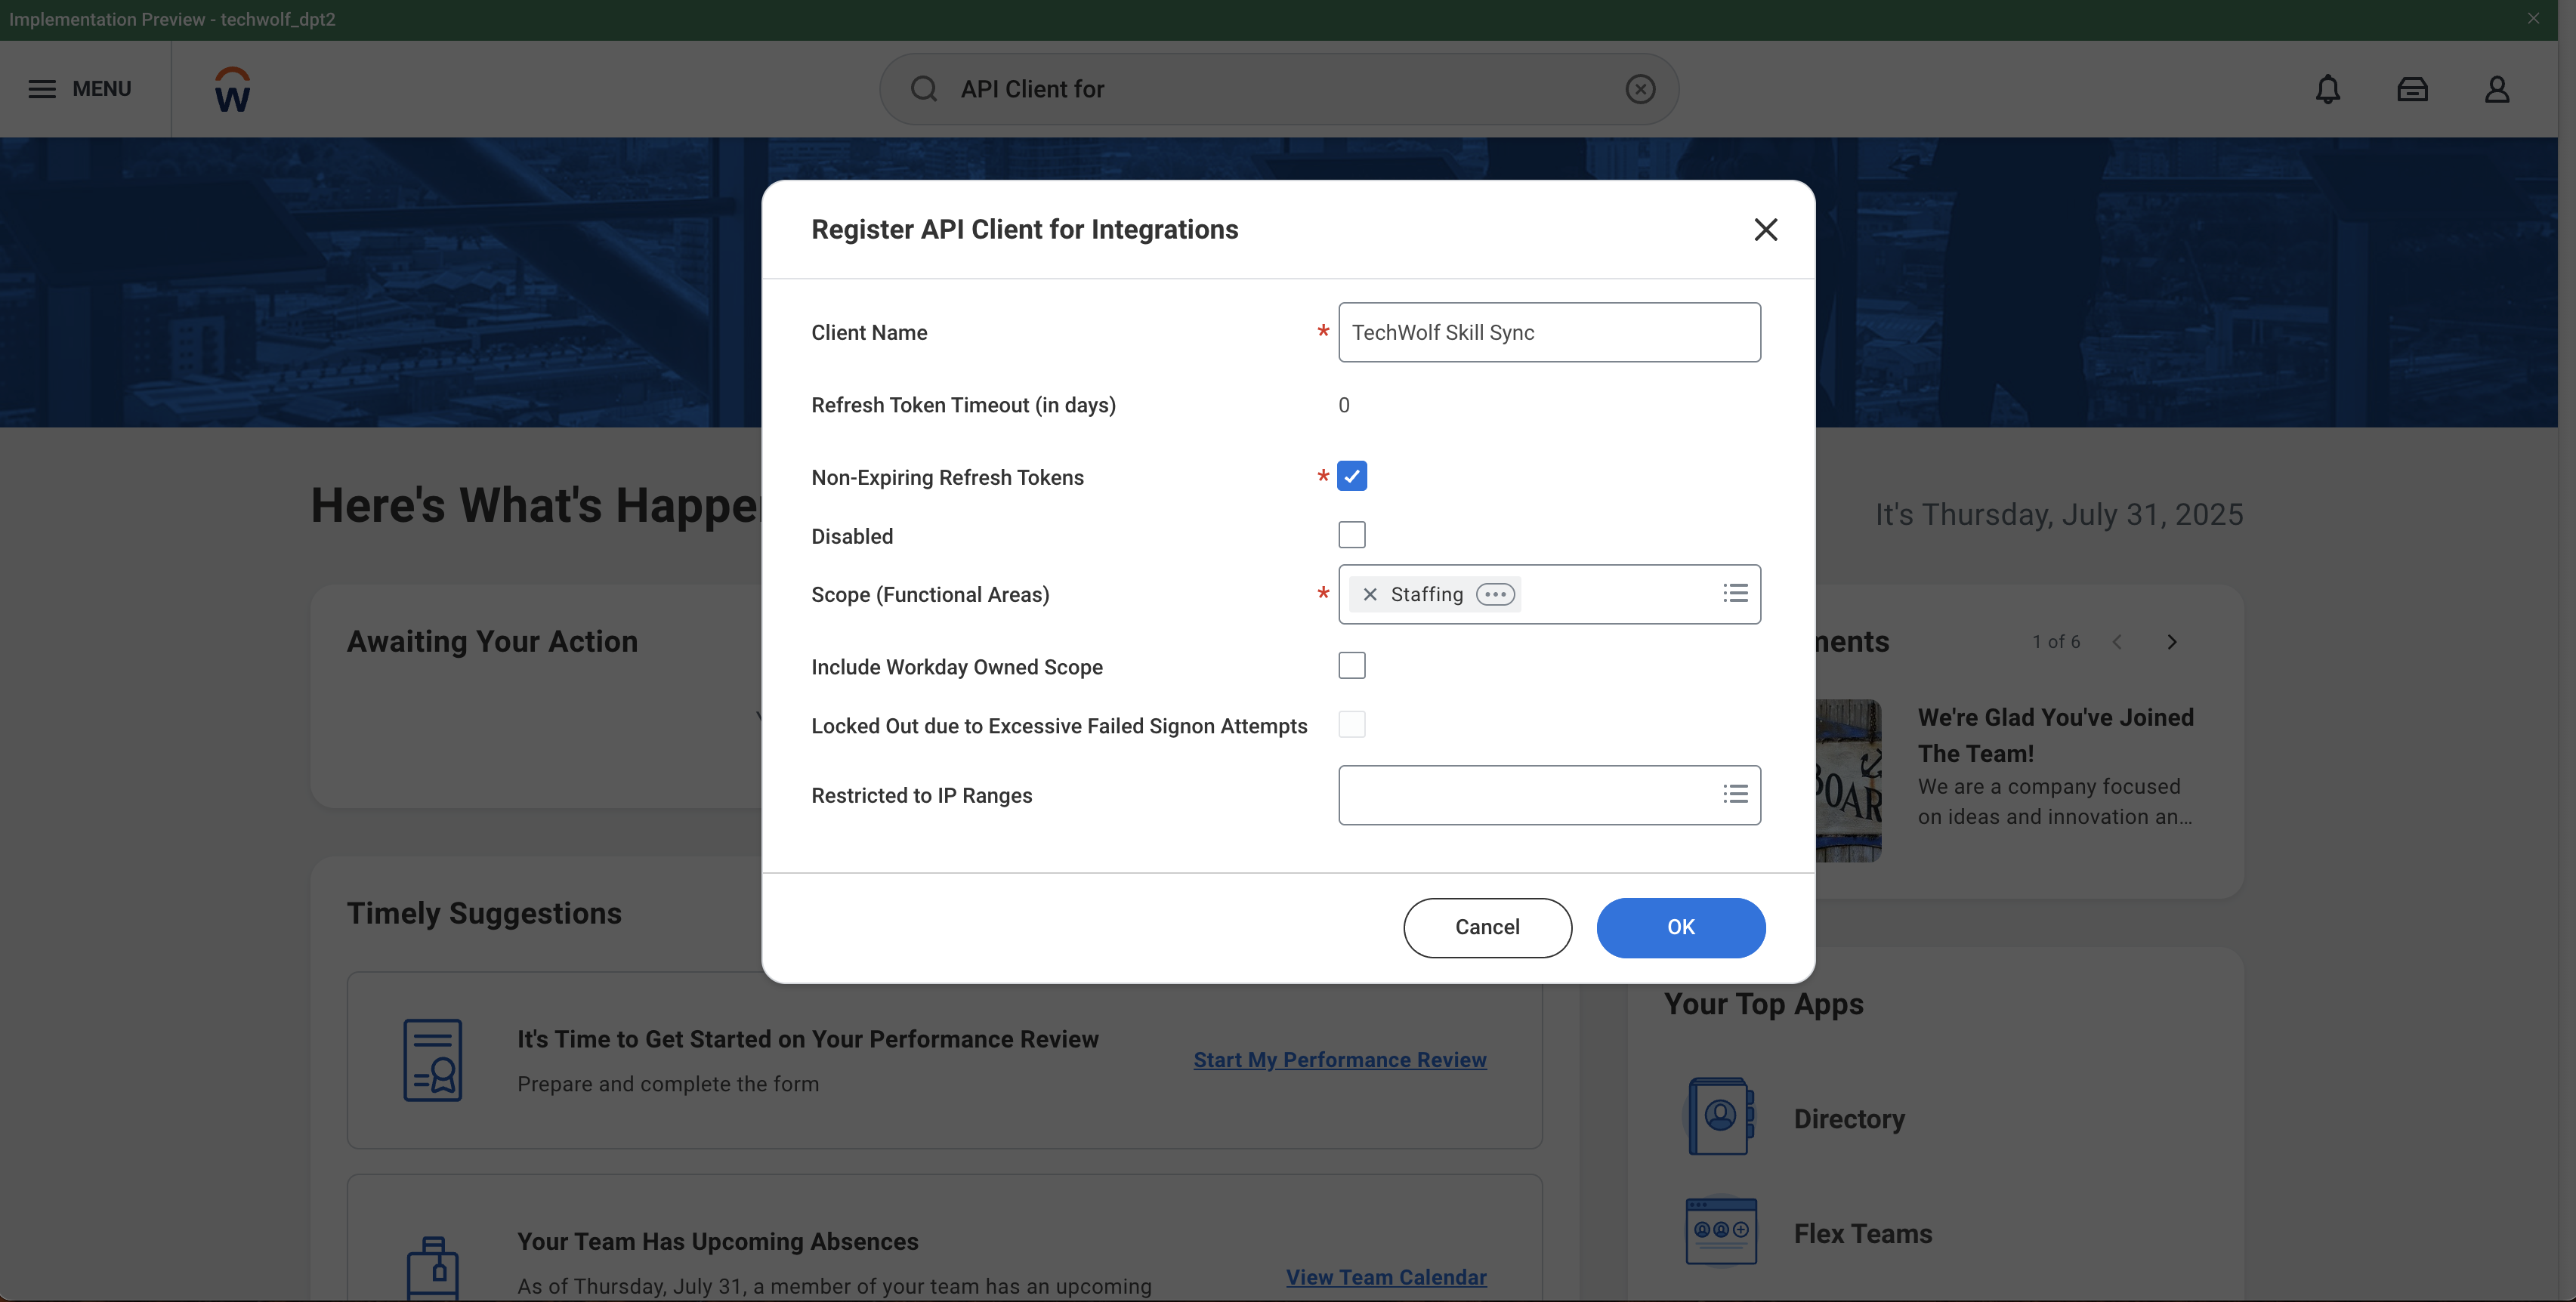 * Optionally, restrict the client to TechWolf's IP ranges by filling in the
"Restricted to IP Ranges" field with the values from the
[IP Addresses ](/integrations/reference/ip-addresses)
page
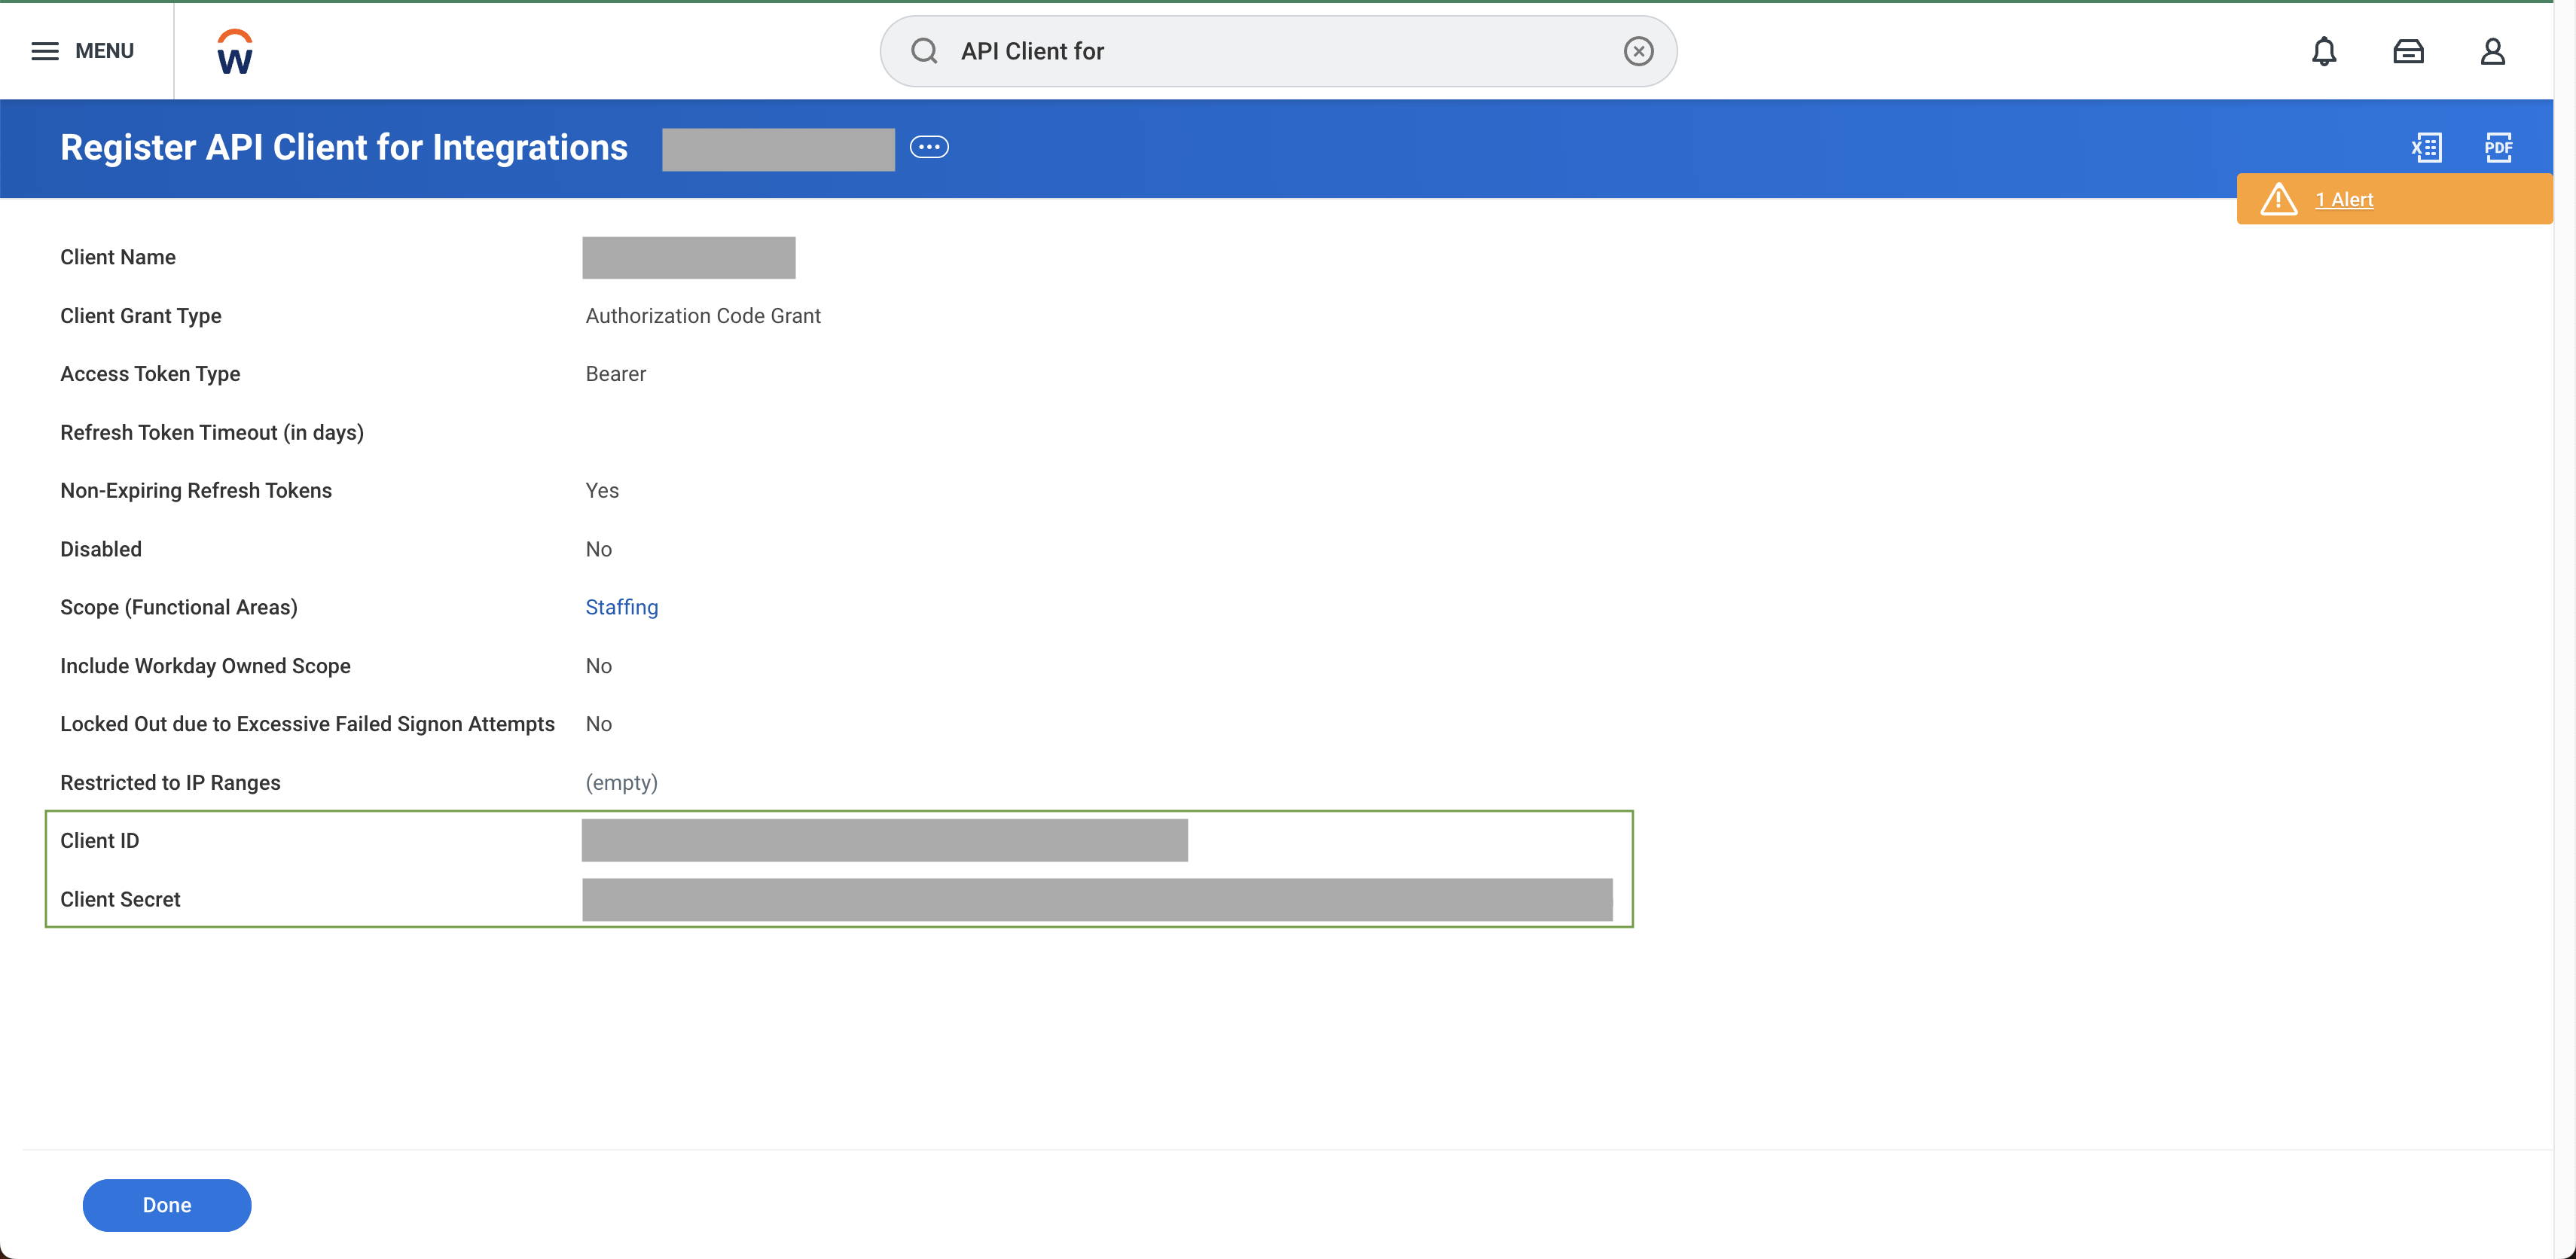
* Securely store the client ID and client secret
* Optionally, restrict the client to TechWolf's IP ranges by filling in the
"Restricted to IP Ranges" field with the values from the
[IP Addresses ](/integrations/reference/ip-addresses)
page
* Securely store the client ID and client secret
 ### 7. Generate Refresh Token
* Search for "View API Clients" report
* Click "API Clients for Integrations" tab
* Note down the token endpoint. You will need to share this later.
### 7. Generate Refresh Token
* Search for "View API Clients" report
* Click "API Clients for Integrations" tab
* Note down the token endpoint. You will need to share this later.
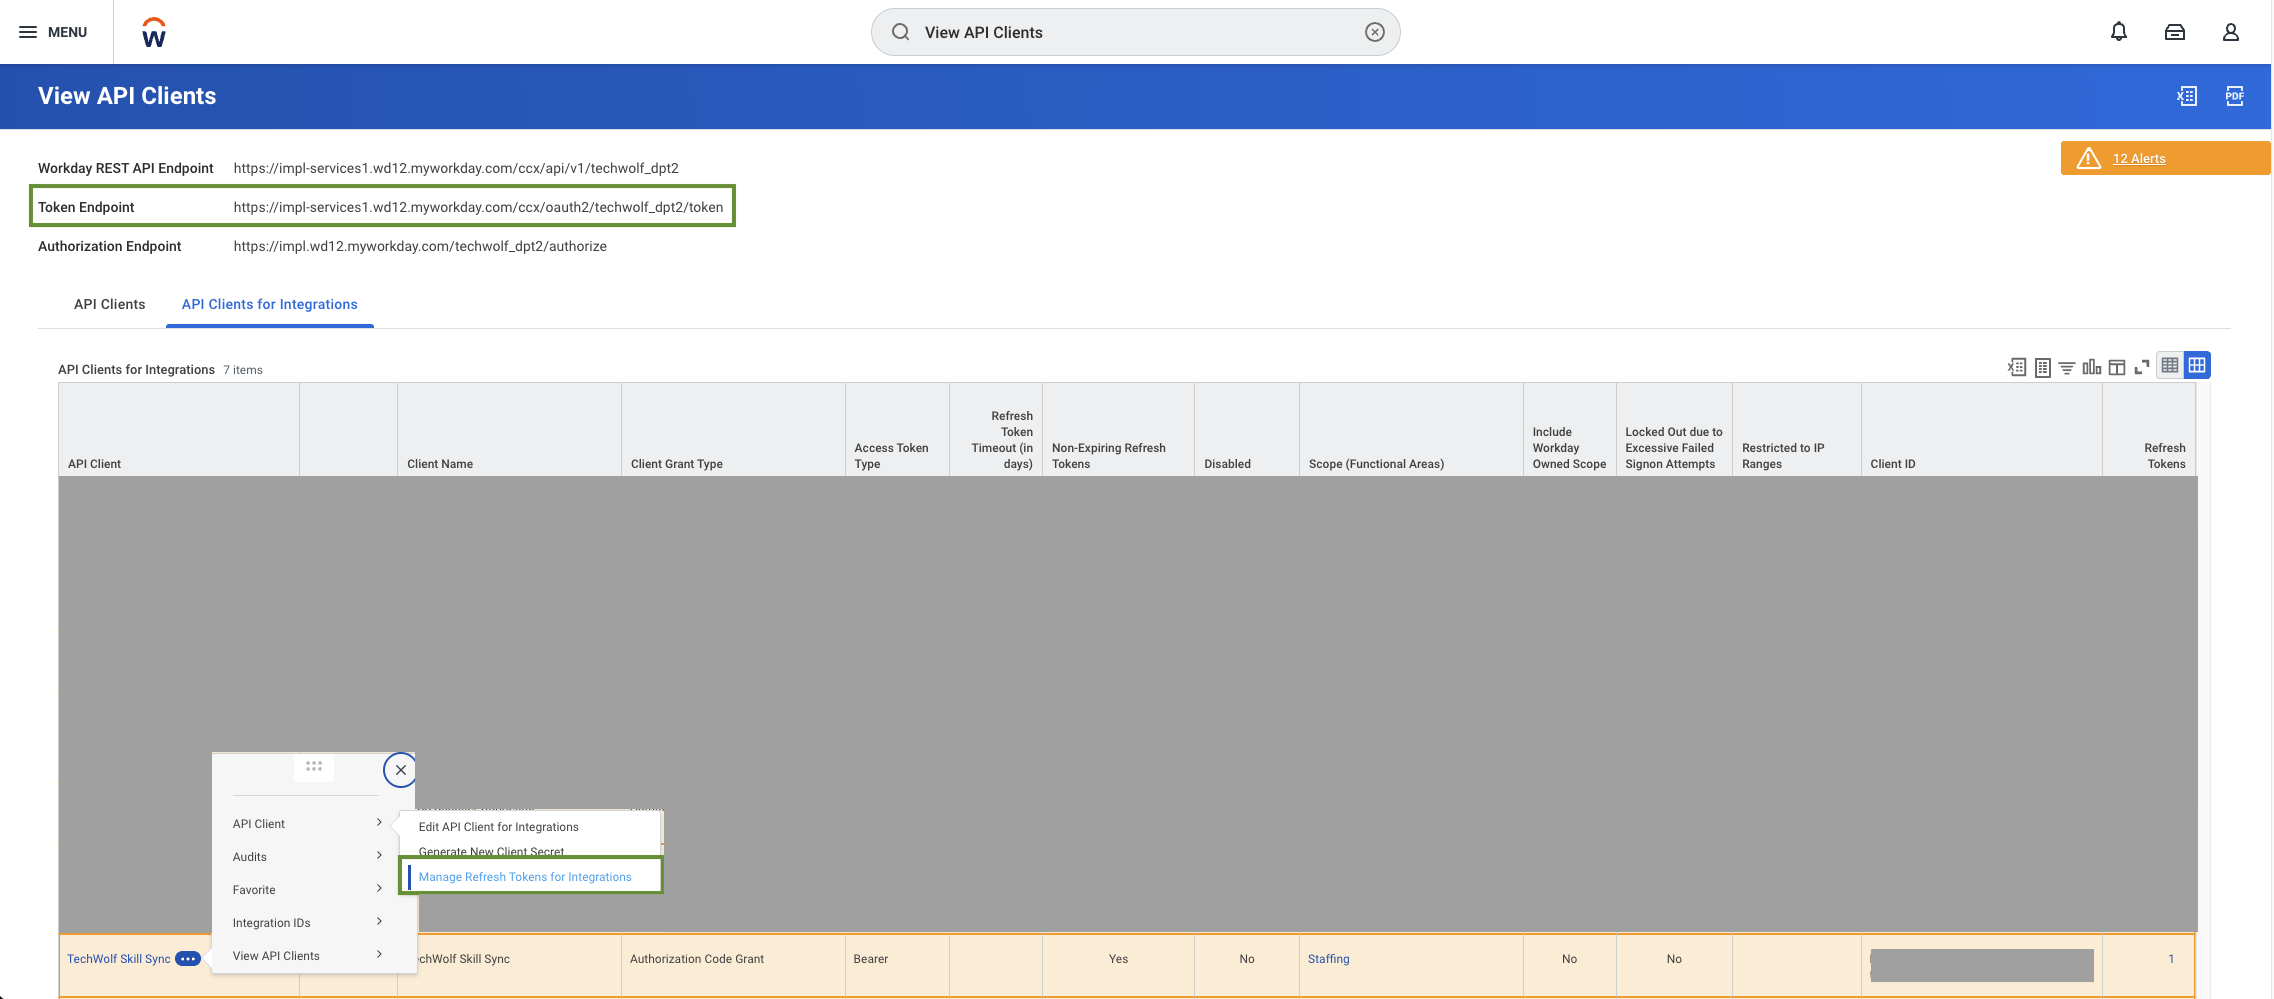 * Find your API client and select "Manage Refresh Tokens for Integrations"
* Under "Workday Account", type in your ISU
* Press OK
* Check the box "Generate new refresh token"
* Press OK
* Securely store the refresh token.
Keep your OAuth credentials secure and share them only with TechWolf through
secure channels.
## Console Configuration
This integration is configured self-service in the TechWolf Console:
1. Enter the Workday API URL and the ISU's OAuth credentials (client ID, client
secret, refresh token). Further explanation specified in section beneath
[Linking Workday & TechWolf](#linking-workday--techwolf)
2. Run the connection validation. It verifies each layer separately: the
credentials (token fetch), read access (profile fetch), and update access — a
reversible test write that appends a marker to one job profile's description,
confirms it, and restores the original.
3. Enable the integration.
**Choosing the validation job profile.** The validation asks for the ID of a
job profile to test against, and remembers it for later validations. Pick a
low-traffic or seperate test profile — each validation shows up as a Manage
Job Profile event in that profile's history.
## Linking Workday & TechWolf
Jobs are matched on the same identifier configuration as the
[Job Skill Sync](/integrations/workday-skill-sync-integration/installation-jobs#linking-workday--techwolf---seamless-matching-of-job-ids):
either Workday Job Codes (Job Profile IDs) or Workday IDs (WIDs), matching the
Job `external_id` in TechWolf. If you run both integrations, they share this
setting.
## Deployment Tasks & Responsibilities
1. **Customer**: Create the Integration System User and grant the permissions
described above (for existing Job Skill Sync tenants: only the business
process permission).
2. **Customer**: Enter the Workday API URL, OAuth credentials and ID of Job
Profile we use during validation in the TechWolf Console and run the
validation.
3. **TechWolf**: Potentially follow the first synchronization and confirm
go-live with the customer.
4. **Customer**: Check end-user test scenarios — publish a job description in
the Console and verify it appears on the Workday Job Profile.
* Find your API client and select "Manage Refresh Tokens for Integrations"
* Under "Workday Account", type in your ISU
* Press OK
* Check the box "Generate new refresh token"
* Press OK
* Securely store the refresh token.
Keep your OAuth credentials secure and share them only with TechWolf through
secure channels.
## Console Configuration
This integration is configured self-service in the TechWolf Console:
1. Enter the Workday API URL and the ISU's OAuth credentials (client ID, client
secret, refresh token). Further explanation specified in section beneath
[Linking Workday & TechWolf](#linking-workday--techwolf)
2. Run the connection validation. It verifies each layer separately: the
credentials (token fetch), read access (profile fetch), and update access — a
reversible test write that appends a marker to one job profile's description,
confirms it, and restores the original.
3. Enable the integration.
**Choosing the validation job profile.** The validation asks for the ID of a
job profile to test against, and remembers it for later validations. Pick a
low-traffic or seperate test profile — each validation shows up as a Manage
Job Profile event in that profile's history.
## Linking Workday & TechWolf
Jobs are matched on the same identifier configuration as the
[Job Skill Sync](/integrations/workday-skill-sync-integration/installation-jobs#linking-workday--techwolf---seamless-matching-of-job-ids):
either Workday Job Codes (Job Profile IDs) or Workday IDs (WIDs), matching the
Job `external_id` in TechWolf. If you run both integrations, they share this
setting.
## Deployment Tasks & Responsibilities
1. **Customer**: Create the Integration System User and grant the permissions
described above (for existing Job Skill Sync tenants: only the business
process permission).
2. **Customer**: Enter the Workday API URL, OAuth credentials and ID of Job
Profile we use during validation in the TechWolf Console and run the
validation.
3. **TechWolf**: Potentially follow the first synchronization and confirm
go-live with the customer.
4. **Customer**: Check end-user test scenarios — publish a job description in
the Console and verify it appears on the Workday Job Profile.