> ## Documentation Index
> Fetch the complete documentation index at: https://developers.techwolf.ai/llms.txt
> Use this file to discover all available pages before exploring further.
# Installation
# Required Roles for Teams Installation
The required roles for the Teams installation are:
* **Azure Admin**: A user with administrative privileges who can grant
permissions to the Skill Assistant app and run a script to force install the
app for users.
* **Teams Admin**: A user with administrative privileges who can install and
manage apps in Teams.
* **Azure Group Admin**: A user that can create and maintain an Azure group of
users.
* **Customer Contact with TechWolf**: A designated representative who
coordinates with TechWolf's team to facilitate the integration process,
provide necessary information, and ensure successful implementation of the
Skill Assistant in your Teams environment.
# Required Teams App Permissions
The Skill Assistant application requires the following permissions:
* `User.Read.All` application permission
* `User.Read` delegated permission
The `User.Read.All` application permission allows the app to read user profiles
for all users in the organization. This is necessary for the Skill Assistant to
fetch the linking property of a user (by default the Employee ID) using the
Microsoft Graph API. More information about this can be found in the
[Linking Microsoft Teams users and employee profiles in TechWolf ](#linking-microsoft-teams-users-and-employee-profiles-in-techwolf)
section. The `User.Read.All` permission is also required for the Skill Assistant
to fetch the user's country information, which is used to send suggestions
according to the user's country timezone when the user-based scheduling setting
is enabled. This country information is read from the **usageLocation** property
in Microsoft Graph.
For the Skill Assistant to use **user timezones** (when user-based
scheduling is enabled), the **usageLocation** property must be set for each
user in Microsoft 365 / Entra ID. The Skill Assistant uses usageLocation to
derive the user's timezone. If usageLocation is not set for a user, that
user will receive suggestions according to the tenant's default timezone
instead. You can set usageLocation in the [Microsoft 365 admin
center](https://admin.microsoft.com/) or via [Microsoft
Graph](https://learn.microsoft.com/en-us/graph/api/user-update). The Skill
Assistant also updates a user's timezone whenever it receives it from Teams
(e.g. from the message context); this only happens after the user has sent
their first message to the Skill Assistant.
The `User.Read` delegated permission allows the app to read user profiles for
the user who is currently logged in. This is necessary for the Skill Assistant
to properly show the Skill Profile Tab.
# Installation steps
The installation consists of several steps, which are described in detail below.
TechWolf needs to configure the Skill Assistant to work with your tenant, you
need to give the app the right permissions, and you need to install the app in
your Teams environment.
Share your **Azure Tenant ID** with TechWolf. TechWolf will configure
the Skill Assistant to work with your production tenant. Follow the
steps in [Get Azure Tenant
ID](https://learn.microsoft.com/en-us/entra/fundamentals/how-to-find-tenant)
to find your Azure Tenant ID.
We need a method to link employee profiles in the TechWolf API to Teams
Users in Microsoft Teams. See [Linking Microsoft Teams users and
employee profiles in TechWolf
](#linking-microsoft-teams-users-and-employee-profiles-in-techwolf).
If your organization restricts outbound internet traffic by default
(i.e., blocks all URLs unless explicitly allowed), you will need to
whitelist the following URL to ensure the Skill Profile tab functions
correctly: `teams-tab-frontdoor.skillengine.eu`. This URL doesn't handle
any personal or company data, it only loads the visual interface for the
Skill Profile tab in Microsoft Teams.
Grant the app the required permissions. Follow [these
steps](#grant-permissions-to-the-skill-assistant-app).
Customize the branding of the Skill Assistant app by following [these
steps](./customizations/#branding).
Install the Skill Assistant for users following [these
steps](#installing-the-skill-assistant-for-users)
### Linking Microsoft Teams users and employee profiles in TechWolf
In order for TechWolf's Skill Assistant to deliver personalized and timely skill
suggestions via Microsoft Teams, it is crucial that we can accurately link each
employee in your organization to their corresponding Teams user.
There are two options to link the two IDs:
1. [Through Microsoft Graph (preferred)](#through-microsoft-graph-preferred)
2. [Through Custom Properties](#through-custom-properties)
If this is set up correctly, the TechWolf Skill Assistant will be able to fetch
all skill suggestions and send them to the right Teams user.
#### Through Microsoft Graph (preferred)
The preferred method is to use the Microsoft Graph API to read a user property
whose value matches the employee ID known within TechWolf's SkillEngine API. By
default this is the `Employee ID` (`employeeId`) property. This requires the
`Employee ID` property to be set in Azure for each user, and for that value to
*exactly match* the employee ID known within TechWolf's SkillEngine API. In that
case we can automatically link the Teams user to the employee profile in
TechWolf.
Ideally, the Employee ID is filled in automatically using an integration with
your organization's HR system. If this is not possible, you can manually
populate the Employee ID property by following this guide:
[Set Employee ID in Microsoft 365](https://o365info.com/set-employee-id-microsoft-365/)
**Linking on a different Microsoft Graph property.** You are not limited to
the `Employee ID` property. If your organization stores the matching value
elsewhere, TechWolf can read it from any other Microsoft Graph user
property instead. Let TechWolf know during onboarding which property to use,
and we will configure it for your tenant.
* **Top-level property:** any user property, for example
`onPremisesImmutableId`.
* **Nested property:** a property inside a complex type, addressed with dot
notation, for example
`onPremisesExtensionAttributes.extensionAttribute1`.
We recommend pointing this at a stable, non-personal identifier (such as an
employee number or immutable ID). The configured value is stored on the
TechWolf side to perform the link, so avoid properties that contain personal
data, like `mail` or `userPrincipalName`.
Whichever property is configured, its value must *exactly match* the
employee ID known within TechWolf's SkillEngine API.
#### Through Custom Properties
If the `Employee ID` property is not set in Azure, or if the Employee ID
property in Azure is different from the employee ID stored in the TechWolf
SkillEngine API, we can use a
[Custom Property]()
for each employee profile in the TechWolf SkillEngine API. The Azure ID should
be stored in the Custom Property with the key `employee_azure_id`. The mapping
between the employee ID known in TechWolf's SkillEngine and their corresponding
custom property should be send to TechWolf via the datasource integration so
that we can store it accordingly.
The Azure ID we require (often referred to as the **Object ID**) has the
following format: `xxxxxxxx-xxxx-xxxx-xxxx-xxxxxxxxxxxx` (e.g.
`3f2a9c4e-7b6d-4e2b-9c9a-1a2b3c4d5e6f`).
### Grant permissions to the Skill Assistant app
Go to your [Teams admin page](https://admin.teams.microsoft.com/).
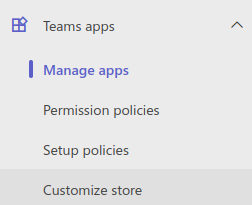
Go to **Teams apps** -> **Manage apps**
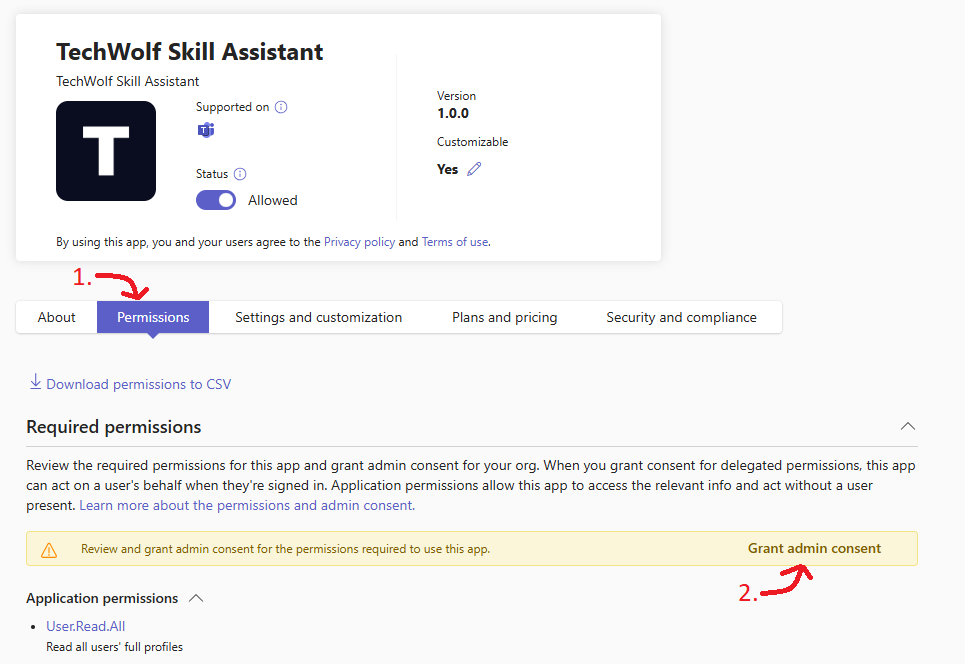
 Type "TechWolf Skill Assistant" in the search bar.
 Click on the name of the "TechWolf Skill Assistant" app.
Navigate to the Permissions tab (1).
Grant the app the required permissions. Do so by pressing **Grant admin consent** (2). This will open a pop up.
More information about the required permissions can be found in the [Required permissions of the Skill Assistant application](#required-teams-app-permissions) section.
Click on the name of the "TechWolf Skill Assistant" app.
Navigate to the Permissions tab (1).
Grant the app the required permissions. Do so by pressing **Grant admin consent** (2). This will open a pop up.
More information about the required permissions can be found in the [Required permissions of the Skill Assistant application](#required-teams-app-permissions) section.
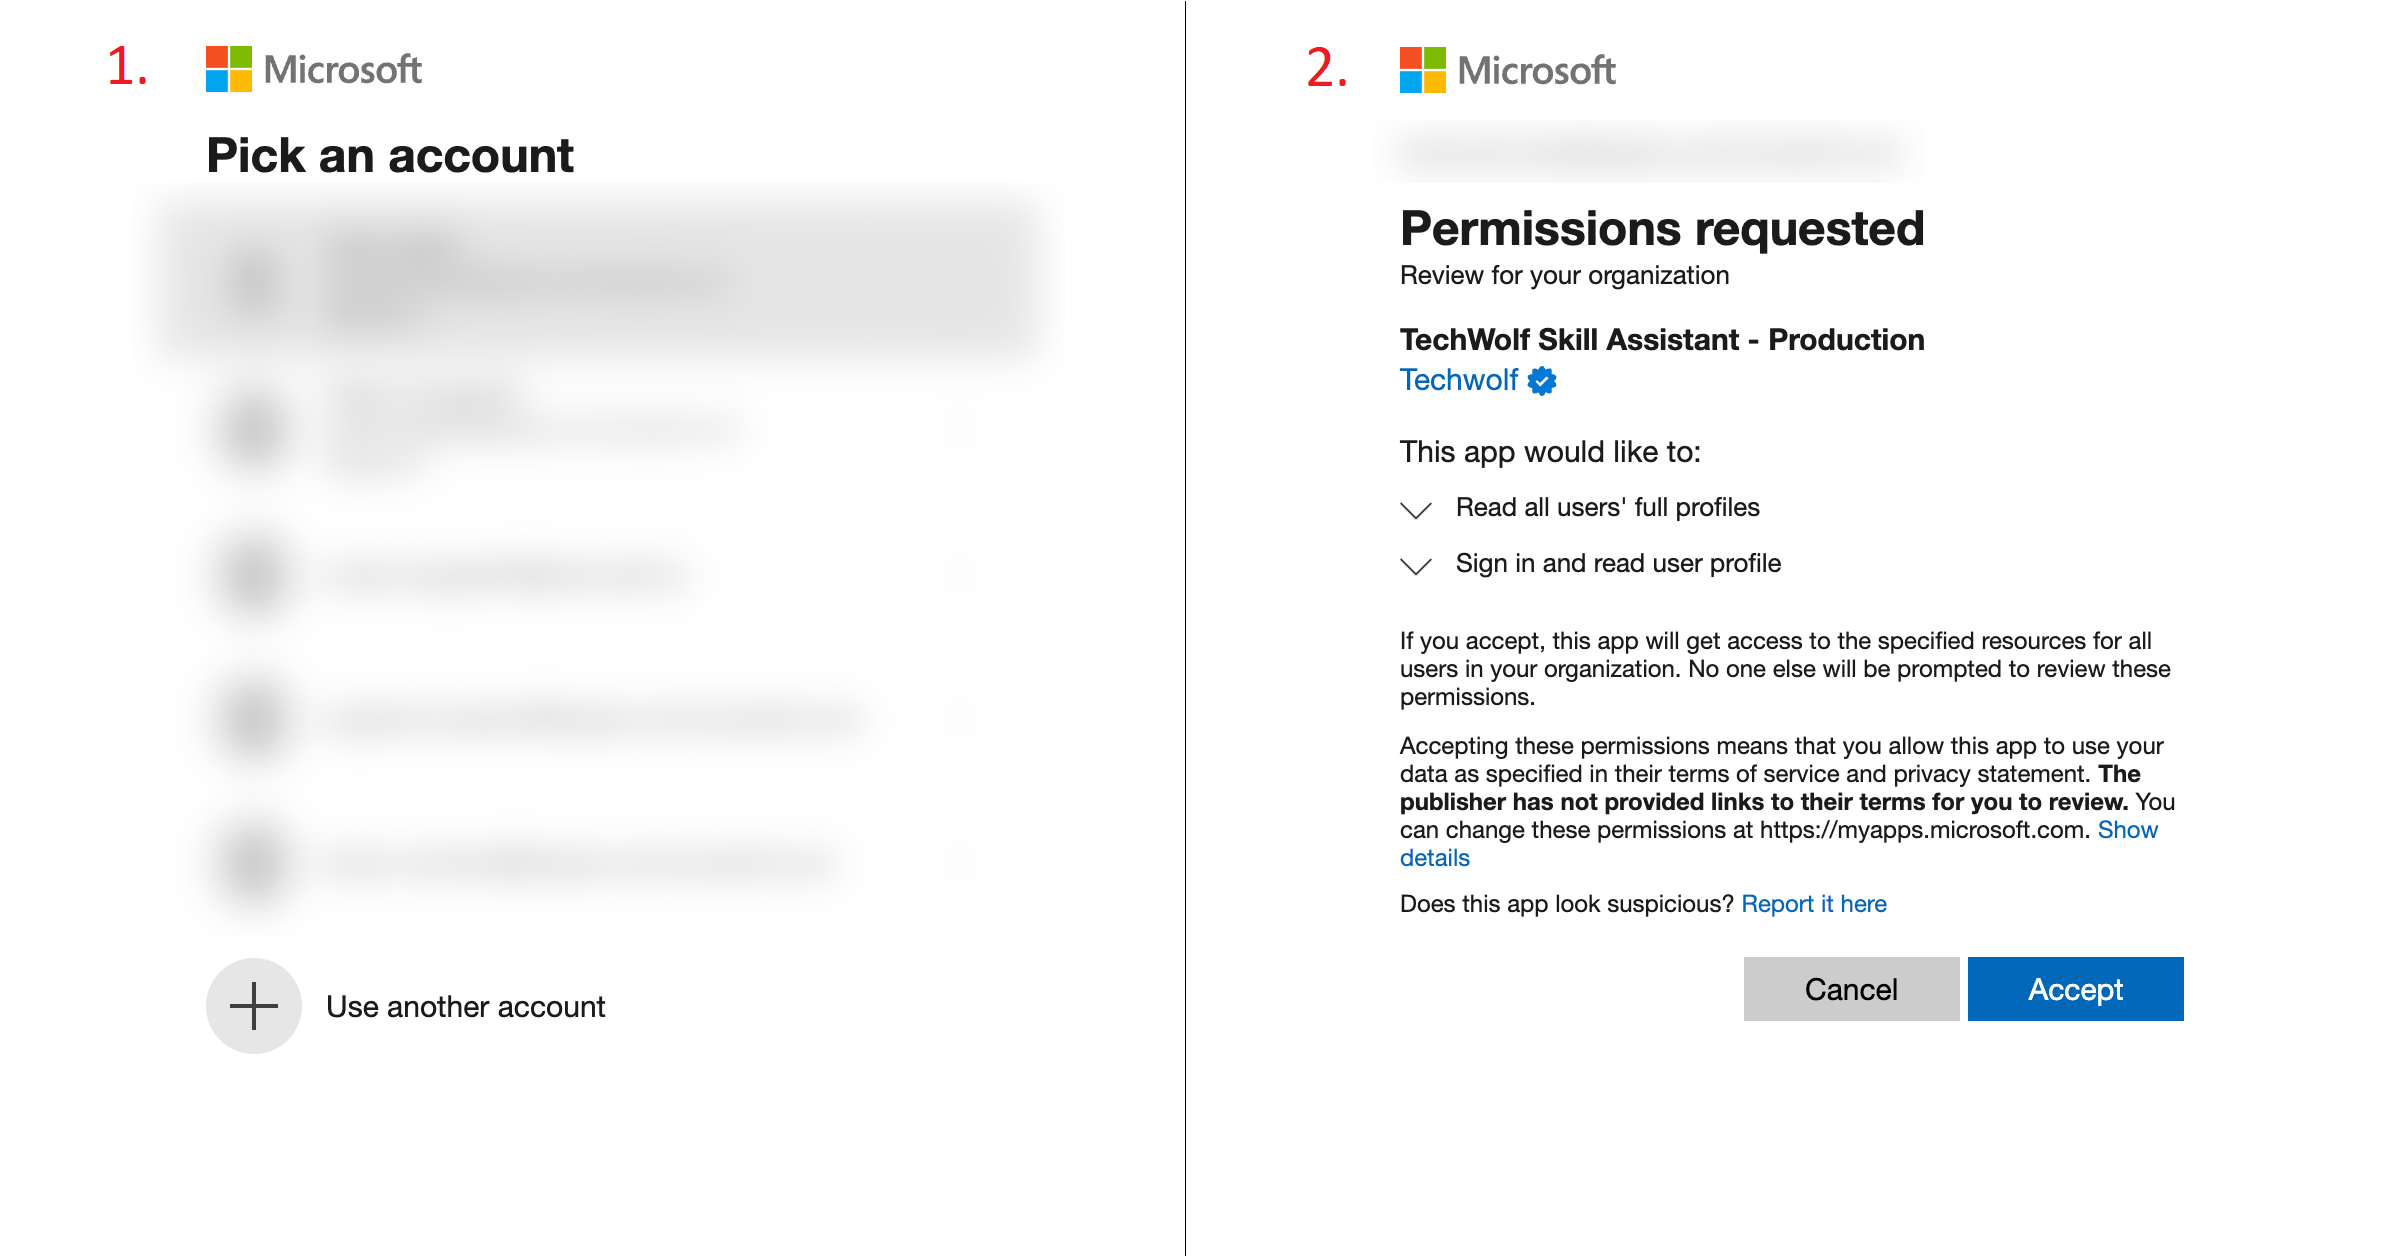
 Select your account and log in if necessary (1).
Review the required permissions and grant them, by clicking **Accept** (2).
Select your account and log in if necessary (1).
Review the required permissions and grant them, by clicking **Accept** (2).
 ### Installing the Skill Assistant for users
Depending on your organisation's workflow to install apps for employees, you
should now install the Skill Assistant for your employees. We recommend the
following workflow:
The easiest way to install the app for a subset of users is to create a group in
Azure AD and assign the app to that group. This way, you can easily manage who
has access to the app. To create a group, follow the
[Microsoft guide on creating a group](https://learn.microsoft.com/en-us/entra/fundamentals/groups-view-azure-portal).
We recommend to use the app centric management functionality if possible.
If you are using app centric functionality, then follow [these steps](#install-the-app-using-app-centric-management) to install the app.
If you are not using app centric functionality, then follow [these steps](#install-the-app-without-app-centric-management) to install the app.
If the app is not installed for all users, you can force the installation for
the remaining users using the Microsoft Graph API by following
[these steps](#force-installing-the-app-using-the-microsoft-graph-api).
#### Install the app using App Centric Management
If you are using app centric management for app availability, you can install
the app for the group of users by following the following steps.
Make the app available for the group of users by following [this guide
from
Microsoft](https://learn.microsoft.com/en-us/microsoftteams/app-centric-management#add-or-modify-app-availability-for-users).
If you are using app centric management for installation, you can
install the app for the group of users by following [this guide from
Microsoft](https://learn.microsoft.com/en-us/microsoftteams/install-teams-apps#install-apps-using-app-centric-management).
If you are not using app centric management for installation, you can use Setup Policies to install the app for the group of users.
Follow [these steps](#install-the-app-using-setup-policies) to install the app using Setup Policies.
This can take a significant amount of time. We advise to install the users at
least 1 week before the go-live date.
Some users might need to restart their Teams to get the app installed.
If there are still users that don't have the app after a week, the force
installation using the next step needs to be done.
#### Install the app without App Centric Management
We recommend to use app centric management for installation if possible.
You can install the app for a group of users using setup policies. Follow [these steps](#install-the-app-using-setup-policies) to install the app using Setup Policies.
The setup policy is only applied after the permission policy is updated (see step 2).
This can take a significant amount of time. We advise to install the users at
least 1 week before the go-live date.
Some users might need to restart their Teams to get the app installed.
If there are still users that don't have the app after a week, the force
installation using the next step needs to be done.
We recommend to adjust the global permission policy to allow the TechWolf Skill Assistant app.
If modifying the global policy is not desired, you can create a new permission policy by following [this guide](https://learn.microsoft.com/en-us/microsoftteams/teams-app-permission-policies#create-an-app-permission-policy)
and assign it to the group by following [these steps](#assigning-the-permission-policy-to-a-group).
#### Install the app using Setup Policies
Follow
[this guide from Microsoft](https://learn.microsoft.com/en-us/microsoftteams/teams-app-setup-policies#install-apps-to-teams-client-of-your-users)
to install the app using Setup Policies.
Make sure to apply the setup policy to the group of users by following
[this section from the Microsoft guide](https://learn.microsoft.com/en-us/microsoftteams/teams-app-setup-policies#assign-a-custom-policy-in-app-setup-policy-to-users-and-groups).
If a setup policy is already applied to a user, the new setup policy will
not be applied to that user!
If you have different groups of users that require different app configurations, you'll need to create a unique setup policy for each group.
#### Assigning the permission policy to a group
This section describes how to assign the permission policy to a group of users.
This section is only relevant when you do not have the app centric
management functionality and have created a new permission policy.
Microsoft Teams does not support assigning app permission policies to groups.
However, it does support
[assigning policies to a batch of users](https://learn.microsoft.com/en-us/microsoftteams/assign-policies-users-and-groups#assign-a-policy-to-a-batch-of-users).
These steps require a setup policy to be applied to the group first.
The users linked to the permission policy will not be automatically updated
when users are added/deleted from the group.
Go to **Users** -> **Manage users**
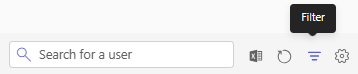
Click on the filter icon in the top right corner.
### Installing the Skill Assistant for users
Depending on your organisation's workflow to install apps for employees, you
should now install the Skill Assistant for your employees. We recommend the
following workflow:
The easiest way to install the app for a subset of users is to create a group in
Azure AD and assign the app to that group. This way, you can easily manage who
has access to the app. To create a group, follow the
[Microsoft guide on creating a group](https://learn.microsoft.com/en-us/entra/fundamentals/groups-view-azure-portal).
We recommend to use the app centric management functionality if possible.
If you are using app centric functionality, then follow [these steps](#install-the-app-using-app-centric-management) to install the app.
If you are not using app centric functionality, then follow [these steps](#install-the-app-without-app-centric-management) to install the app.
If the app is not installed for all users, you can force the installation for
the remaining users using the Microsoft Graph API by following
[these steps](#force-installing-the-app-using-the-microsoft-graph-api).
#### Install the app using App Centric Management
If you are using app centric management for app availability, you can install
the app for the group of users by following the following steps.
Make the app available for the group of users by following [this guide
from
Microsoft](https://learn.microsoft.com/en-us/microsoftteams/app-centric-management#add-or-modify-app-availability-for-users).
If you are using app centric management for installation, you can
install the app for the group of users by following [this guide from
Microsoft](https://learn.microsoft.com/en-us/microsoftteams/install-teams-apps#install-apps-using-app-centric-management).
If you are not using app centric management for installation, you can use Setup Policies to install the app for the group of users.
Follow [these steps](#install-the-app-using-setup-policies) to install the app using Setup Policies.
This can take a significant amount of time. We advise to install the users at
least 1 week before the go-live date.
Some users might need to restart their Teams to get the app installed.
If there are still users that don't have the app after a week, the force
installation using the next step needs to be done.
#### Install the app without App Centric Management
We recommend to use app centric management for installation if possible.
You can install the app for a group of users using setup policies. Follow [these steps](#install-the-app-using-setup-policies) to install the app using Setup Policies.
The setup policy is only applied after the permission policy is updated (see step 2).
This can take a significant amount of time. We advise to install the users at
least 1 week before the go-live date.
Some users might need to restart their Teams to get the app installed.
If there are still users that don't have the app after a week, the force
installation using the next step needs to be done.
We recommend to adjust the global permission policy to allow the TechWolf Skill Assistant app.
If modifying the global policy is not desired, you can create a new permission policy by following [this guide](https://learn.microsoft.com/en-us/microsoftteams/teams-app-permission-policies#create-an-app-permission-policy)
and assign it to the group by following [these steps](#assigning-the-permission-policy-to-a-group).
#### Install the app using Setup Policies
Follow
[this guide from Microsoft](https://learn.microsoft.com/en-us/microsoftteams/teams-app-setup-policies#install-apps-to-teams-client-of-your-users)
to install the app using Setup Policies.
Make sure to apply the setup policy to the group of users by following
[this section from the Microsoft guide](https://learn.microsoft.com/en-us/microsoftteams/teams-app-setup-policies#assign-a-custom-policy-in-app-setup-policy-to-users-and-groups).
If a setup policy is already applied to a user, the new setup policy will
not be applied to that user!
If you have different groups of users that require different app configurations, you'll need to create a unique setup policy for each group.
#### Assigning the permission policy to a group
This section describes how to assign the permission policy to a group of users.
This section is only relevant when you do not have the app centric
management functionality and have created a new permission policy.
Microsoft Teams does not support assigning app permission policies to groups.
However, it does support
[assigning policies to a batch of users](https://learn.microsoft.com/en-us/microsoftteams/assign-policies-users-and-groups#assign-a-policy-to-a-batch-of-users).
These steps require a setup policy to be applied to the group first.
The users linked to the permission policy will not be automatically updated
when users are added/deleted from the group.
Go to **Users** -> **Manage users**
Click on the filter icon in the top right corner.
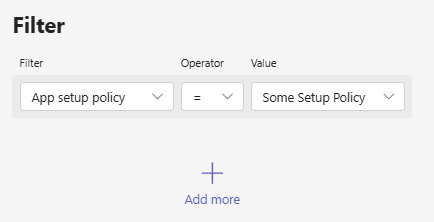
 Select the setup policy as filter and the created setup policy as filter value.
Click on **Apply** to apply the filter.
Select the setup policy as filter and the created setup policy as filter value.
Click on **Apply** to apply the filter.
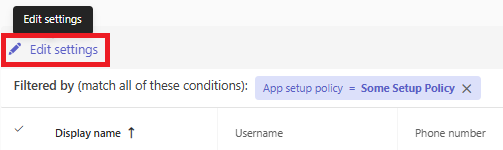
 Click on the checkmark icon in the top left corner to select all users.
 Click on the **Edit settings** button in the top left corner.
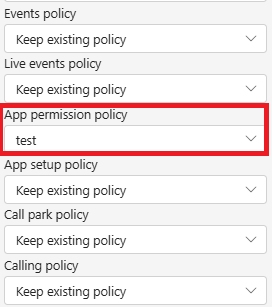
 Select the created permission policy from the dropdown menu.
Click on **Apply** to assign the permission policy to the selected users.
Select the created permission policy from the dropdown menu.
Click on **Apply** to assign the permission policy to the selected users.
 #### Force installing the app using the Microsoft Graph API
If the app is not installed for all users, you can force the installation for
the remaining users using the
[Microsoft Graph API](https://docs.microsoft.com/en-us/graph/api/userteamwork-post-installedapps).
Create a text file containing all Azure IDs (Object IDs) of the people for which the app
needs to be installed. This file is structured as a list of the Azure IDs,
separated by newlines.
```plaintext theme={null}
3f2a9c4e-7b6d-4e2b-9c9a-1a2b3c4d5e6f
a1b2c3d4-e5f6-7890-abcd-ef1234567890
12345678-90ab-cdef-1234-567890abcdef
...
```
We created a template script that you can use to force install the app.
Create a new service principal in Azure AD to run the script. Follow the
[Microsoft guide on creating a service principal](https://learn.microsoft.com/en-us/entra/identity-platform/howto-create-service-principal-portal#register-an-application-with-microsoft-entra-id-and-create-a-service-principal).
A client secret is needed to run the script.
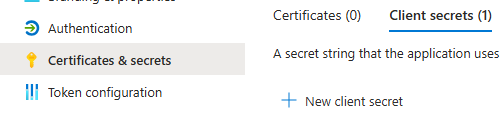
In the newly created service principal, select `Certificates & secrets`.
Select `Client secrets`, and then select `New client secret` and click `Add`.
You will need this secret later to run the script.
#### Force installing the app using the Microsoft Graph API
If the app is not installed for all users, you can force the installation for
the remaining users using the
[Microsoft Graph API](https://docs.microsoft.com/en-us/graph/api/userteamwork-post-installedapps).
Create a text file containing all Azure IDs (Object IDs) of the people for which the app
needs to be installed. This file is structured as a list of the Azure IDs,
separated by newlines.
```plaintext theme={null}
3f2a9c4e-7b6d-4e2b-9c9a-1a2b3c4d5e6f
a1b2c3d4-e5f6-7890-abcd-ef1234567890
12345678-90ab-cdef-1234-567890abcdef
...
```
We created a template script that you can use to force install the app.
Create a new service principal in Azure AD to run the script. Follow the
[Microsoft guide on creating a service principal](https://learn.microsoft.com/en-us/entra/identity-platform/howto-create-service-principal-portal#register-an-application-with-microsoft-entra-id-and-create-a-service-principal).
A client secret is needed to run the script.
In the newly created service principal, select `Certificates & secrets`.
Select `Client secrets`, and then select `New client secret` and click `Add`.
You will need this secret later to run the script.
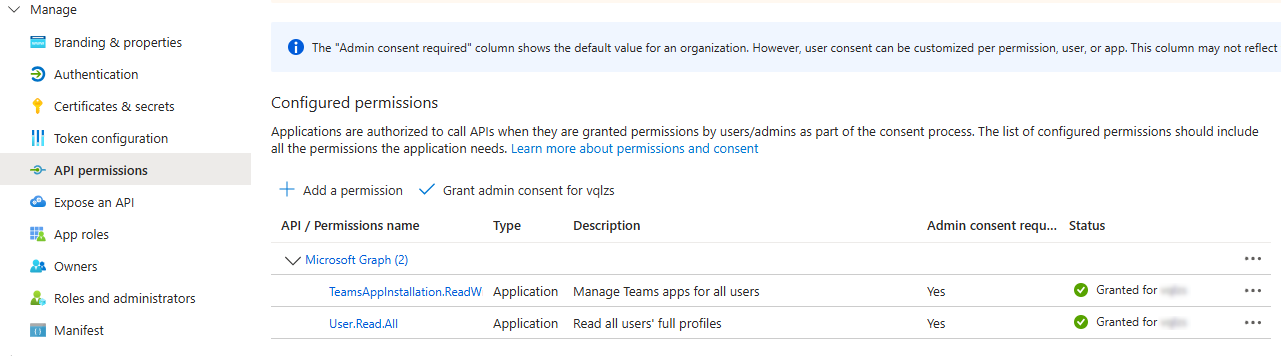
 The script requires the `TeamsAppInstallation.ReadWriteForUser.All` and `User.Read.All` permissions.
In the service principal, select `API permissions`.
Click on `Add a permission` and select `Microsoft Graph`.
Select `Application permissions` and search for
`TeamsAppInstallation.ReadWriteForUser.All` and select it.
Search `User.Read.All` and select it too.
Click on `Add permissions` to add the permission.
Select the added permissions and click `Grant admin consent`.
The script requires the `TeamsAppInstallation.ReadWriteForUser.All` and `User.Read.All` permissions.
In the service principal, select `API permissions`.
Click on `Add a permission` and select `Microsoft Graph`.
Select `Application permissions` and search for
`TeamsAppInstallation.ReadWriteForUser.All` and select it.
Search `User.Read.All` and select it too.
Click on `Add permissions` to add the permission.
Select the added permissions and click `Grant admin consent`.
 Fill in the variables in the script:
* `$FilePath`: the path to the previously created file (from Step 1) containing
the Azure IDs
* `$ApplicationID`: The Application Client ID of the newly created service principal (from step 3)
* `$ClientSecret`: The Application Client Secret of the newly created service principal (from step 4)
* `$TenantID`: The tenant ID of your Teams instance
Run the script in Powershell.
In [Azure Portal](https://portal.azure.com/), click in the top right on the
`Cloud Shell` icon.
Fill in the variables in the script:
* `$FilePath`: the path to the previously created file (from Step 1) containing
the Azure IDs
* `$ApplicationID`: The Application Client ID of the newly created service principal (from step 3)
* `$ClientSecret`: The Application Client Secret of the newly created service principal (from step 4)
* `$TenantID`: The tenant ID of your Teams instance
Run the script in Powershell.
In [Azure Portal](https://portal.azure.com/), click in the top right on the
`Cloud Shell` icon.
 Click on `Manage files` and upload the file with Azure IDs and
the filled in script. Run the script by typing `./script.ps1`.
Click on `Manage files` and upload the file with Azure IDs and
the filled in script. Run the script by typing `./script.ps1`.