> ## Documentation Index
> Fetch the complete documentation index at: https://developers.techwolf.ai/llms.txt
> Use this file to discover all available pages before exploring further.
# Installation
### Prerequisites
Before continuing, ensure you have the following:
* A valid TechWolf contract and access to a **live TechWolf tenant**.
* This tenant must contain Employees corresponding to the PerPerson entities
present in SAP SuccessFactors. This can be achieved by either:
* Using the Standard
[Employee Data Input Integration ](/integrations/datasource-integrations/sap-standard-input-integration/overview).
* Creating custom input integrations. When doing this, ensure the
TechWolf SkillEngine API Employees are linked with their SAP PerPerson
counterparts by using the Per Person UUID (`perPersonUuid`) as the
TechWolf Employee ID (`external_id`). Additionally, each TechWolf
Employee should have a custom property called `person_id_external`
with as value the `Person External ID` of the corresponding PerPerson
entity in SAP SuccessFactors. More information on custom properties
can be found in the
[API Reference ](https://developers.techwolf.ai/reference/latest/Custom%20Properties/CustomPropertiesDefinitions/overview).
* An SAP SuccessFactors environment with **Talent Intelligence Hub**
implemented.
* Access to the TechWolf
[SFTP server ](/integrations/reference/sftp/sftp)
to host the integration files.
* A successful SAP support case to
[whitelist the TechWolf SFTP server ](/integrations/datasource-integrations/sap-standard-input-integration/how-to-whitelist-sap-sftp-server).
* The necessary setup of the Attributes Library in SAP SuccessFactors.
* This includes at least the following:
* A proficiency rating scale of your choice, aligned with the one
configured for SAP in TechWolf. Preferably, the default TechWolf
proficiency scale (1-5) is used. Contact your TechWolf representative
for the current configuration, or to update the configuration. See
[How To: Manage the Skill Proficiency Rating Scale ](/integrations/sap-skill-sync-integration/how-to-manage-proficiency-rating-scale)
for more information on how to manage the proficiency rating scale in
SAP SuccessFactors.
* The desired set of TechWolf skills present and active in your SAP
Attributes Library, as Attributes of the default "Skill" iconType
* More information on the Attributes Library and the maintenance of the
Attributes Library in SAP SuccessFactors can be found in the
[Skills Taxonomy Sync ](/integrations/sap-skill-sync-integration/installation-skills-taxonomy)
installation guide.
## SAP SuccessFactors Configuration
TechWolf has already pre-configured some parts of the integration. The following
ZIP archive contains the necessary files that will be used in the subsequent
steps to configure the integration in SAP SuccessFactors.
Required files for the SAP Employee Skill Sync Integration
### 1. Find out the correct SAP SuccessFactors Company ID
* As an SAP administrator, log into the SAP SuccessFactors environment you want
to configure the integration for.
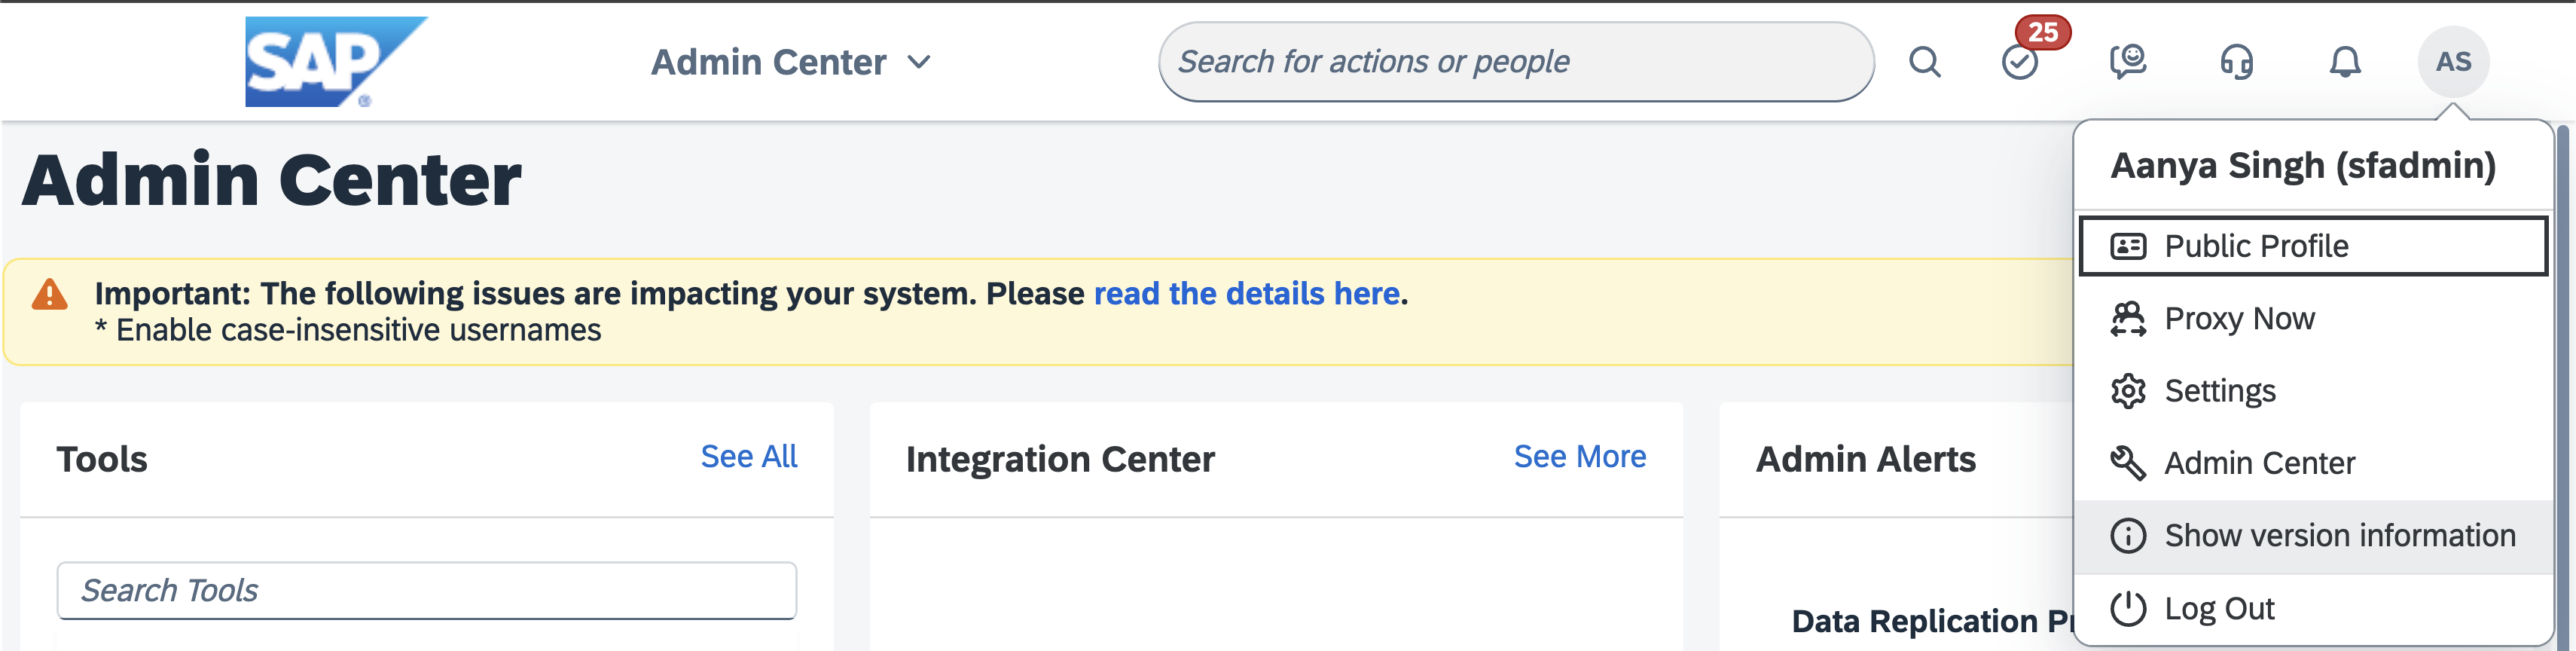
* Click on your profile icon in the top right corner and select "Show version
information".
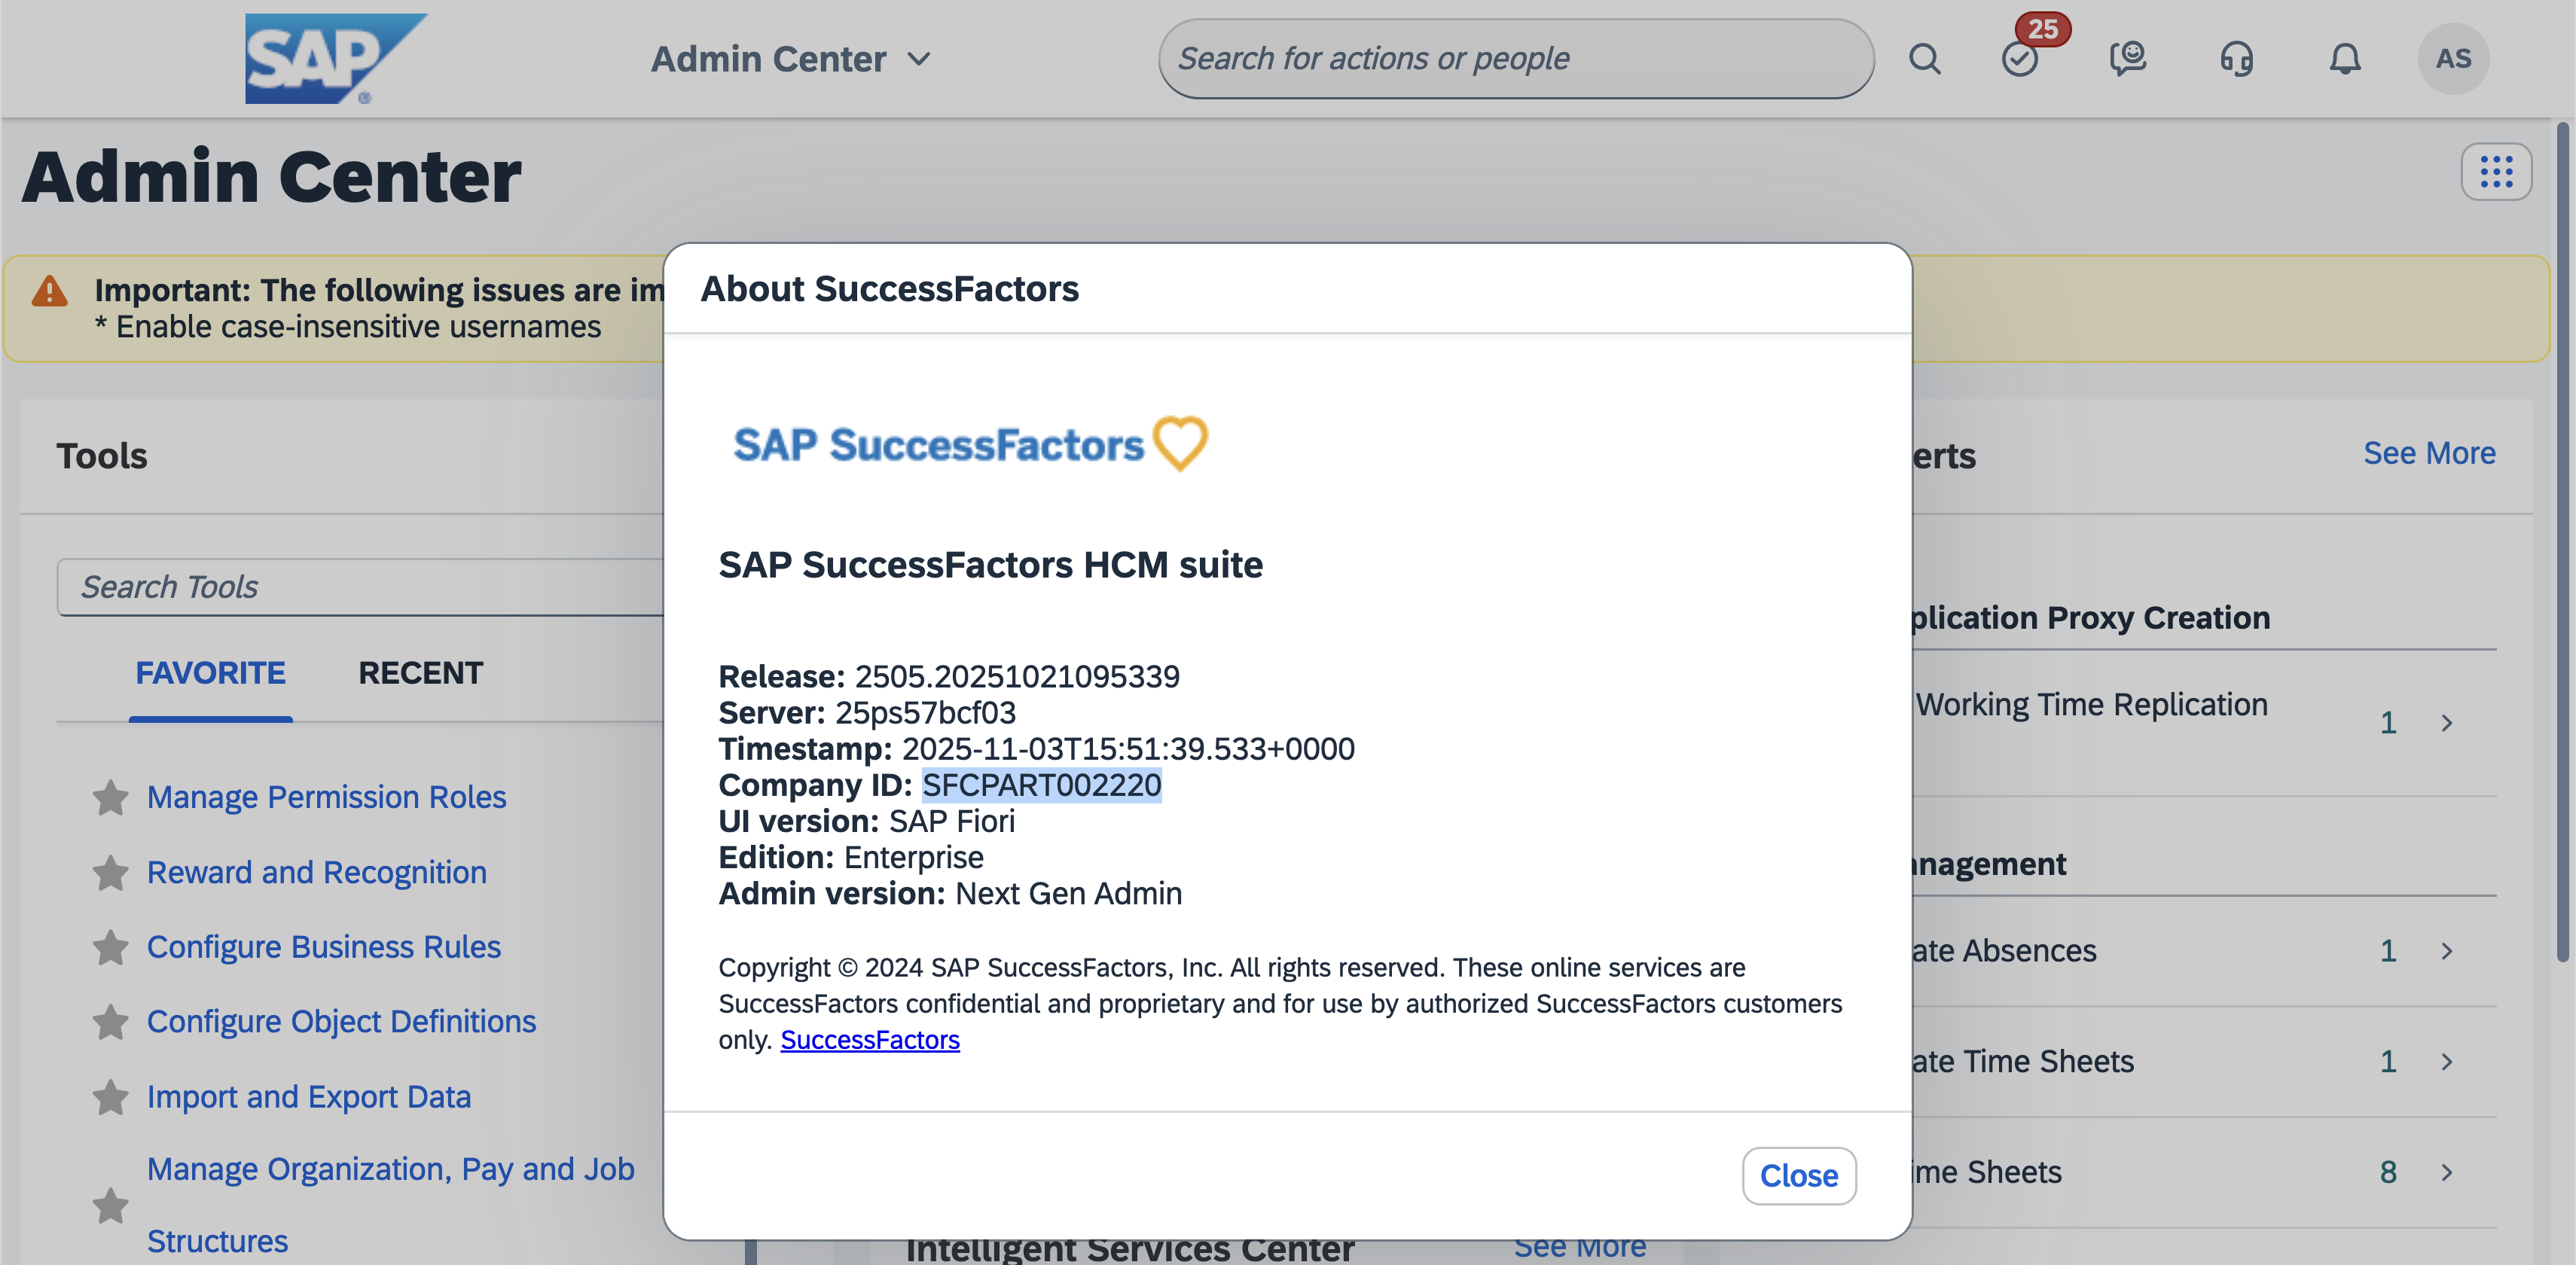
 * The Company ID will be shown in the resulting window.
 ### 2. Find out the correct SAP SuccessFactors API URL
* As an SAP administrator, go to
[SAP for Me ](https://me.sap.com/systemsprovisioning/systems)
(if you have multiple credentials, sign in with your S-User credentials).
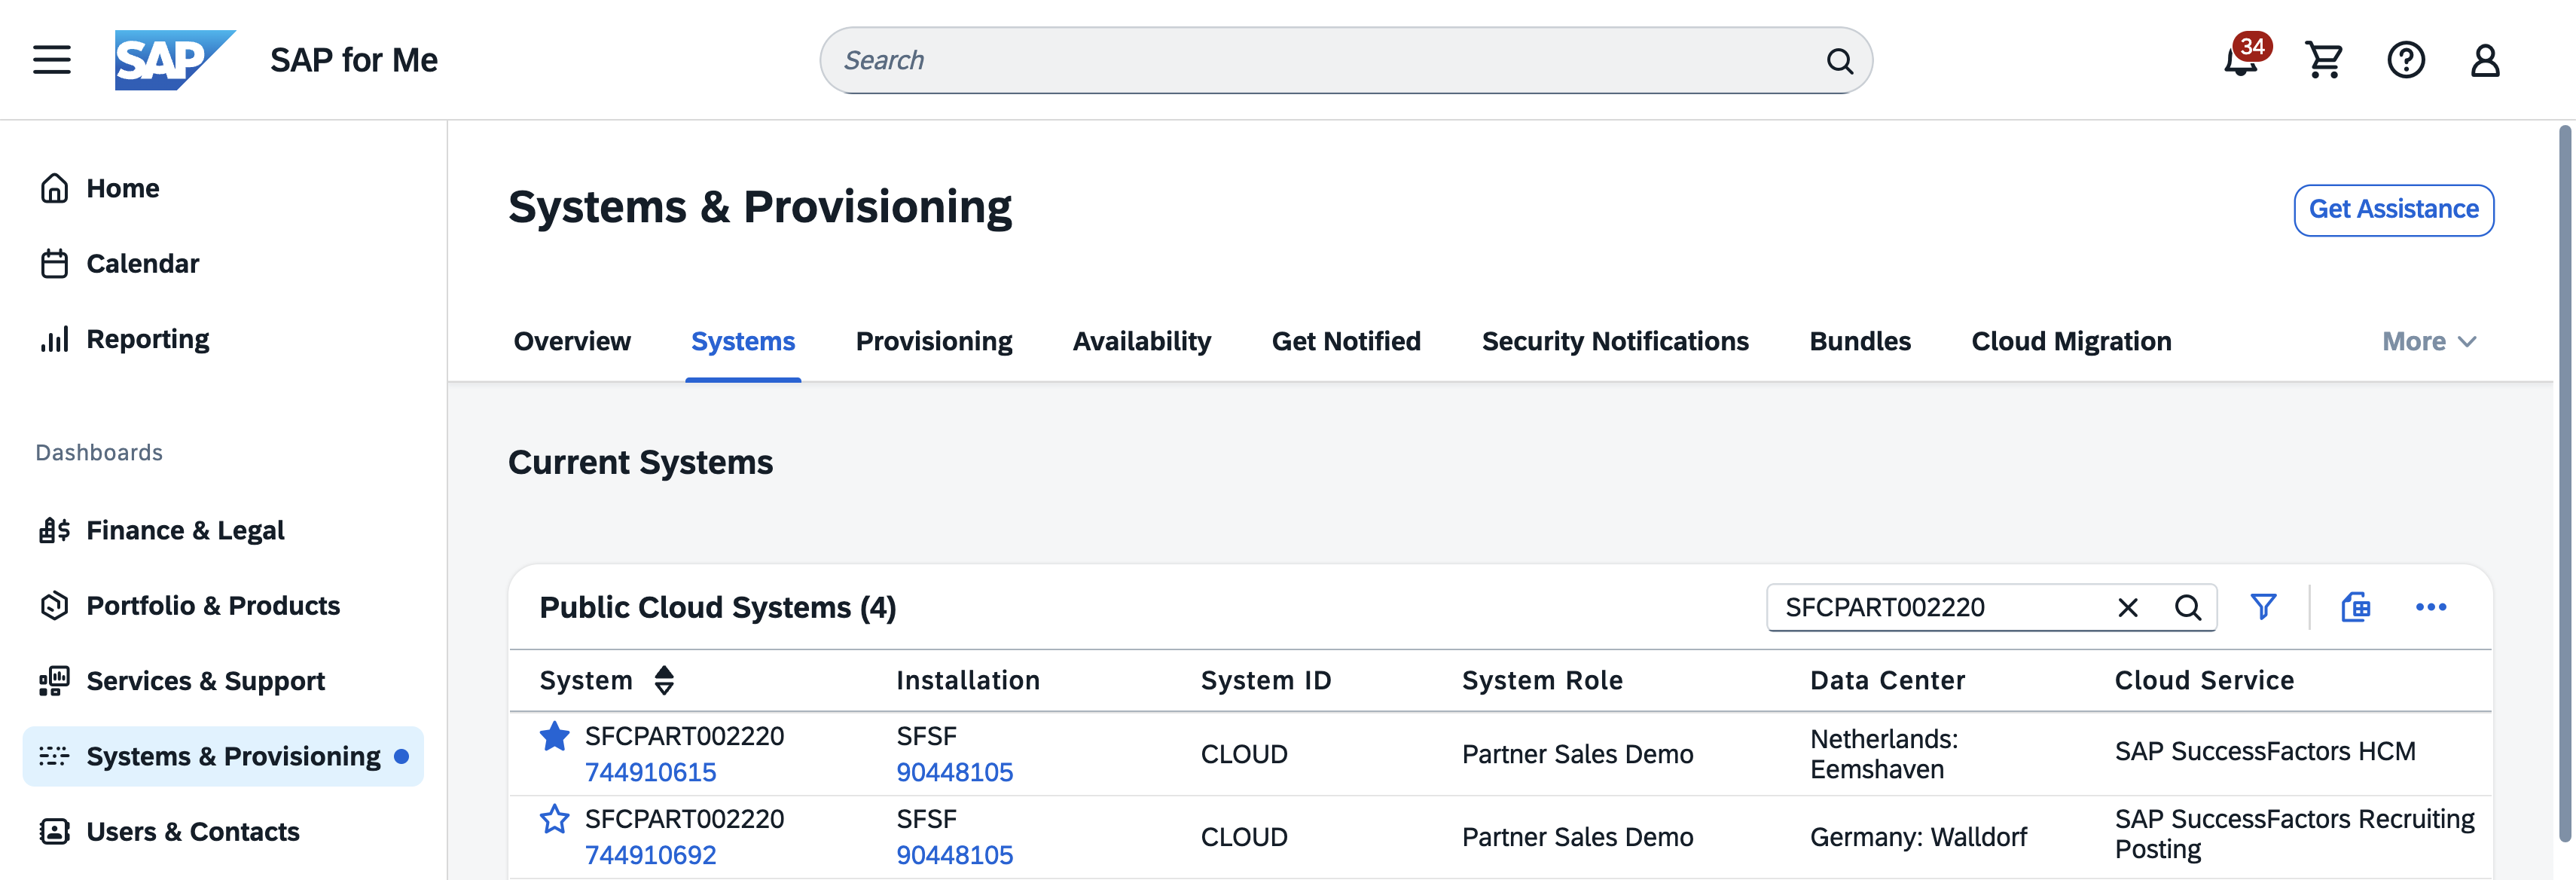
* In the *Public Cloud Systems* table, find the system you want to configure the
integration for.
* This system should have the value "SAP SuccessFactors HCM" in the
`Cloud Service` column.
* The `Data Center` column will show the location of the data center of the
system, e.g. "Netherlands: Eemshaven".
### 2. Find out the correct SAP SuccessFactors API URL
* As an SAP administrator, go to
[SAP for Me ](https://me.sap.com/systemsprovisioning/systems)
(if you have multiple credentials, sign in with your S-User credentials).
* In the *Public Cloud Systems* table, find the system you want to configure the
integration for.
* This system should have the value "SAP SuccessFactors HCM" in the
`Cloud Service` column.
* The `Data Center` column will show the location of the data center of the
system, e.g. "Netherlands: Eemshaven".
 * Go to the
[List of SAP SuccessFactors API Servers ](https://help.sap.com/docs/successfactors-platform/it-landscape-requirements-for-sap-successfactors/list-of-sap-successfactors-api-servers)
* In the *API Servers* table, find your Data Center.
* This Data Center should have the previously determined data center location
as the value of the `Location` column. Note that the location name might
differ in format from the location name in the previous step, e.g.
"Eemshaven, The Netherlands" vs "Netherlands: Eemshaven". Among all rows
with this location, find the row with the appropriate value for the
`Environment` column.
* The `API Server` column will show the API URL for the API Server.
* Go to the
[List of SAP SuccessFactors API Servers ](https://help.sap.com/docs/successfactors-platform/it-landscape-requirements-for-sap-successfactors/list-of-sap-successfactors-api-servers)
* In the *API Servers* table, find your Data Center.
* This Data Center should have the previously determined data center location
as the value of the `Location` column. Note that the location name might
differ in format from the location name in the previous step, e.g.
"Eemshaven, The Netherlands" vs "Netherlands: Eemshaven". Among all rows
with this location, find the row with the appropriate value for the
`Environment` column.
* The `API Server` column will show the API URL for the API Server.
 ### 3. Create a TechWolf User in your SAP SuccessFactors environment
* In the search bar at the top right of SAP SuccessFactors, enter
`Import Employee Data`.
* In the resulting window, under the `Select an entity` dropdown, choose "Basic
Import". In the `Choose File` field, upload the
`techwolf_api_user_definition.csv` file from the required-files zip downloaded
above.
### 3. Create a TechWolf User in your SAP SuccessFactors environment
* In the search bar at the top right of SAP SuccessFactors, enter
`Import Employee Data`.
* In the resulting window, under the `Select an entity` dropdown, choose "Basic
Import". In the `Choose File` field, upload the
`techwolf_api_user_definition.csv` file from the required-files zip downloaded
above.
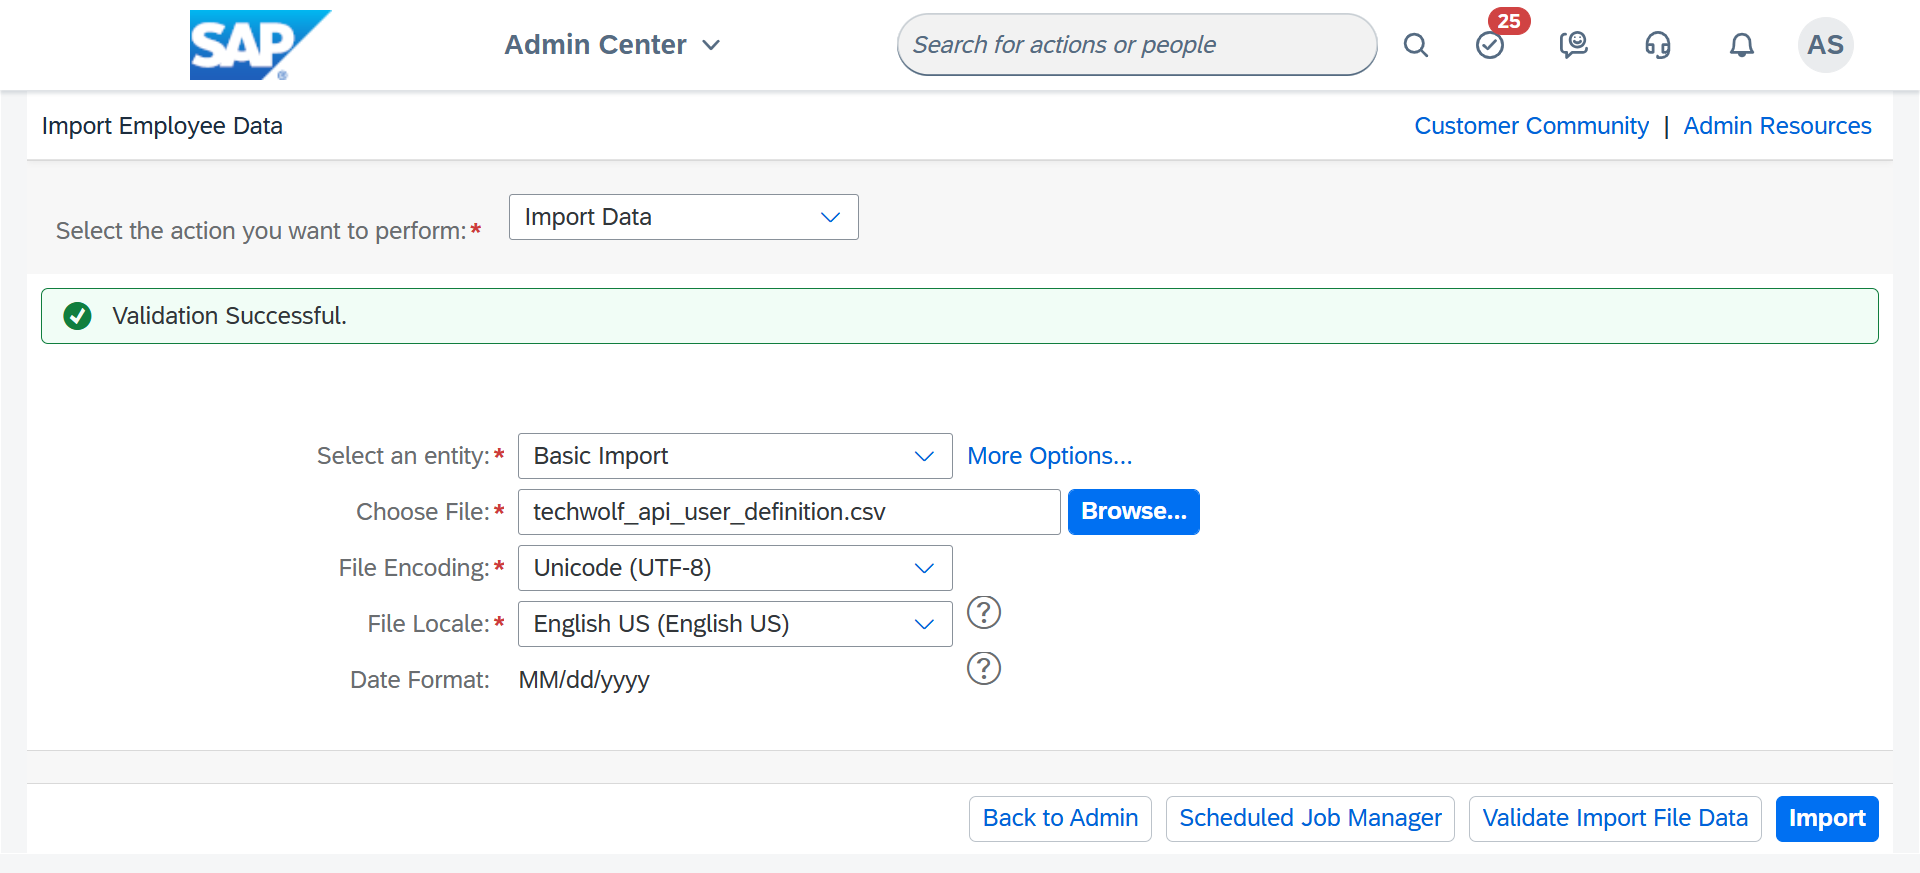 * Leave the other fields unchanged and click `Validate Import File Data`. If the
validation is successful, click `Import`.
If you already created a TechWolf User for another TechWolf - SAP
SuccessFactors integration, this step can be skipped.
### 4. Create a new OAuth2 Client Application
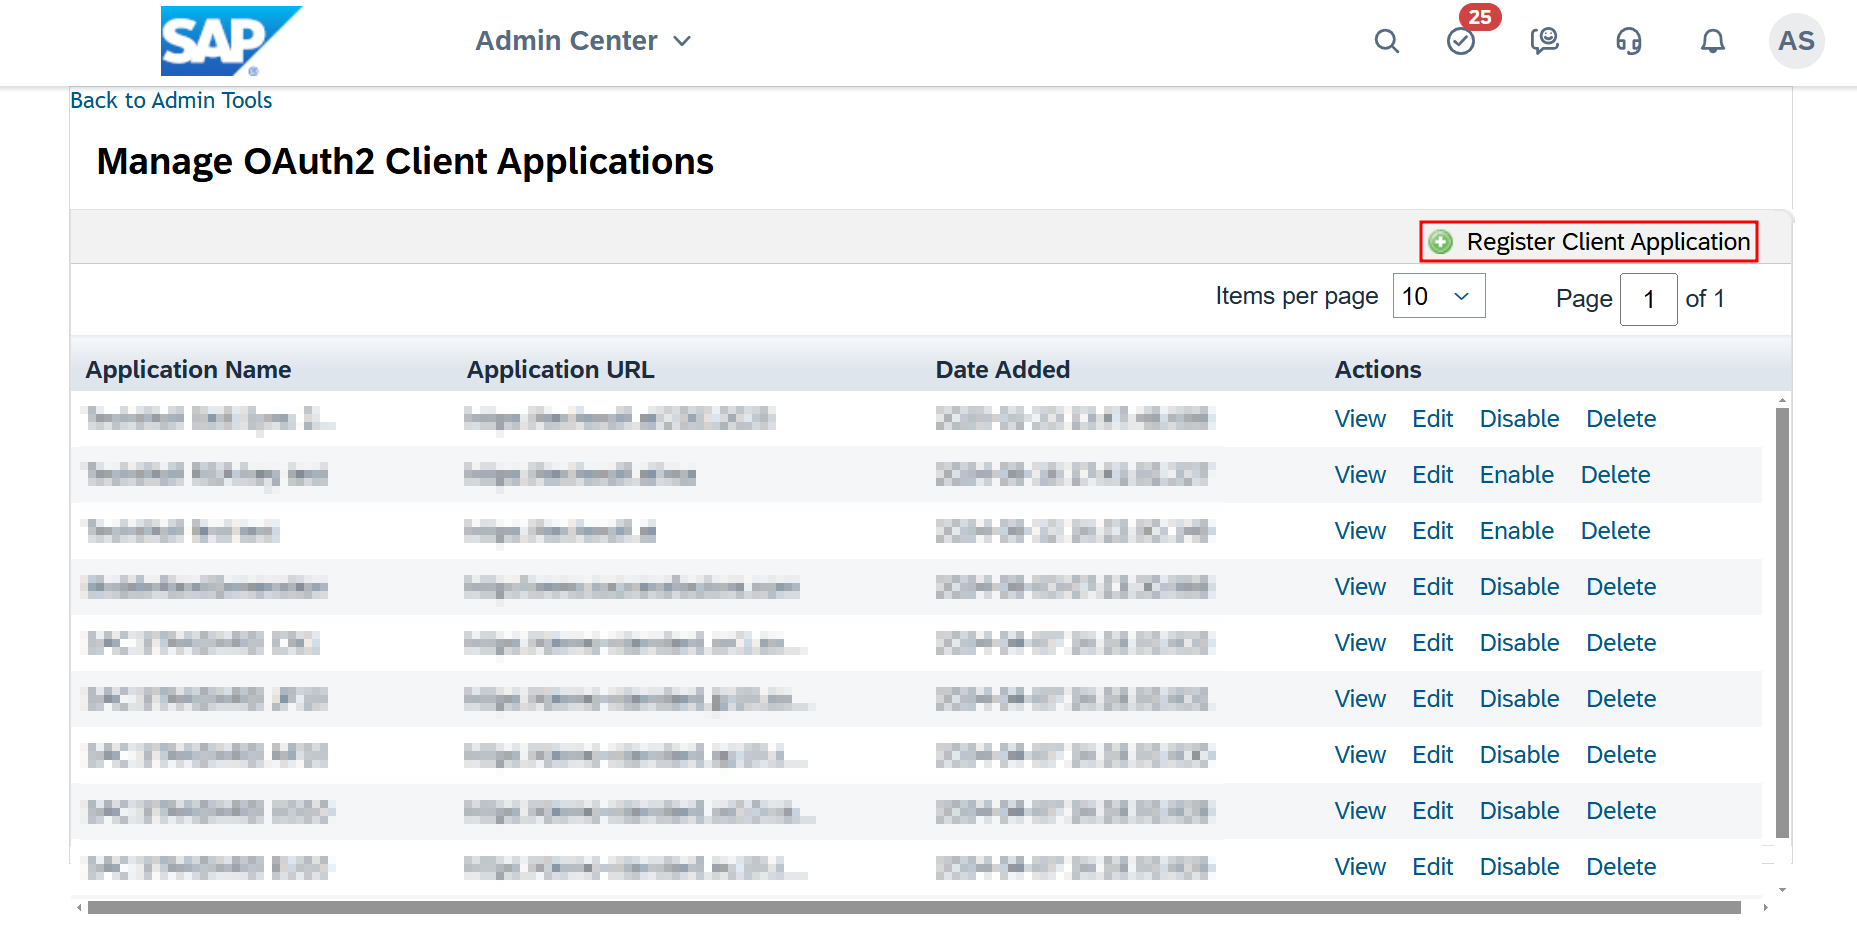
* In the search bar at the top right of the screen, enter
`Manage OAuth2 Client Applications` and press enter.
* In the window that opens, click `Register Client Application`.
* Leave the other fields unchanged and click `Validate Import File Data`. If the
validation is successful, click `Import`.
If you already created a TechWolf User for another TechWolf - SAP
SuccessFactors integration, this step can be skipped.
### 4. Create a new OAuth2 Client Application
* In the search bar at the top right of the screen, enter
`Manage OAuth2 Client Applications` and press enter.
* In the window that opens, click `Register Client Application`.
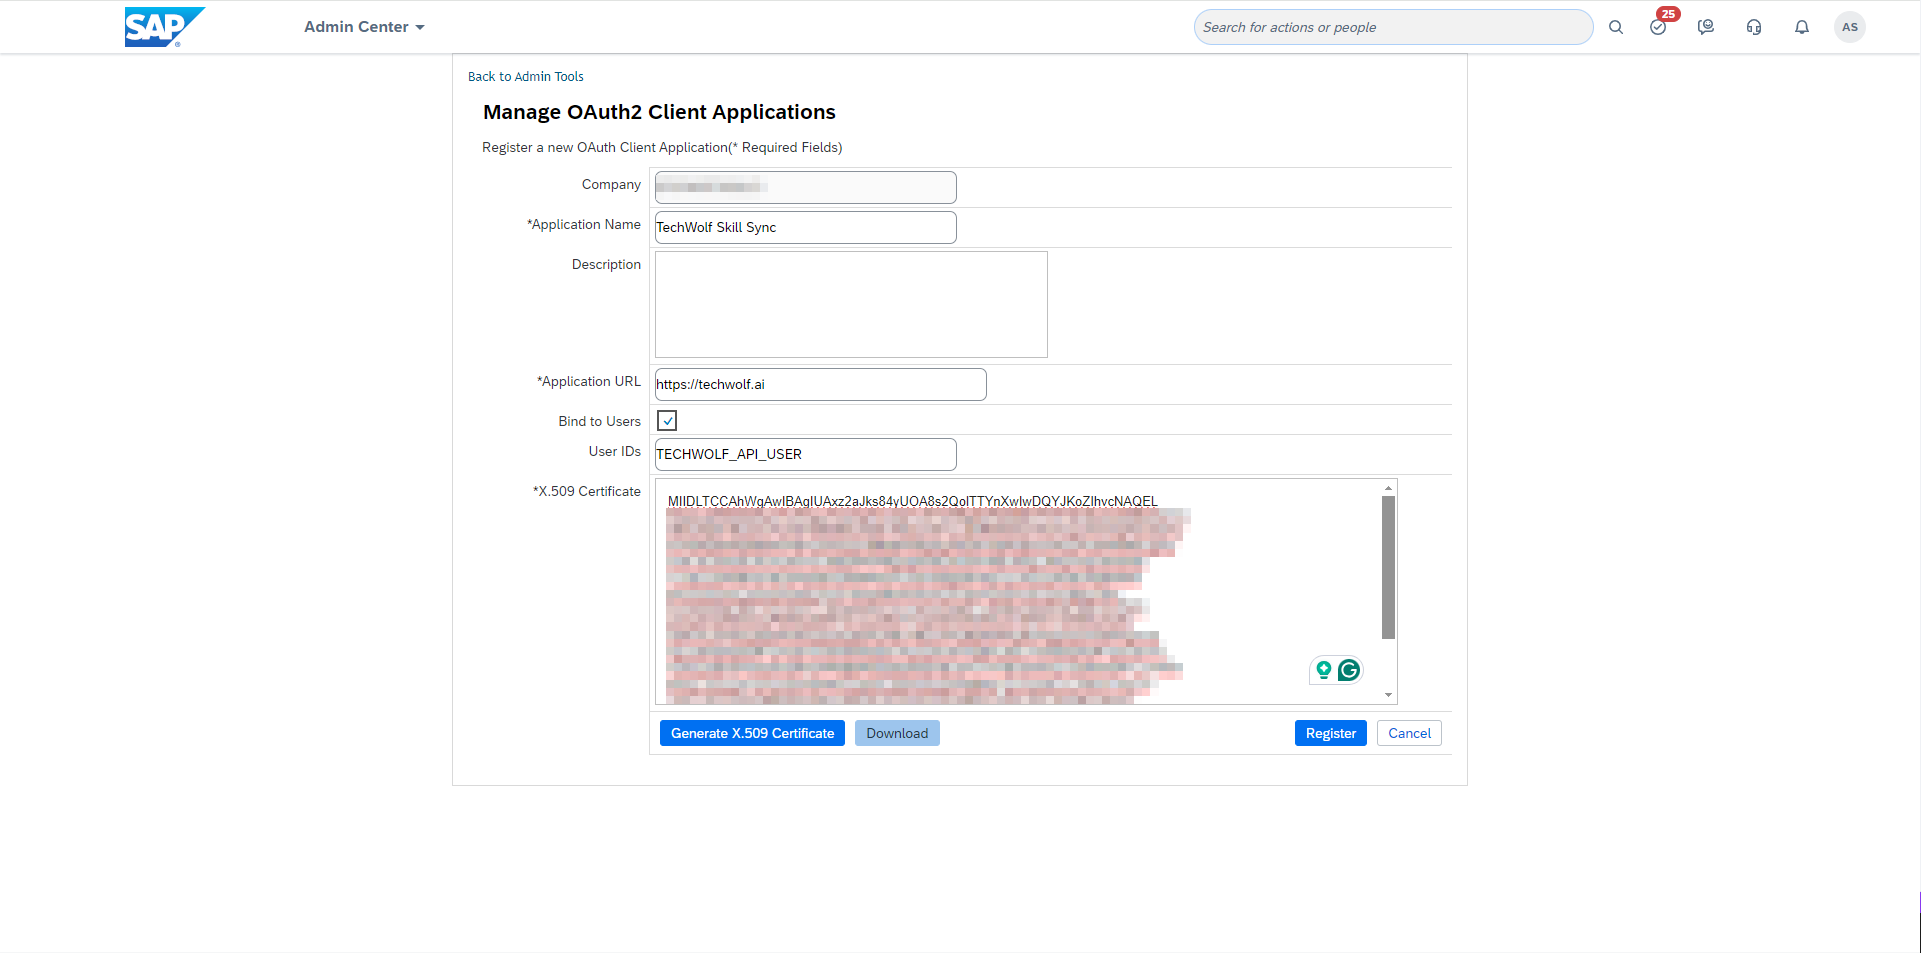
 * In the resulting page, the following fields must be filled in:
* `Application Name`: "TechWolf Skill Sync"
* `Application URL`: "[https://techwolf.ai](https://techwolf.ai)"
* `Bind to Users`: Check the checkbox
* `User IDs`: `TechWolf_TIH_GP` (refers to the user created in the previous
step)
* `X.509 Certificate`: Go to your TechWolf point of contact to request the
certificate file. Once you received the file, open it. It will have the
following text guards around it: "-----BEGIN CERTIFICATE-----" and "-----END
CERTIFICATE-----". Copy all the text in between these guards and paste it
into the `X.509 Certificate` field.
* In the resulting page, the following fields must be filled in:
* `Application Name`: "TechWolf Skill Sync"
* `Application URL`: "[https://techwolf.ai](https://techwolf.ai)"
* `Bind to Users`: Check the checkbox
* `User IDs`: `TechWolf_TIH_GP` (refers to the user created in the previous
step)
* `X.509 Certificate`: Go to your TechWolf point of contact to request the
certificate file. Once you received the file, open it. It will have the
following text guards around it: "-----BEGIN CERTIFICATE-----" and "-----END
CERTIFICATE-----". Copy all the text in between these guards and paste it
into the `X.509 Certificate` field.
 * Now, click `Register`.
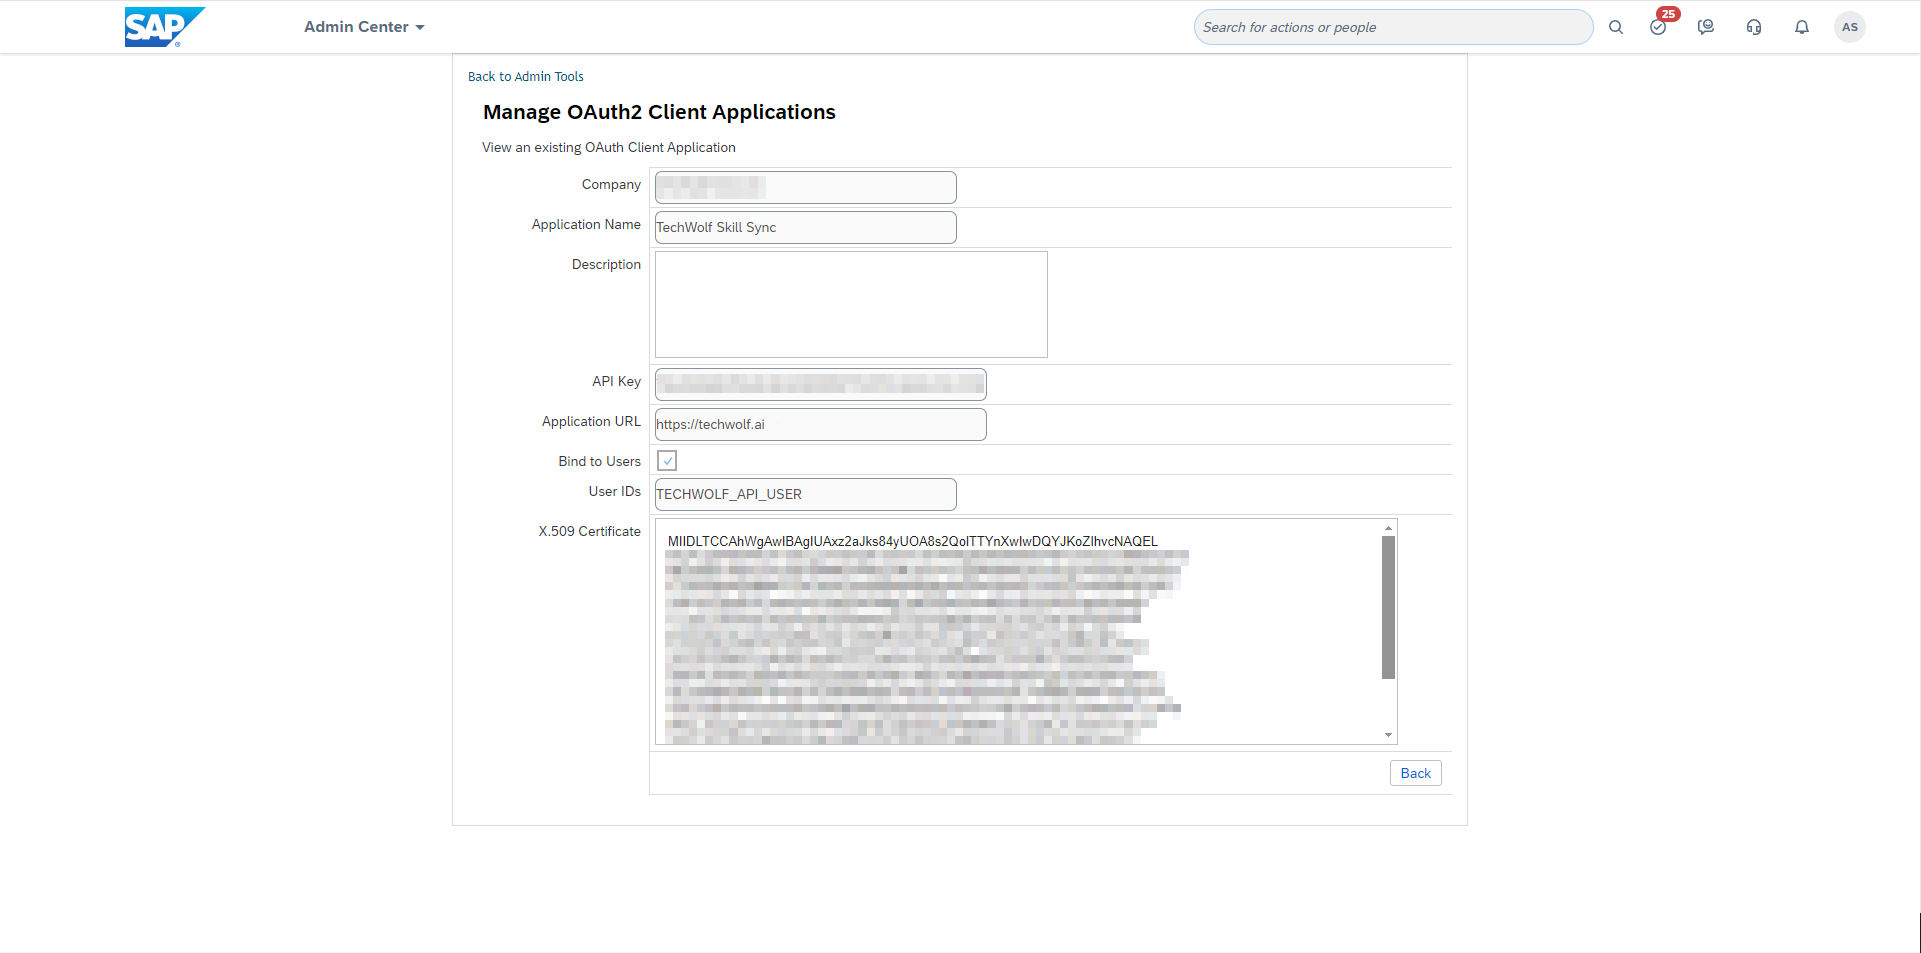
* Once the Client Application is registered, go back to the
`Manage OAuth2 Client Applications` page and find the application you just
created. Click `View` on it.
* On this view, you can see the `API Key` you will need for the integration
configuration.
* Now, click `Register`.
* Once the Client Application is registered, go back to the
`Manage OAuth2 Client Applications` page and find the application you just
created. Click `View` on it.
* On this view, you can see the `API Key` you will need for the integration
configuration.
 ### 5. Configure the permissions for the TechWolf user
The `TechWolf_TIH_GP` user needs a Permission Group and a Permission Role to run
the Skill Sync.
If another TechWolf - SAP SuccessFactors integration using the
`TechWolf_TIH_GP` user has already been configured in this tenant, the
Permission Group and Permission Role already exist. Skip the group creation
and role assignment steps below and only **add the missing permissions**
from the table to the existing Permission Role.
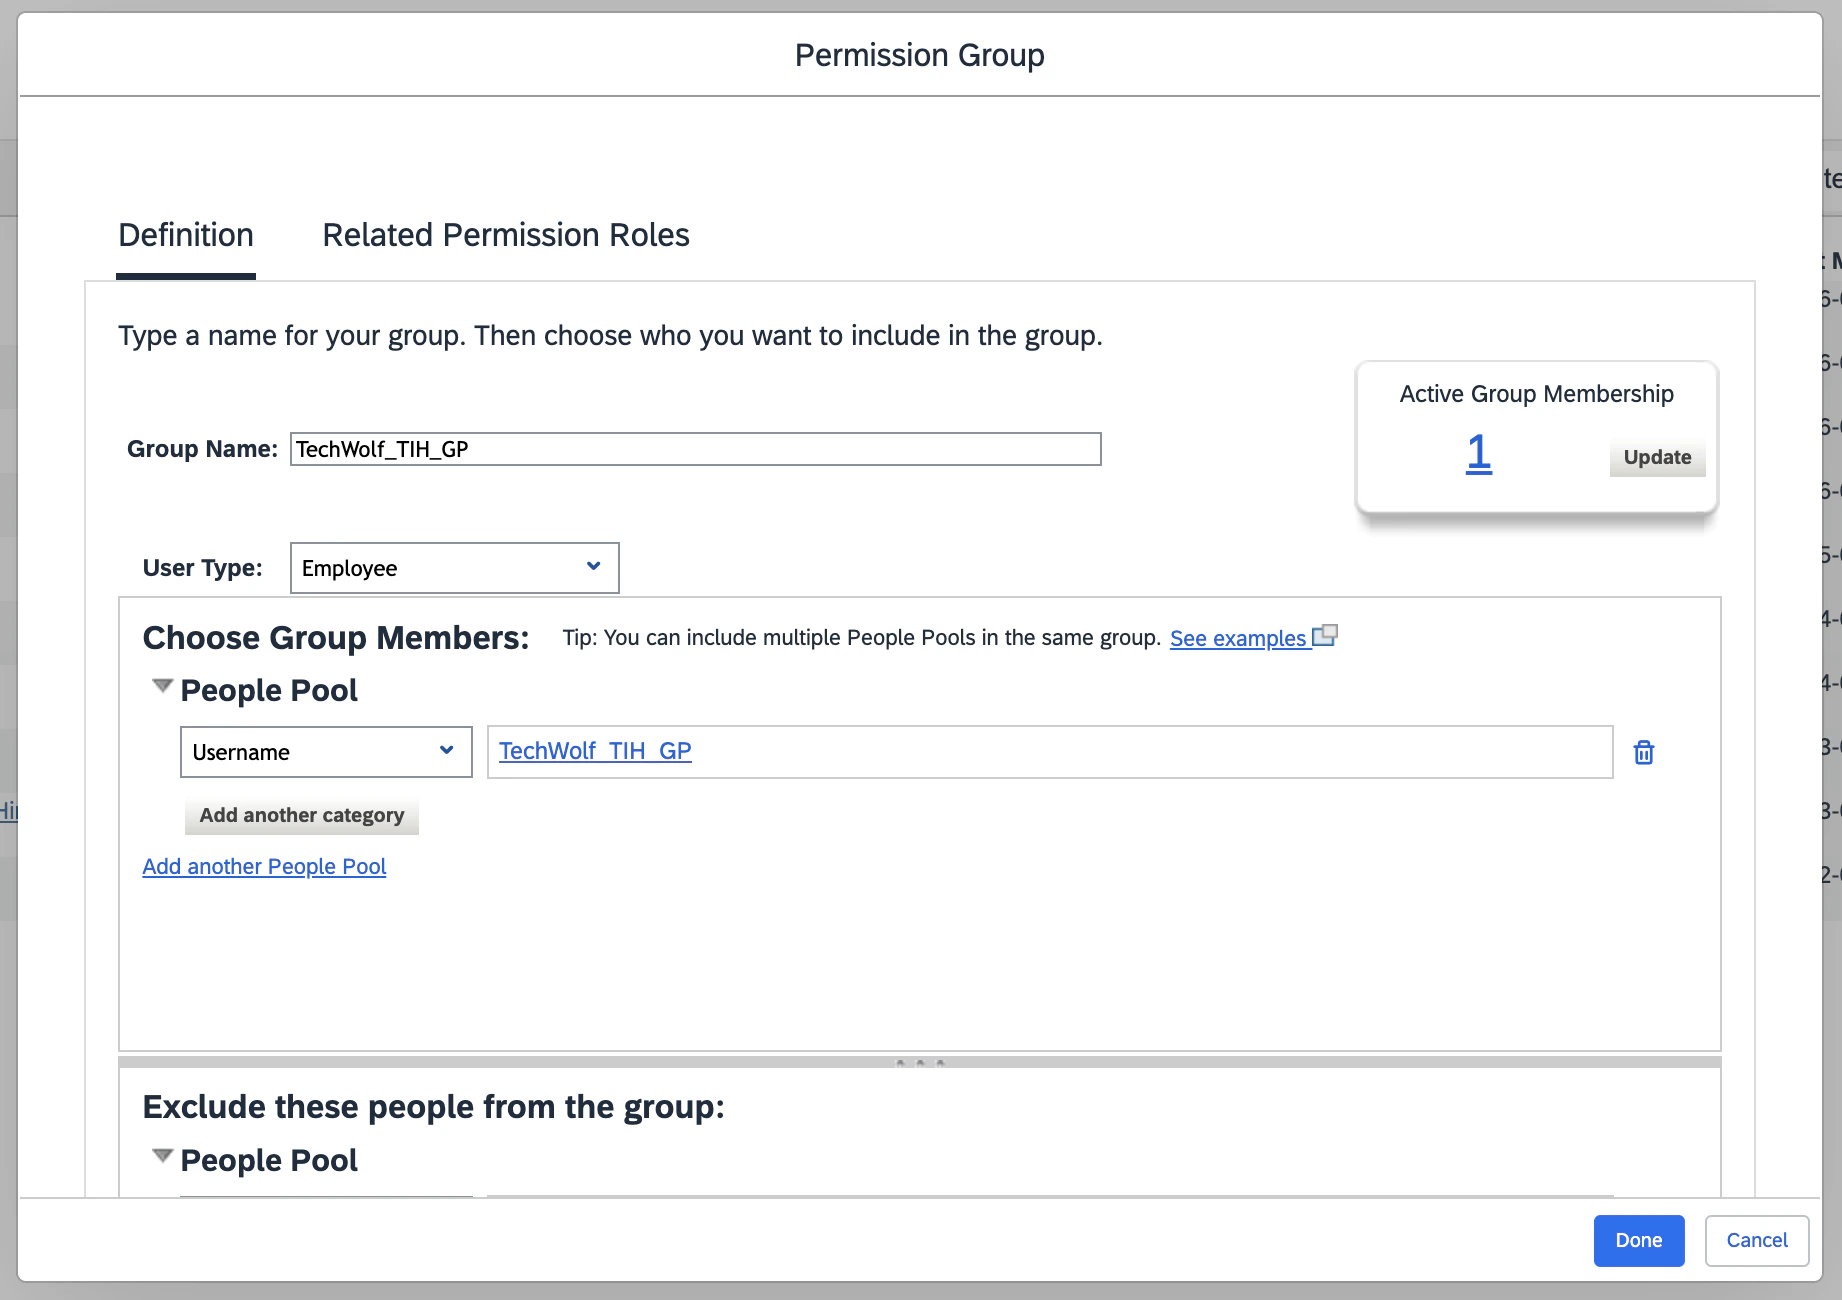
* **Create a Permission Group**
* In the search bar at the top, enter `Manage Permission Groups` and open
it.
* Click `Create New`.
* Name the group `TechWolf_TIH_GP`.
* Pick the `Username` filter and set it equal to `TechWolf_TIH_GP`.
* Click `Done`.
### 5. Configure the permissions for the TechWolf user
The `TechWolf_TIH_GP` user needs a Permission Group and a Permission Role to run
the Skill Sync.
If another TechWolf - SAP SuccessFactors integration using the
`TechWolf_TIH_GP` user has already been configured in this tenant, the
Permission Group and Permission Role already exist. Skip the group creation
and role assignment steps below and only **add the missing permissions**
from the table to the existing Permission Role.
* **Create a Permission Group**
* In the search bar at the top, enter `Manage Permission Groups` and open
it.
* Click `Create New`.
* Name the group `TechWolf_TIH_GP`.
* Pick the `Username` filter and set it equal to `TechWolf_TIH_GP`.
* Click `Done`.
 * **Create a Permission Role**
* In the search bar at the top, enter `Manage Permission Roles` and open it.
* Create a new Role with user type `Employee`.
* Under `User Permissions` → `Growth Portfolio`, grant the following:
| Permission | Access |
| ----------------------- | ---------------------------------------------------------------------- |
| Attribute | View |
| Growth Portfolio | View, Edit, Create, Delete, Edit Proficiency Level, Mark as passionate |
| Proficiency Level Scale | View |
* **Create a Permission Role**
* In the search bar at the top, enter `Manage Permission Roles` and open it.
* Create a new Role with user type `Employee`.
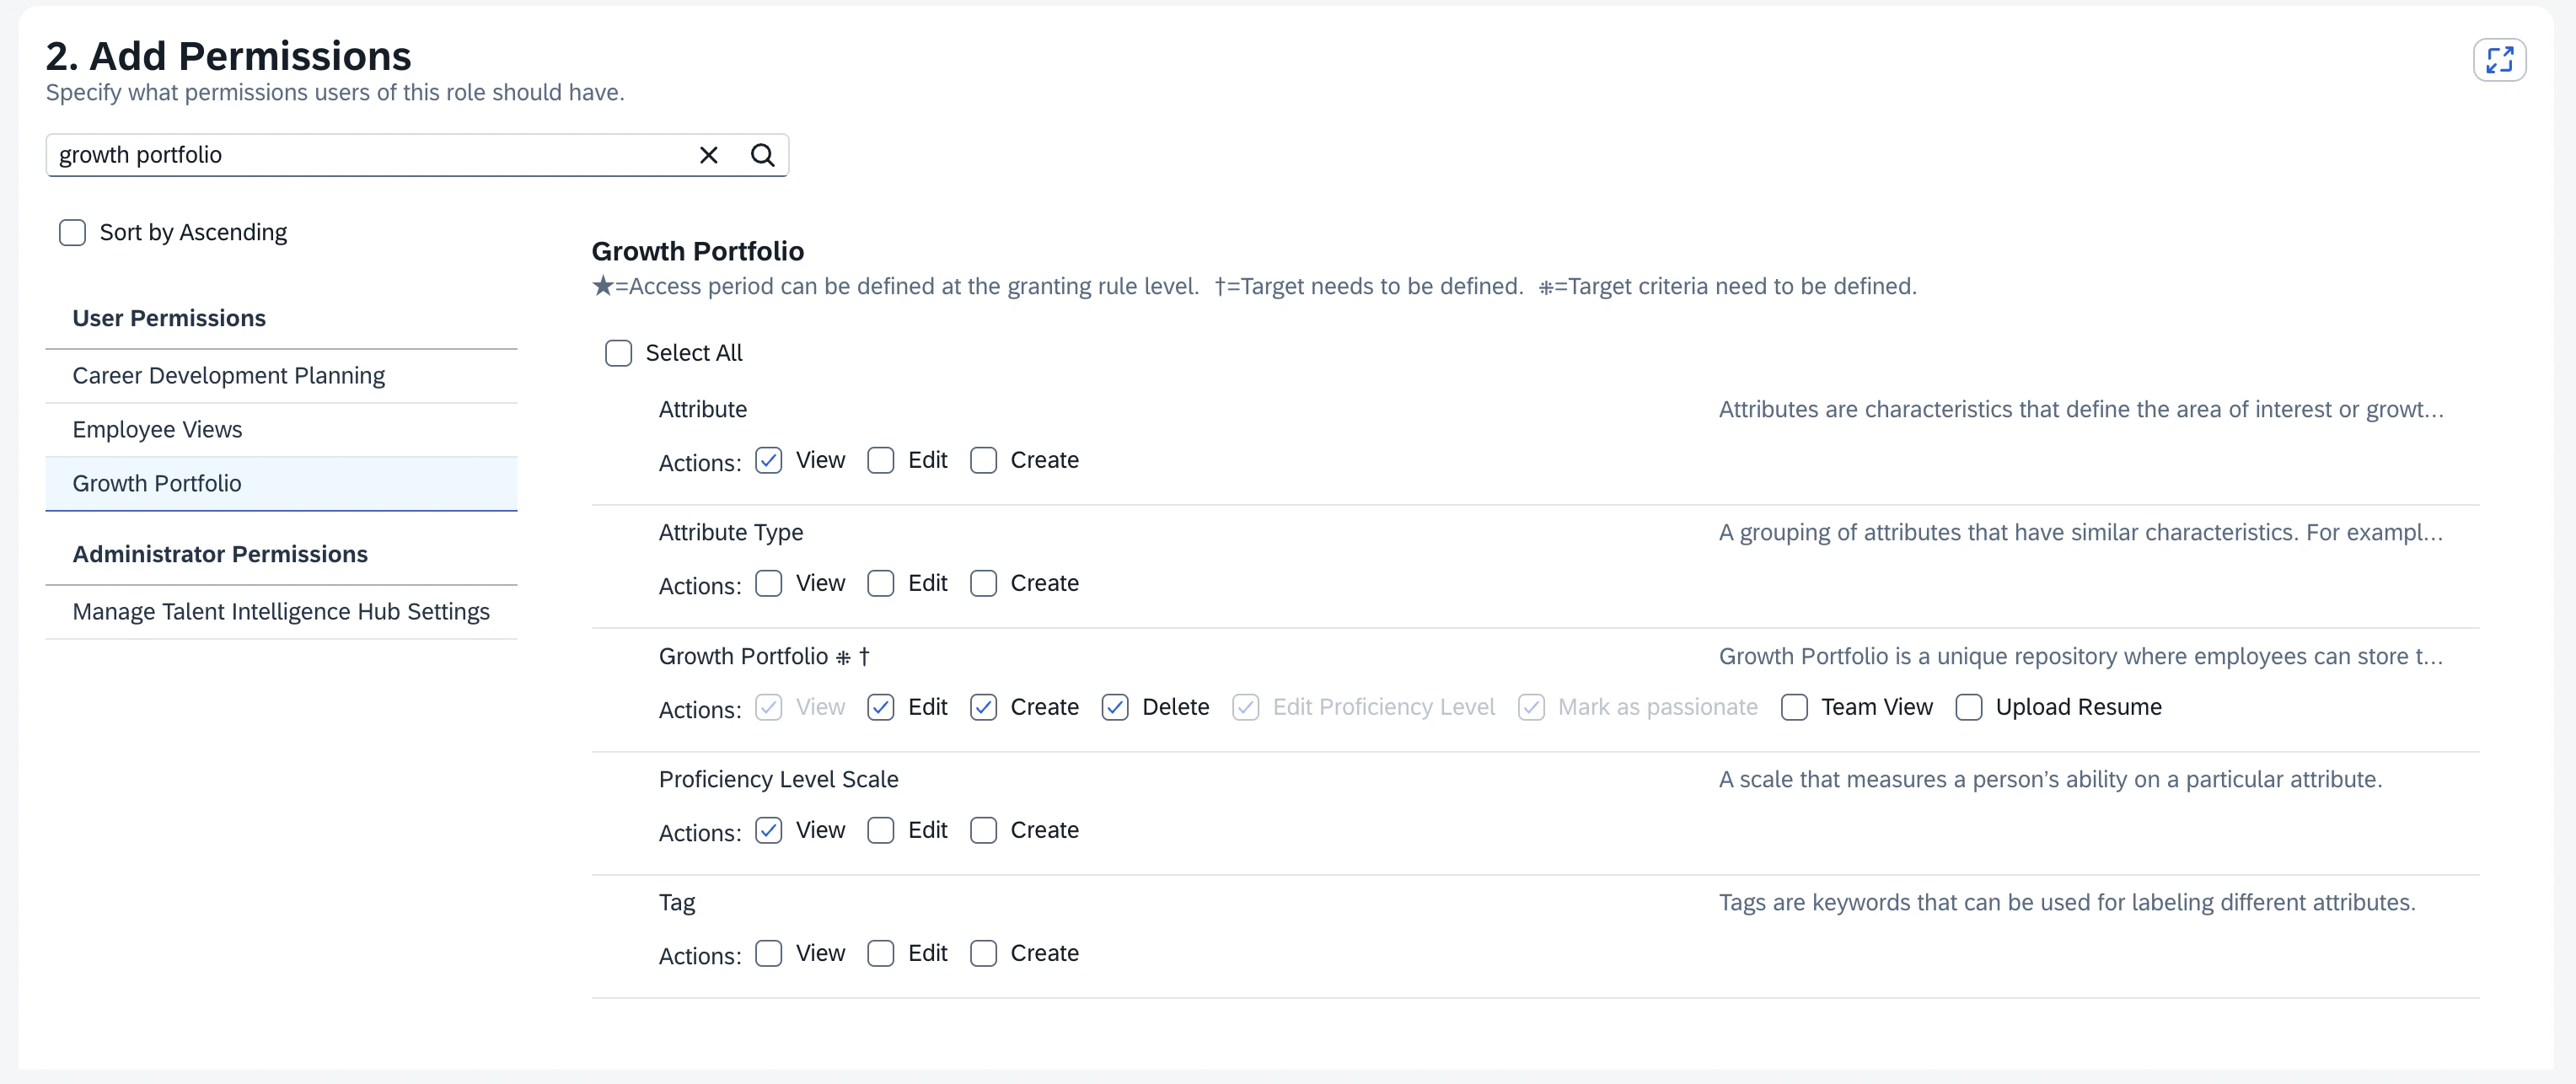
* Under `User Permissions` → `Growth Portfolio`, grant the following:
| Permission | Access |
| ----------------------- | ---------------------------------------------------------------------- |
| Attribute | View |
| Growth Portfolio | View, Edit, Create, Delete, Edit Proficiency Level, Mark as passionate |
| Proficiency Level Scale | View |
 * Under `Administrator Permissions` →
`Manage Talent Intelligence Hub Settings`, grant the following:
| Permission |
| --------------------------------------------------------------- |
| Import/Export Talent Intelligence Hub and Growth Portfolio Data |
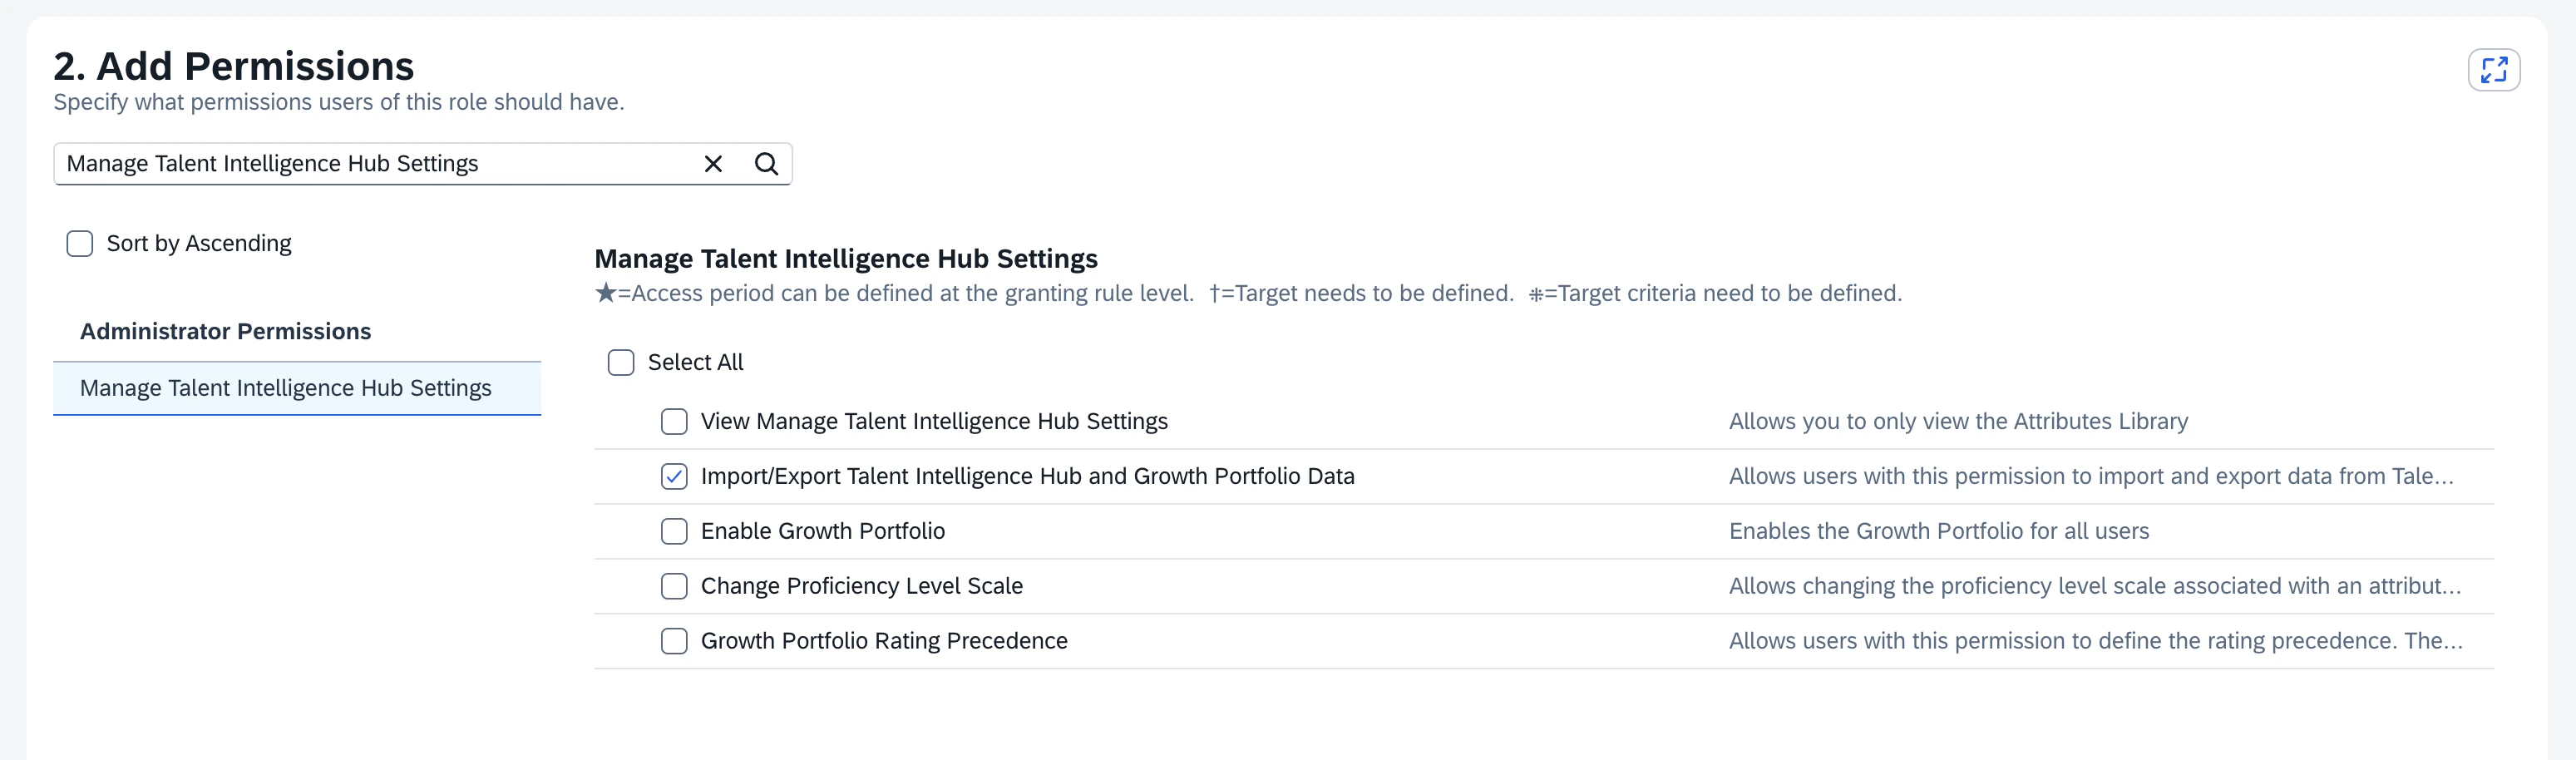
* Under `Administrator Permissions` →
`Manage Talent Intelligence Hub Settings`, grant the following:
| Permission |
| --------------------------------------------------------------- |
| Import/Export Talent Intelligence Hub and Growth Portfolio Data |
 * Save the Permission Role.
* **Assign the Permission Role to the Permission Group**
* On the saved Permission Role, click `Add Role Assignments`.
* Click `Next`.
* On the `Grant Access To` page, select `From Groups`.
* Click `Select Groups` and pick the `TechWolf_TIH_GP` group created above.
* Click `Next`, then `Next` again, and save the Role Assignment.
* Save the Permission Role.
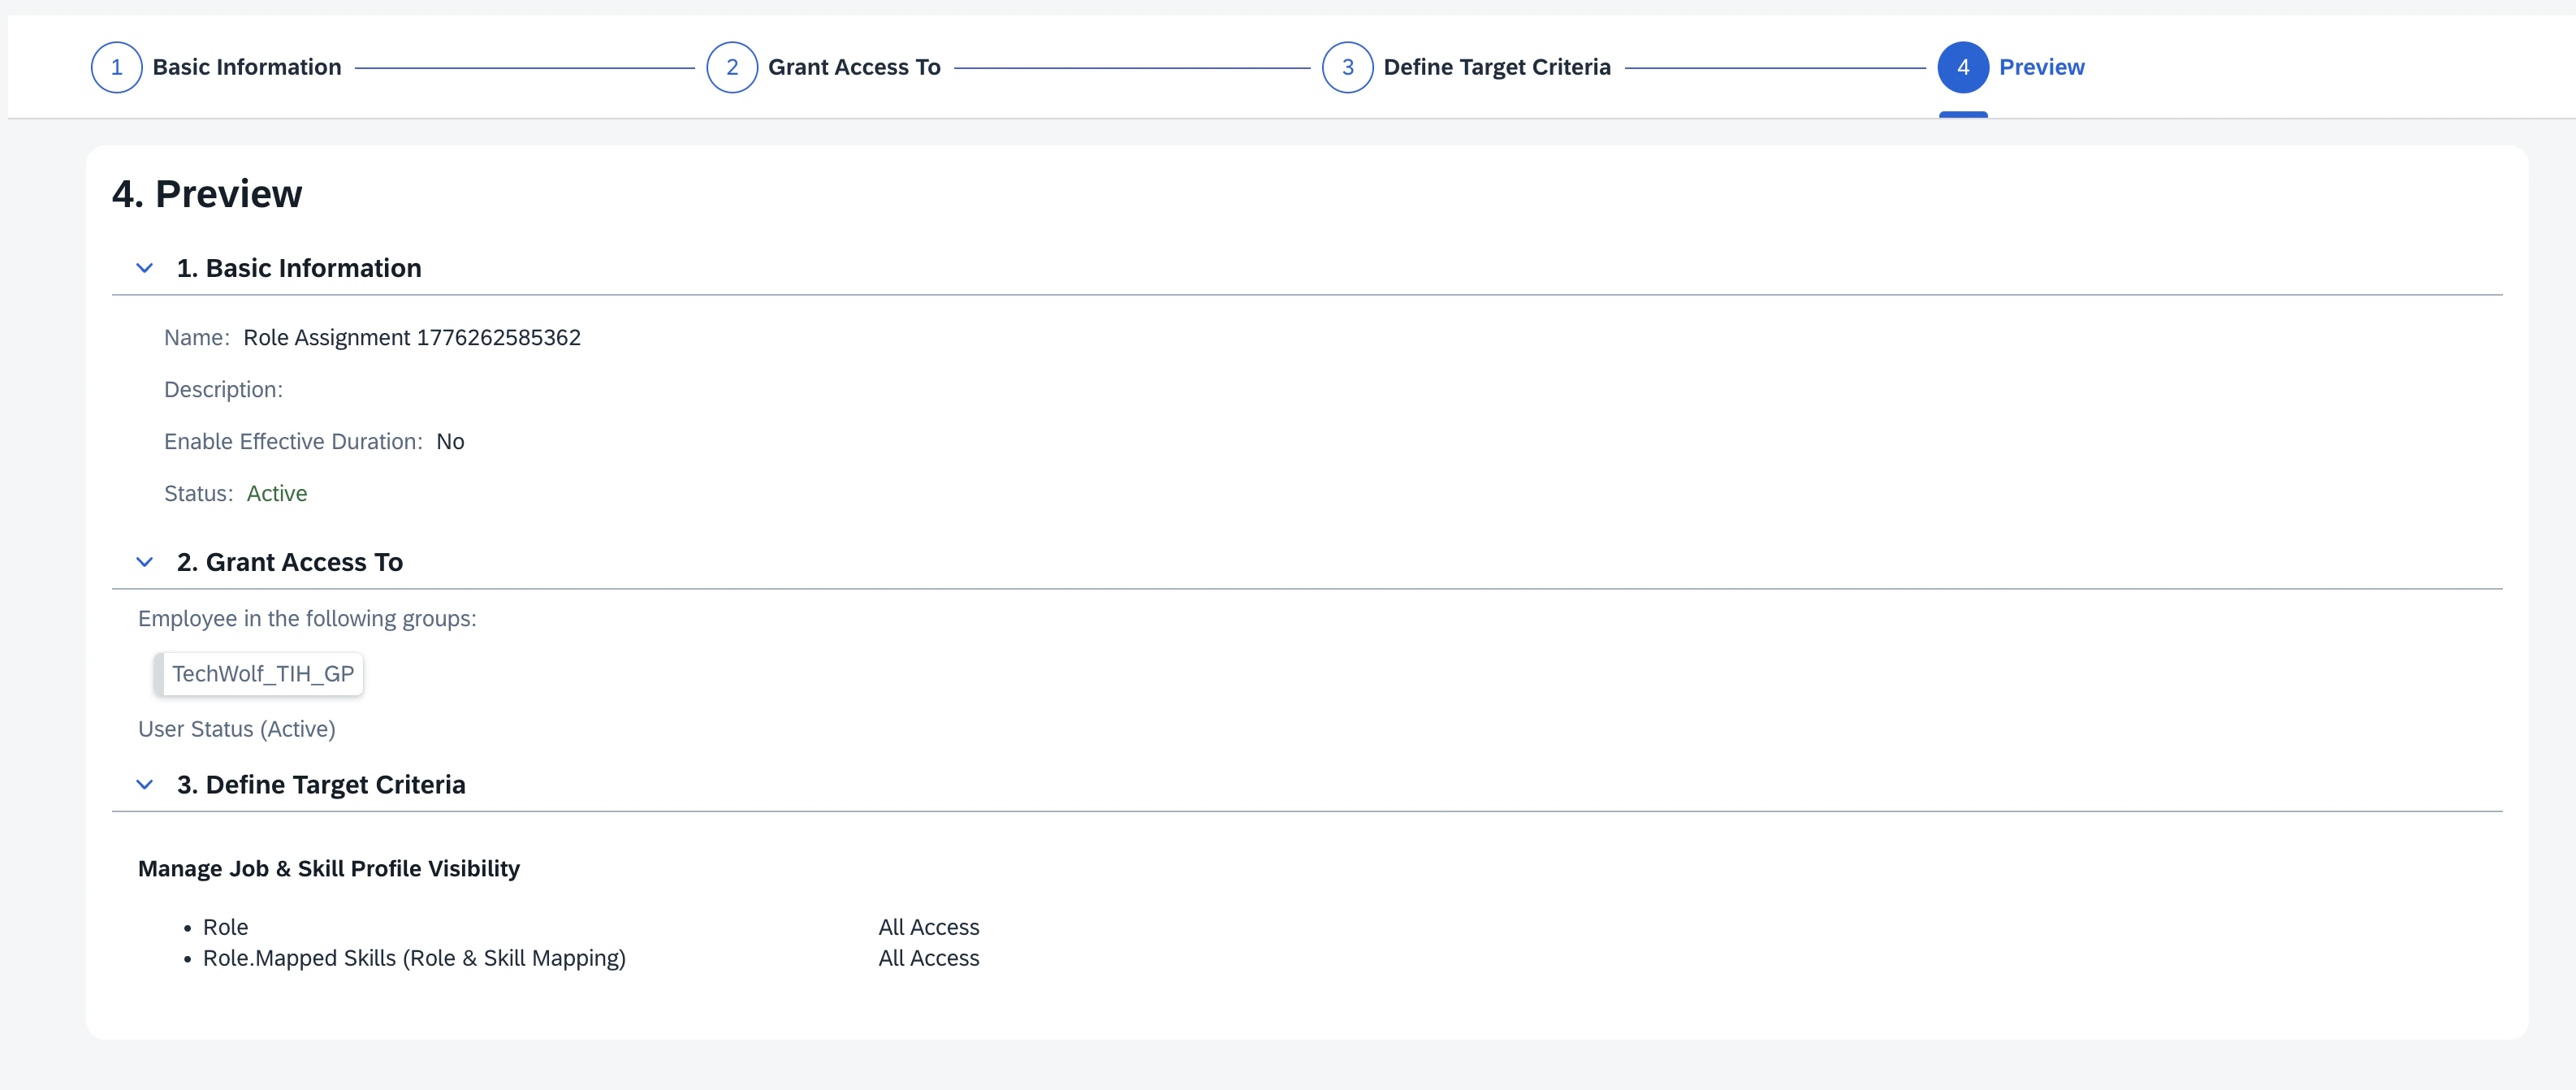
* **Assign the Permission Role to the Permission Group**
* On the saved Permission Role, click `Add Role Assignments`.
* Click `Next`.
* On the `Grant Access To` page, select `From Groups`.
* Click `Select Groups` and pick the `TechWolf_TIH_GP` group created above.
* Click `Next`, then `Next` again, and save the Role Assignment.
 On recent SAP SuccessFactors releases, the Talent Intelligence Hub adds data
source governance for external skill providers. If your tenant exposes the
**Manage Data Sources** task or a **Manage Skills Governance** section under
**Manage Talent Intelligence Hub**, complete
[How To: Register TechWolf as a Trusted Data Source ](/integrations/sap-skill-sync-integration/how-to-register-data-source)
so Growth Portfolio updates from TechWolf flow through without additional
manual review.
### 6. Create Employee Growth Portfolio Export Schedule
Follow the steps in
[How To: Load Export Integration Definitions ](/integrations/datasource-integrations/sap-standard-input-integration/how-to-load-export-integration-definitions)
to create a new export integration definition that will create an export of
Employee Growth Portfolios. Use the values from the table below when setting up
the integration definition.
Preferably, the time of day of the `Start Time` of the schedule is set to be
some time (e.g. one hour) after the time of day of the `Start Time` of the
Attribute Import Schedule (Step 1) of the
[Skills Taxonomy Sync ](/integrations/sap-skill-sync-integration/installation-skills-taxonomy).
| **Configuration Item** | **Value** |
| -------------------------- | ---------------------------------------------------------- |
| **Integration Definition** | `techwolf_employee_growth_portfolio_export_definition.icd` |
| **File Name Prefix** | `EmployeeGrowthPortfolioExport` |
| **Date Suffix Format** | `yyMMddHHmmssZ` |
| **File Folder** | `/tih/exports/employee_growth_portfolio` |
**Base ICD**:
[Talent Intelligence Hub Growth Portfolio Export ](https://api.sap.com/package/TalentIntelligenceHubGrowthPortfolioExportTemplate/icd)
The ICDs provided by TechWolf are based on the default integration definitions by SAP, as indicated by the **Base ICD** mentioned.
These have been pre-filled with some necessary values such as the file name prefix for your convenience, to ease the setup process.
TechWolf is committed to keeping these integration definitions up to date with the latest SAP SuccessFactors releases, but cannot guarantee full alignment with the SAP SuccessFactors release schedule.
Should issues arise when using these integration definitions, please contact [support@techwolf.ai](mailto:support@techwolf.ai).
## TechWolf Configuration
The TechWolf tenant will be configured by TechWolf itself.
1. In the integration service on the TechWolf side, TechWolf adds the
credentials of the customer-created integration user. For this, the customer
will need to share the following values with TechWolf:
* The Company ID of the SAP SuccessFactors environment (see Step 1 of the
SAP SuccessFactors Configuration section)
* The API URL of the SAP SuccessFactors environment (see Step 2 of the SAP
SuccessFactors Configuration section)
* Username of the integration user (see Step 3 & 4 of the SAP SuccessFactors
Configuration section, must be `TechWolf_TIH_GP`)
* The API Key of the OAuth2 Client Application (see Step 4 of the SAP
SuccessFactors Configuration section)
Additionally, the customer will need to share the following configuration
settings with TechWolf:
* The minimum proficiency level for skill attributes in SAP SuccessFactors
(see
[How To: Manage the Skill Proficiency Rating Scale ](/integrations/sap-skill-sync-integration/how-to-manage-proficiency-rating-scale))
* The number of proficiency levels for skill attributes in SAP
SuccessFactors (see
[How To: Manage the Skill Proficiency Rating Scale ](/integrations/sap-skill-sync-integration/how-to-manage-proficiency-rating-scale))
2. TechWolf adds TechWolf API credentials with correct scopes to have access to
the TechWolf API and links that TechWolf tenant to the SAP SuccessFactors
tenant.
3. TechWolf enables the schedule to consume the SAP SuccessFactors Growth
Portfolio export files on TechWolf's side.
## Configuration Options
The integration supports multiple configuration options to fine-tune the
integration to the customer's needs. More information on the configuration
options can be found in the
[How It Works ](/integrations/sap-skill-sync-integration/how-it-works)
section.
### Sync Direction
The integration supports three sync direction options:
* **Bidirectional** (default): Two-way sync between TechWolf and SAP
SuccessFactors
* **TechWolf to SAP Only**: Skills flow from TechWolf to SAP SuccessFactors only
* **SAP to TechWolf Only**: Skills flow from SAP SuccessFactors to TechWolf only
### Merge Strategy
The integration supports three options for the construction of the initial
profile of each entity after the integration is first enabled, or when it is
re-enabled after having been paused, or when it encounters an entity it had no
knowledge about yet:
* **Merge Systems**: Combines skills from both systems, i.e. the resulting skill
profile in both systems will contain all skills that were present in either
system initially.
* **Push TechWolf**: Uses the TechWolf Employee Skill Profile as the initial
source of truth, and will align the SAP SuccessFactors Employee Growth
Portfolio with it.
* **Push SAP**: Uses the SAP SuccessFactors Employee Growth Portfolio as the
initial source of truth, and will align the TechWolf Employee Skill Profile
with it.
## Deployment Tasks & Responsibilities
1. **TechWolf**: Setup Skill Sync environment and tenant requirements
2. **Customer**: Configure SAP SuccessFactors as described above.
3. **Customer**: Share nessary SAP SuccessFactors information and credentials
with TechWolf:
* Company ID
* API URL
* Username of the integration user
* API Key of the OAuth2 Client Application
4. **TechWolf**: Validate API access by attempting the addition, update and
removal of a skill in the Employee Growth Portfolio of the integration user.
5. **TechWolf**: Run initial sync of user profiles with TechWolf API.
6. **TechWolf**: Setup tenant configuration and start sync process based on
configured direction.
7. **Customer**: Check end-user test scenarios.
On recent SAP SuccessFactors releases, the Talent Intelligence Hub adds data
source governance for external skill providers. If your tenant exposes the
**Manage Data Sources** task or a **Manage Skills Governance** section under
**Manage Talent Intelligence Hub**, complete
[How To: Register TechWolf as a Trusted Data Source ](/integrations/sap-skill-sync-integration/how-to-register-data-source)
so Growth Portfolio updates from TechWolf flow through without additional
manual review.
### 6. Create Employee Growth Portfolio Export Schedule
Follow the steps in
[How To: Load Export Integration Definitions ](/integrations/datasource-integrations/sap-standard-input-integration/how-to-load-export-integration-definitions)
to create a new export integration definition that will create an export of
Employee Growth Portfolios. Use the values from the table below when setting up
the integration definition.
Preferably, the time of day of the `Start Time` of the schedule is set to be
some time (e.g. one hour) after the time of day of the `Start Time` of the
Attribute Import Schedule (Step 1) of the
[Skills Taxonomy Sync ](/integrations/sap-skill-sync-integration/installation-skills-taxonomy).
| **Configuration Item** | **Value** |
| -------------------------- | ---------------------------------------------------------- |
| **Integration Definition** | `techwolf_employee_growth_portfolio_export_definition.icd` |
| **File Name Prefix** | `EmployeeGrowthPortfolioExport` |
| **Date Suffix Format** | `yyMMddHHmmssZ` |
| **File Folder** | `/tih/exports/employee_growth_portfolio` |
**Base ICD**:
[Talent Intelligence Hub Growth Portfolio Export ](https://api.sap.com/package/TalentIntelligenceHubGrowthPortfolioExportTemplate/icd)
The ICDs provided by TechWolf are based on the default integration definitions by SAP, as indicated by the **Base ICD** mentioned.
These have been pre-filled with some necessary values such as the file name prefix for your convenience, to ease the setup process.
TechWolf is committed to keeping these integration definitions up to date with the latest SAP SuccessFactors releases, but cannot guarantee full alignment with the SAP SuccessFactors release schedule.
Should issues arise when using these integration definitions, please contact [support@techwolf.ai](mailto:support@techwolf.ai).
## TechWolf Configuration
The TechWolf tenant will be configured by TechWolf itself.
1. In the integration service on the TechWolf side, TechWolf adds the
credentials of the customer-created integration user. For this, the customer
will need to share the following values with TechWolf:
* The Company ID of the SAP SuccessFactors environment (see Step 1 of the
SAP SuccessFactors Configuration section)
* The API URL of the SAP SuccessFactors environment (see Step 2 of the SAP
SuccessFactors Configuration section)
* Username of the integration user (see Step 3 & 4 of the SAP SuccessFactors
Configuration section, must be `TechWolf_TIH_GP`)
* The API Key of the OAuth2 Client Application (see Step 4 of the SAP
SuccessFactors Configuration section)
Additionally, the customer will need to share the following configuration
settings with TechWolf:
* The minimum proficiency level for skill attributes in SAP SuccessFactors
(see
[How To: Manage the Skill Proficiency Rating Scale ](/integrations/sap-skill-sync-integration/how-to-manage-proficiency-rating-scale))
* The number of proficiency levels for skill attributes in SAP
SuccessFactors (see
[How To: Manage the Skill Proficiency Rating Scale ](/integrations/sap-skill-sync-integration/how-to-manage-proficiency-rating-scale))
2. TechWolf adds TechWolf API credentials with correct scopes to have access to
the TechWolf API and links that TechWolf tenant to the SAP SuccessFactors
tenant.
3. TechWolf enables the schedule to consume the SAP SuccessFactors Growth
Portfolio export files on TechWolf's side.
## Configuration Options
The integration supports multiple configuration options to fine-tune the
integration to the customer's needs. More information on the configuration
options can be found in the
[How It Works ](/integrations/sap-skill-sync-integration/how-it-works)
section.
### Sync Direction
The integration supports three sync direction options:
* **Bidirectional** (default): Two-way sync between TechWolf and SAP
SuccessFactors
* **TechWolf to SAP Only**: Skills flow from TechWolf to SAP SuccessFactors only
* **SAP to TechWolf Only**: Skills flow from SAP SuccessFactors to TechWolf only
### Merge Strategy
The integration supports three options for the construction of the initial
profile of each entity after the integration is first enabled, or when it is
re-enabled after having been paused, or when it encounters an entity it had no
knowledge about yet:
* **Merge Systems**: Combines skills from both systems, i.e. the resulting skill
profile in both systems will contain all skills that were present in either
system initially.
* **Push TechWolf**: Uses the TechWolf Employee Skill Profile as the initial
source of truth, and will align the SAP SuccessFactors Employee Growth
Portfolio with it.
* **Push SAP**: Uses the SAP SuccessFactors Employee Growth Portfolio as the
initial source of truth, and will align the TechWolf Employee Skill Profile
with it.
## Deployment Tasks & Responsibilities
1. **TechWolf**: Setup Skill Sync environment and tenant requirements
2. **Customer**: Configure SAP SuccessFactors as described above.
3. **Customer**: Share nessary SAP SuccessFactors information and credentials
with TechWolf:
* Company ID
* API URL
* Username of the integration user
* API Key of the OAuth2 Client Application
4. **TechWolf**: Validate API access by attempting the addition, update and
removal of a skill in the Employee Growth Portfolio of the integration user.
5. **TechWolf**: Run initial sync of user profiles with TechWolf API.
6. **TechWolf**: Setup tenant configuration and start sync process based on
configured direction.
7. **Customer**: Check end-user test scenarios.