> ## Documentation Index
> Fetch the complete documentation index at: https://developers.techwolf.ai/llms.txt
> Use this file to discover all available pages before exploring further.
# Installation
### Prerequisites
Before continuing, ensure you have the following:
* A valid TechWolf contract and access to a **live TechWolf tenant**.
* This tenant must contain Employees corresponding to the Per Person
entities present in SAP SuccessFactors. This can be achieved by either:
* Using the Standard
[Employee Data Input Integration ](/integrations/datasource-integrations/sap-standard-input-integration/overview).
* Creating custom input integrations. When doing this, ensure the
TechWolf SkillEngine API Employees are linked with their SAP Per
Person counterparts by using the Per Person UUID (`perPersonUuid`) as
the TechWolf Employee ID (`external_id`). Additionally, each TechWolf
Employee should have a custom property called `person_id_external`
with as value the `Person External ID` of the corresponding PerPerson
entity in SAP SuccessFactors. More information on custom properties
can be found in the
[API Reference ](https://developers.techwolf.ai/reference/latest/Custom%20Properties/CustomPropertiesDefinitions/overview).
* A working **SAP SuccessFactors** environment with
[Talent Intelligence Hub ](https://help.sap.com/docs/SAP_SUCCESSFACTORS_PLATFORM/e15477b0414b4b25b224a97ad52c12ec/ec345d8396d64bd0936a3cc8280098e0.html)
enabled.
* An SAP SuccessFactors administrator user with permission to **Manage OAuth 2
Client Applications** and to import employee data.
* A working **SAP BTP** tenant with **SAP Integration Suite** provisioned,
including the *Build Integration Scenarios* capability. Your user must have
the `PI_Administrator` and `PI_Integration_Developer` roles. For more
information on setting up Integration Suite, refer to
[the SAP community guide ](https://community.sap.com/t5/technology-blog-posts-by-members/step-by-step-guide-create-trial-account-for-sap-integration-suite-2025-amp/ba-p/14002055).
* An **AIR key**, provided by your TechWolf representative.
* The **Integration Suite Content Package** zip file, provided by your TechWolf
representative.
* Access to the TechWolf
[SFTP server ](/integrations/reference/sftp/sftp)
to host the Employee Growth Portfolio export files.
* A successful SAP support case to
[whitelist the TechWolf SFTP server ](/integrations/datasource-integrations/sap-standard-input-integration/how-to-whitelist-sap-sftp-server).
The AIR key (Application Interface Register key) is an identifier SAP issues
to certified PartnerEdge partners. The iFlows pass it in the header of every
SuccessFactors API call so SAP can attribute traffic to the TechWolf Skill
Sync partner solution. It is an identifier, not a secret credential.
The technical user ID `TechWolf_TIH_GP` is hardcoded. It must be used
verbatim in three places: as the Common Name (CN) of the certificate created
in Step 1, as the User ID of the SuccessFactors technical user created in
Step 2, and as the User ID bound to the OAuth 2 Client Application created
in Step 3. The SAML Bearer flow only succeeds if all three values match
exactly.
If you already configured the
[SAP BTP Job Skill Sync ](/integrations/sap-btp-skill-sync/installation-jobs)
in the same BTP tenant, the shared BTP/SuccessFactors setup (Steps 1-3 and
Steps 5-9) is already in place. You can skip to Step 4 to add the
Employee-specific permissions, Step 10 to configure the Employee iFlow, and
Step 11 to set up the Employee Growth Portfolio export schedule.
## SAP BTP and SuccessFactors Configuration
TechWolf has already pre-configured some parts of the integration. The following
ZIP archive contains the necessary files that will be used in the subsequent
steps to configure the integration in SAP BTP and SAP SuccessFactors.
Required files for the SAP BTP Employee Skill Sync Integration
### 1. Create a Certificate for authenticating to SuccessFactors
* In SAP Integration Suite, go to **Monitor > Integrations and APIs > Manage
Security > Keystore**, then click **Create > Key Pair**.
* Set **Alias** to a value you will remember for Step 5 (e.g.
`techwolf_skillsync_successfactors`).
* Set **Common Name** to `TechWolf_TIH_GP` (hardcoded, see the warning above).
* Set **Country** to the two-letter ISO 3166-1 alpha-2 code for your country
(e.g. `BE` for Belgium, `US` for the United States).
[List of ISO 3166-1 alpha-2 codes ](https://en.wikipedia.org/wiki/ISO_3166-1_alpha-2).
* (Optional) Change **Valid Until** to a date of your choice.
* Leave all other fields on their default values.
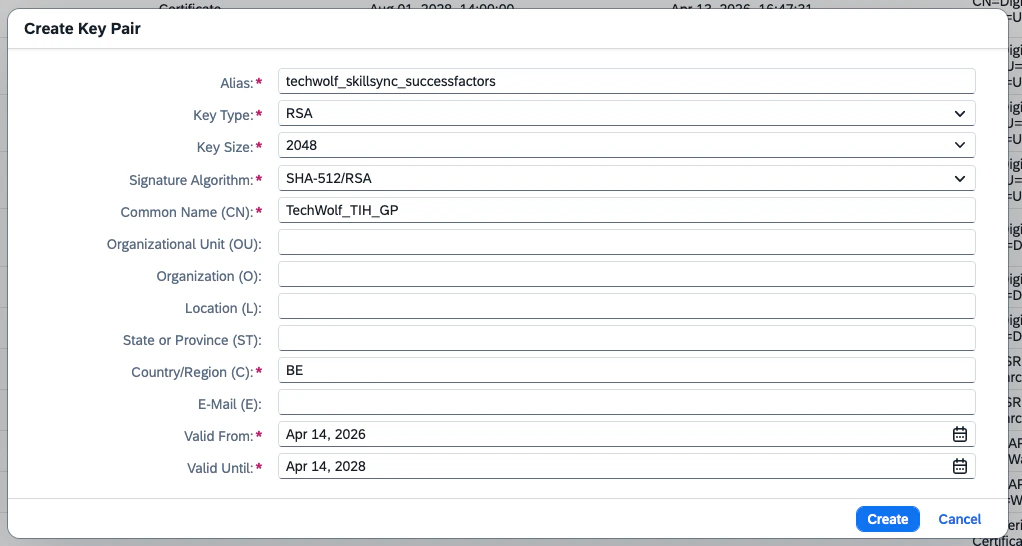 * Click **Create**. The new key pair appears in the Keystore overview.
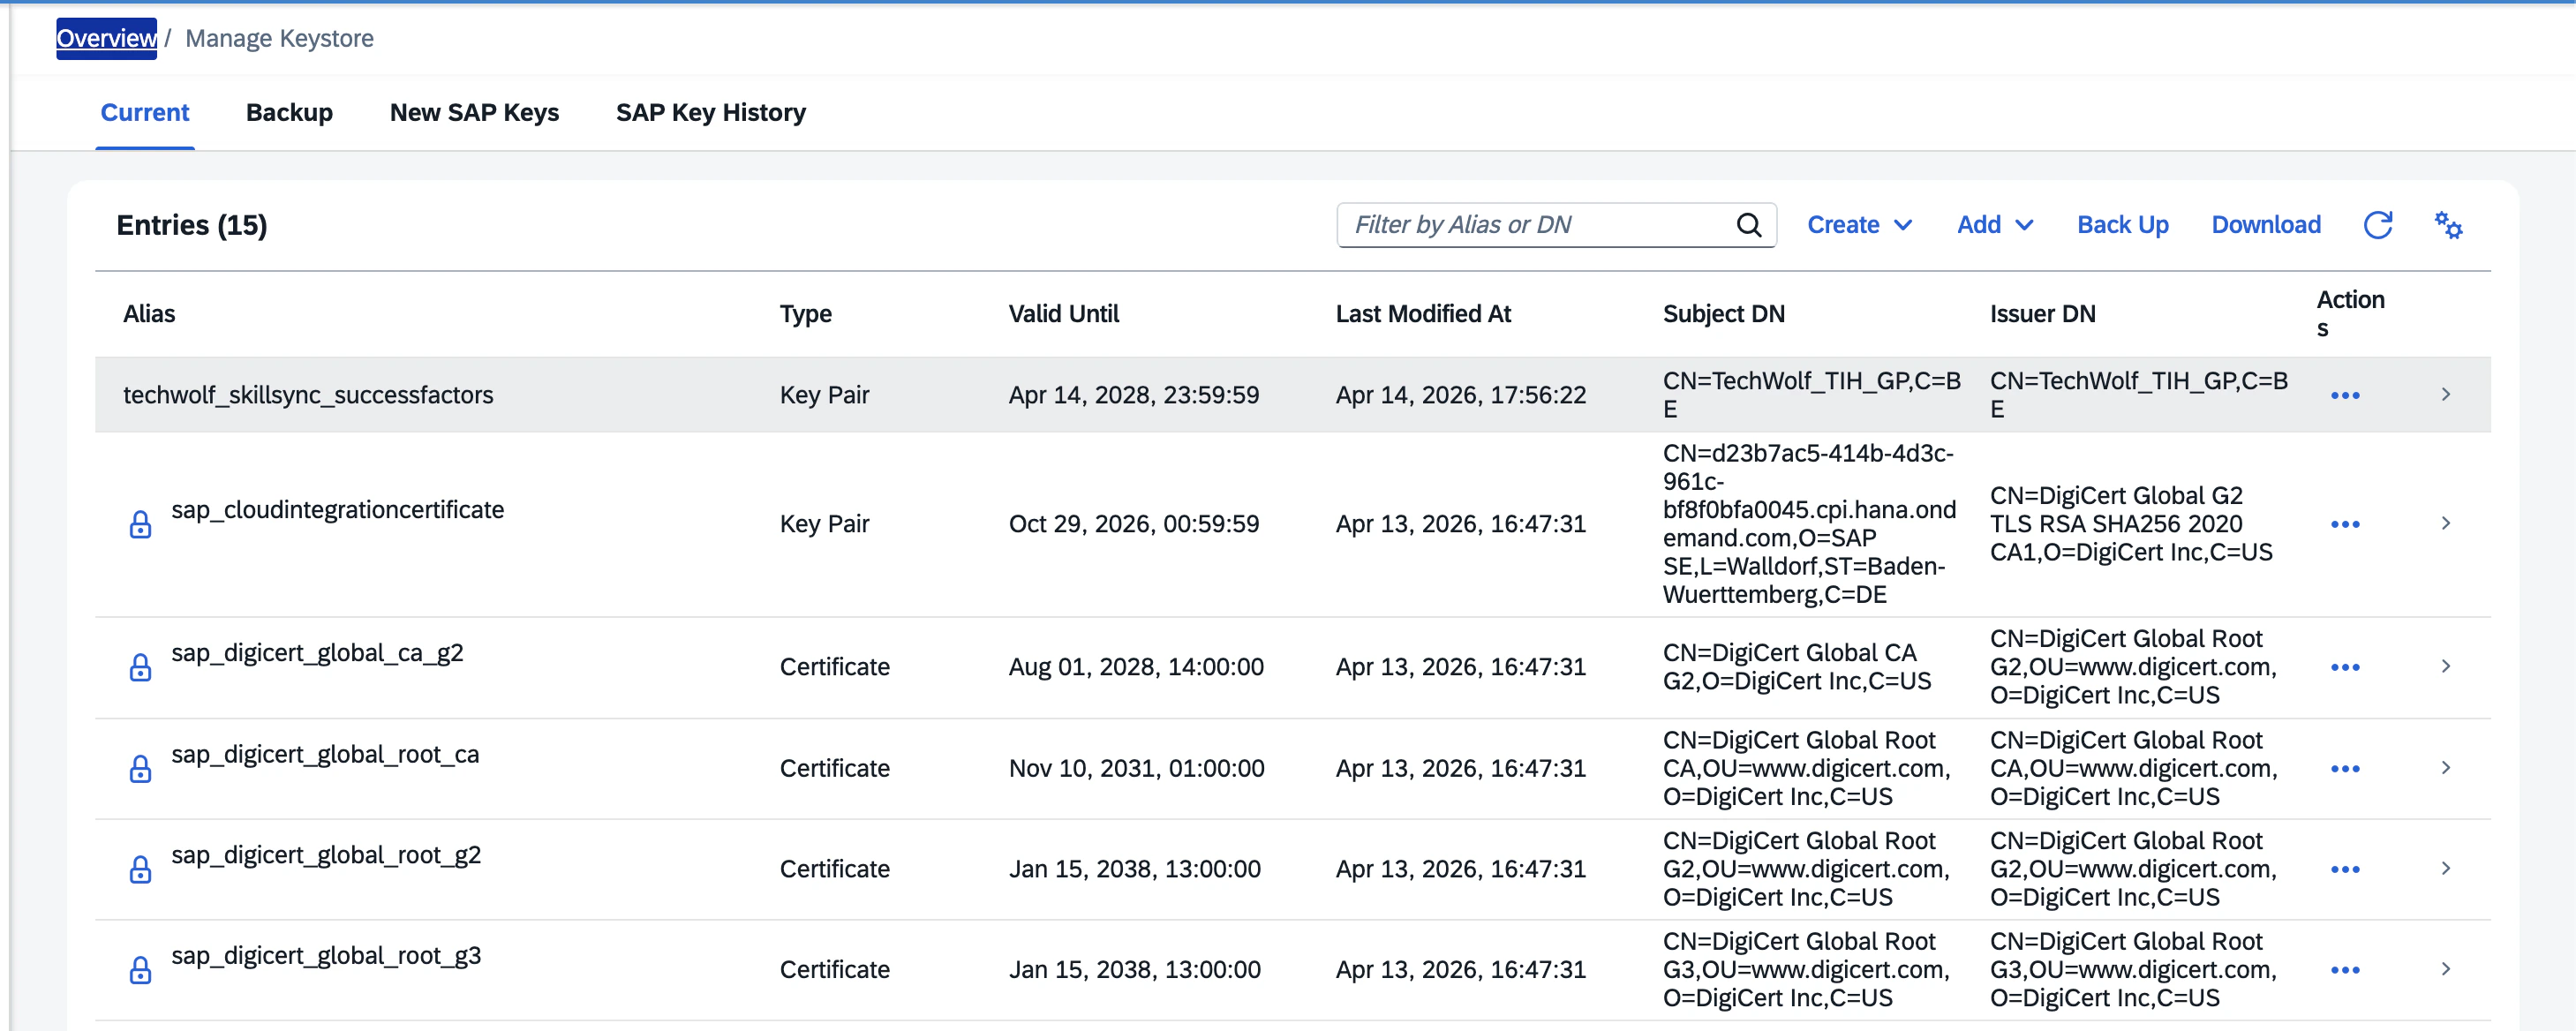 * Click the new key pair, then click **Download > Certificate**. Keep the
downloaded certificate file available; you will paste its contents into
SuccessFactors in Step 3.
### 2. Create the TechWolf integration user in SuccessFactors
* In the search bar at the top right of SAP SuccessFactors, enter
`Import Employee Data`.
* In the resulting window, under the `Select an entity` dropdown, choose "Basic
Import". In the `Choose File` field, upload the
`techwolf_api_user_definition.csv` file from the required-files zip downloaded
above.
* Click the new key pair, then click **Download > Certificate**. Keep the
downloaded certificate file available; you will paste its contents into
SuccessFactors in Step 3.
### 2. Create the TechWolf integration user in SuccessFactors
* In the search bar at the top right of SAP SuccessFactors, enter
`Import Employee Data`.
* In the resulting window, under the `Select an entity` dropdown, choose "Basic
Import". In the `Choose File` field, upload the
`techwolf_api_user_definition.csv` file from the required-files zip downloaded
above.
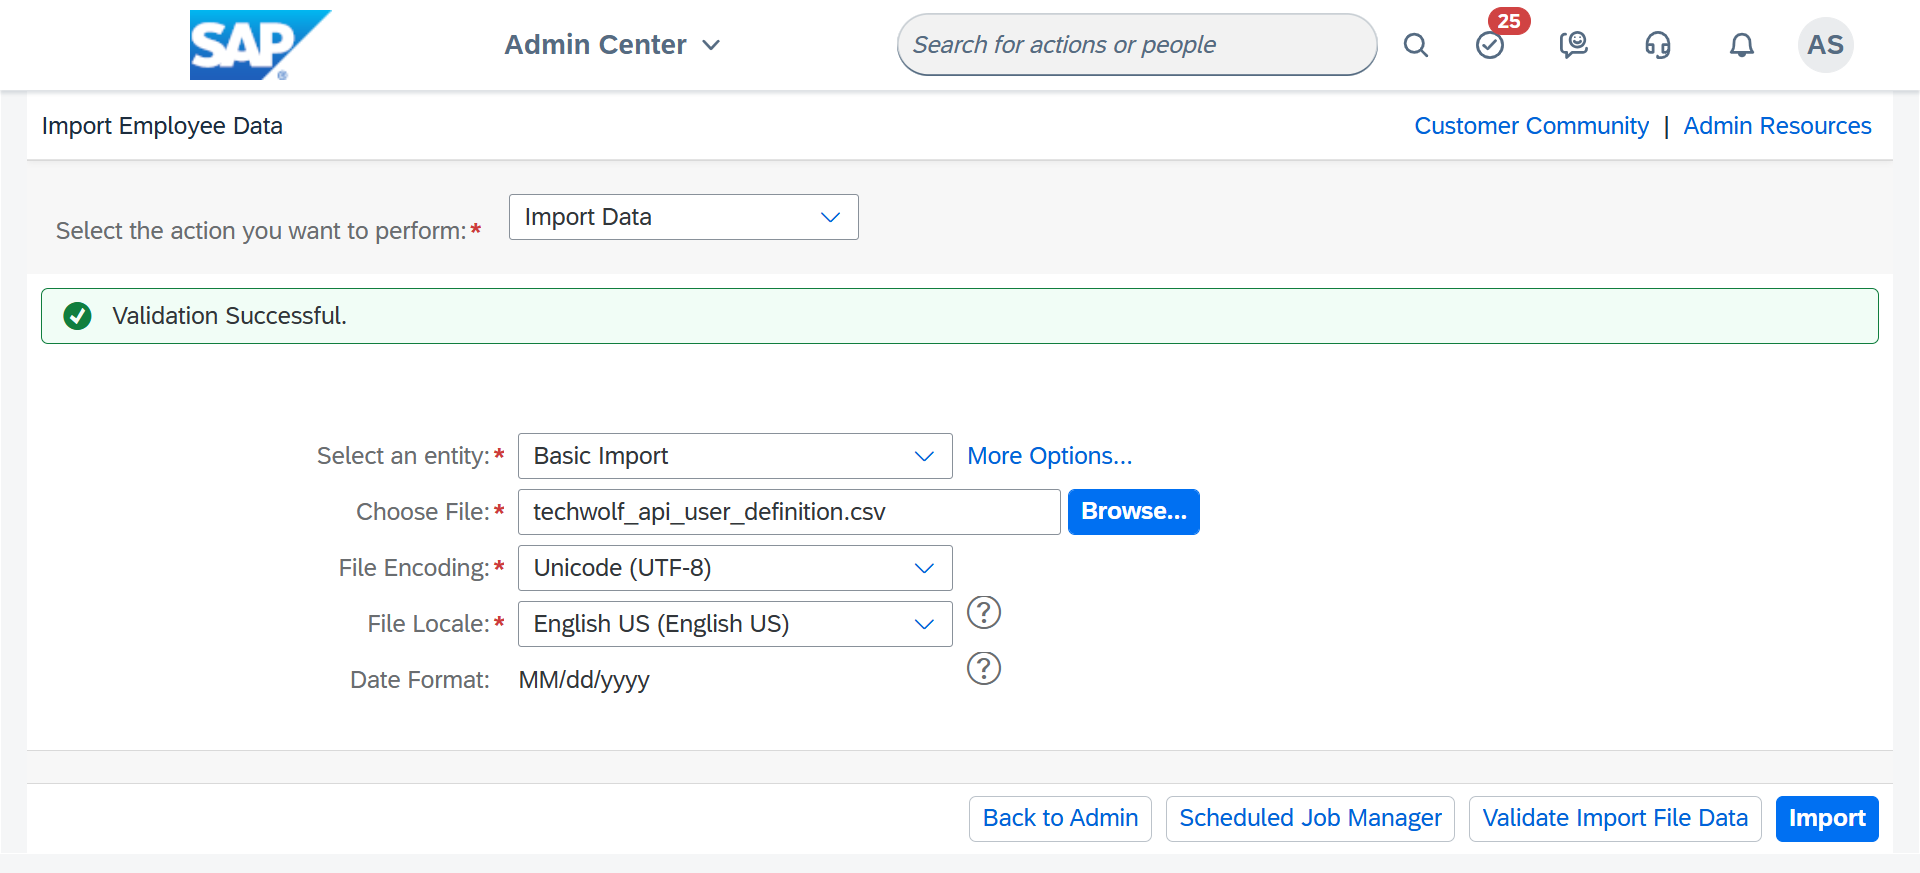 * Leave the other fields unchanged and click `Validate Import File Data`. If the
validation is successful, click `Import`.
If you already created a TechWolf User for another TechWolf - SAP
SuccessFactors integration, this step can be skipped.
### 3. Configure the permissions for the TechWolf user
The `TechWolf_TIH_GP` user needs a Permission Group and a Permission Role to run
the Skill Sync.
If another TechWolf - SAP SuccessFactors integration using the
`TechWolf_TIH_GP` user has already been configured in this tenant, the
Permission Group and Permission Role already exist. Skip the group creation
and role assignment steps below and only **add the missing permissions**
from the table to the existing Permission Role.
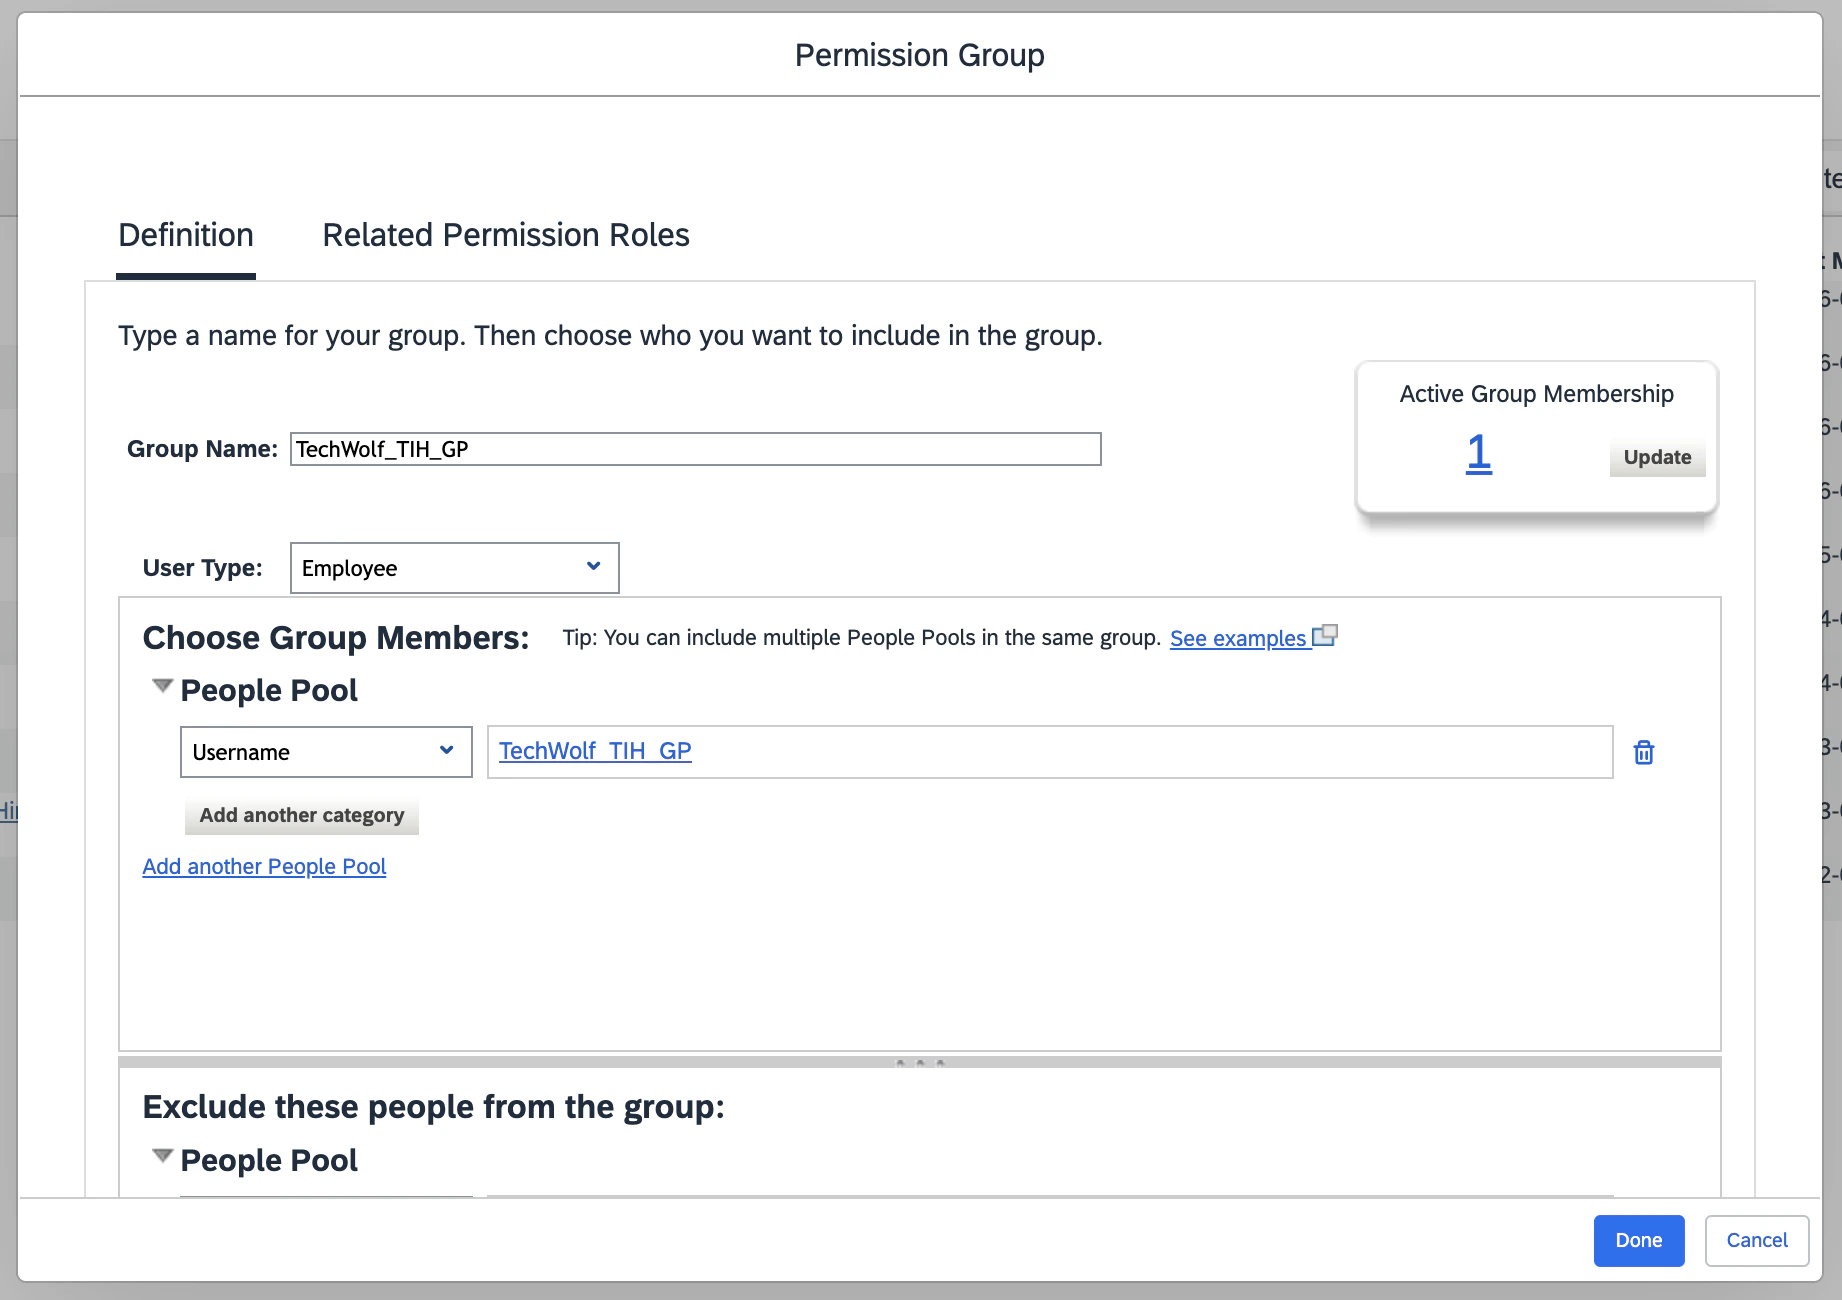
* **Create a Permission Group**
* In the search bar at the top, enter `Manage Permission Groups` and open
it.
* Click `Create New`.
* Name the group `TechWolf_TIH_GP`.
* Pick the `Username` filter and set it equal to `TechWolf_TIH_GP`.
* Click `Done`.
* Leave the other fields unchanged and click `Validate Import File Data`. If the
validation is successful, click `Import`.
If you already created a TechWolf User for another TechWolf - SAP
SuccessFactors integration, this step can be skipped.
### 3. Configure the permissions for the TechWolf user
The `TechWolf_TIH_GP` user needs a Permission Group and a Permission Role to run
the Skill Sync.
If another TechWolf - SAP SuccessFactors integration using the
`TechWolf_TIH_GP` user has already been configured in this tenant, the
Permission Group and Permission Role already exist. Skip the group creation
and role assignment steps below and only **add the missing permissions**
from the table to the existing Permission Role.
* **Create a Permission Group**
* In the search bar at the top, enter `Manage Permission Groups` and open
it.
* Click `Create New`.
* Name the group `TechWolf_TIH_GP`.
* Pick the `Username` filter and set it equal to `TechWolf_TIH_GP`.
* Click `Done`.
 * **Create a Permission Role**
* In the search bar at the top, enter `Manage Permission Roles` and open it.
* Create a new Role with user type `Employee`.
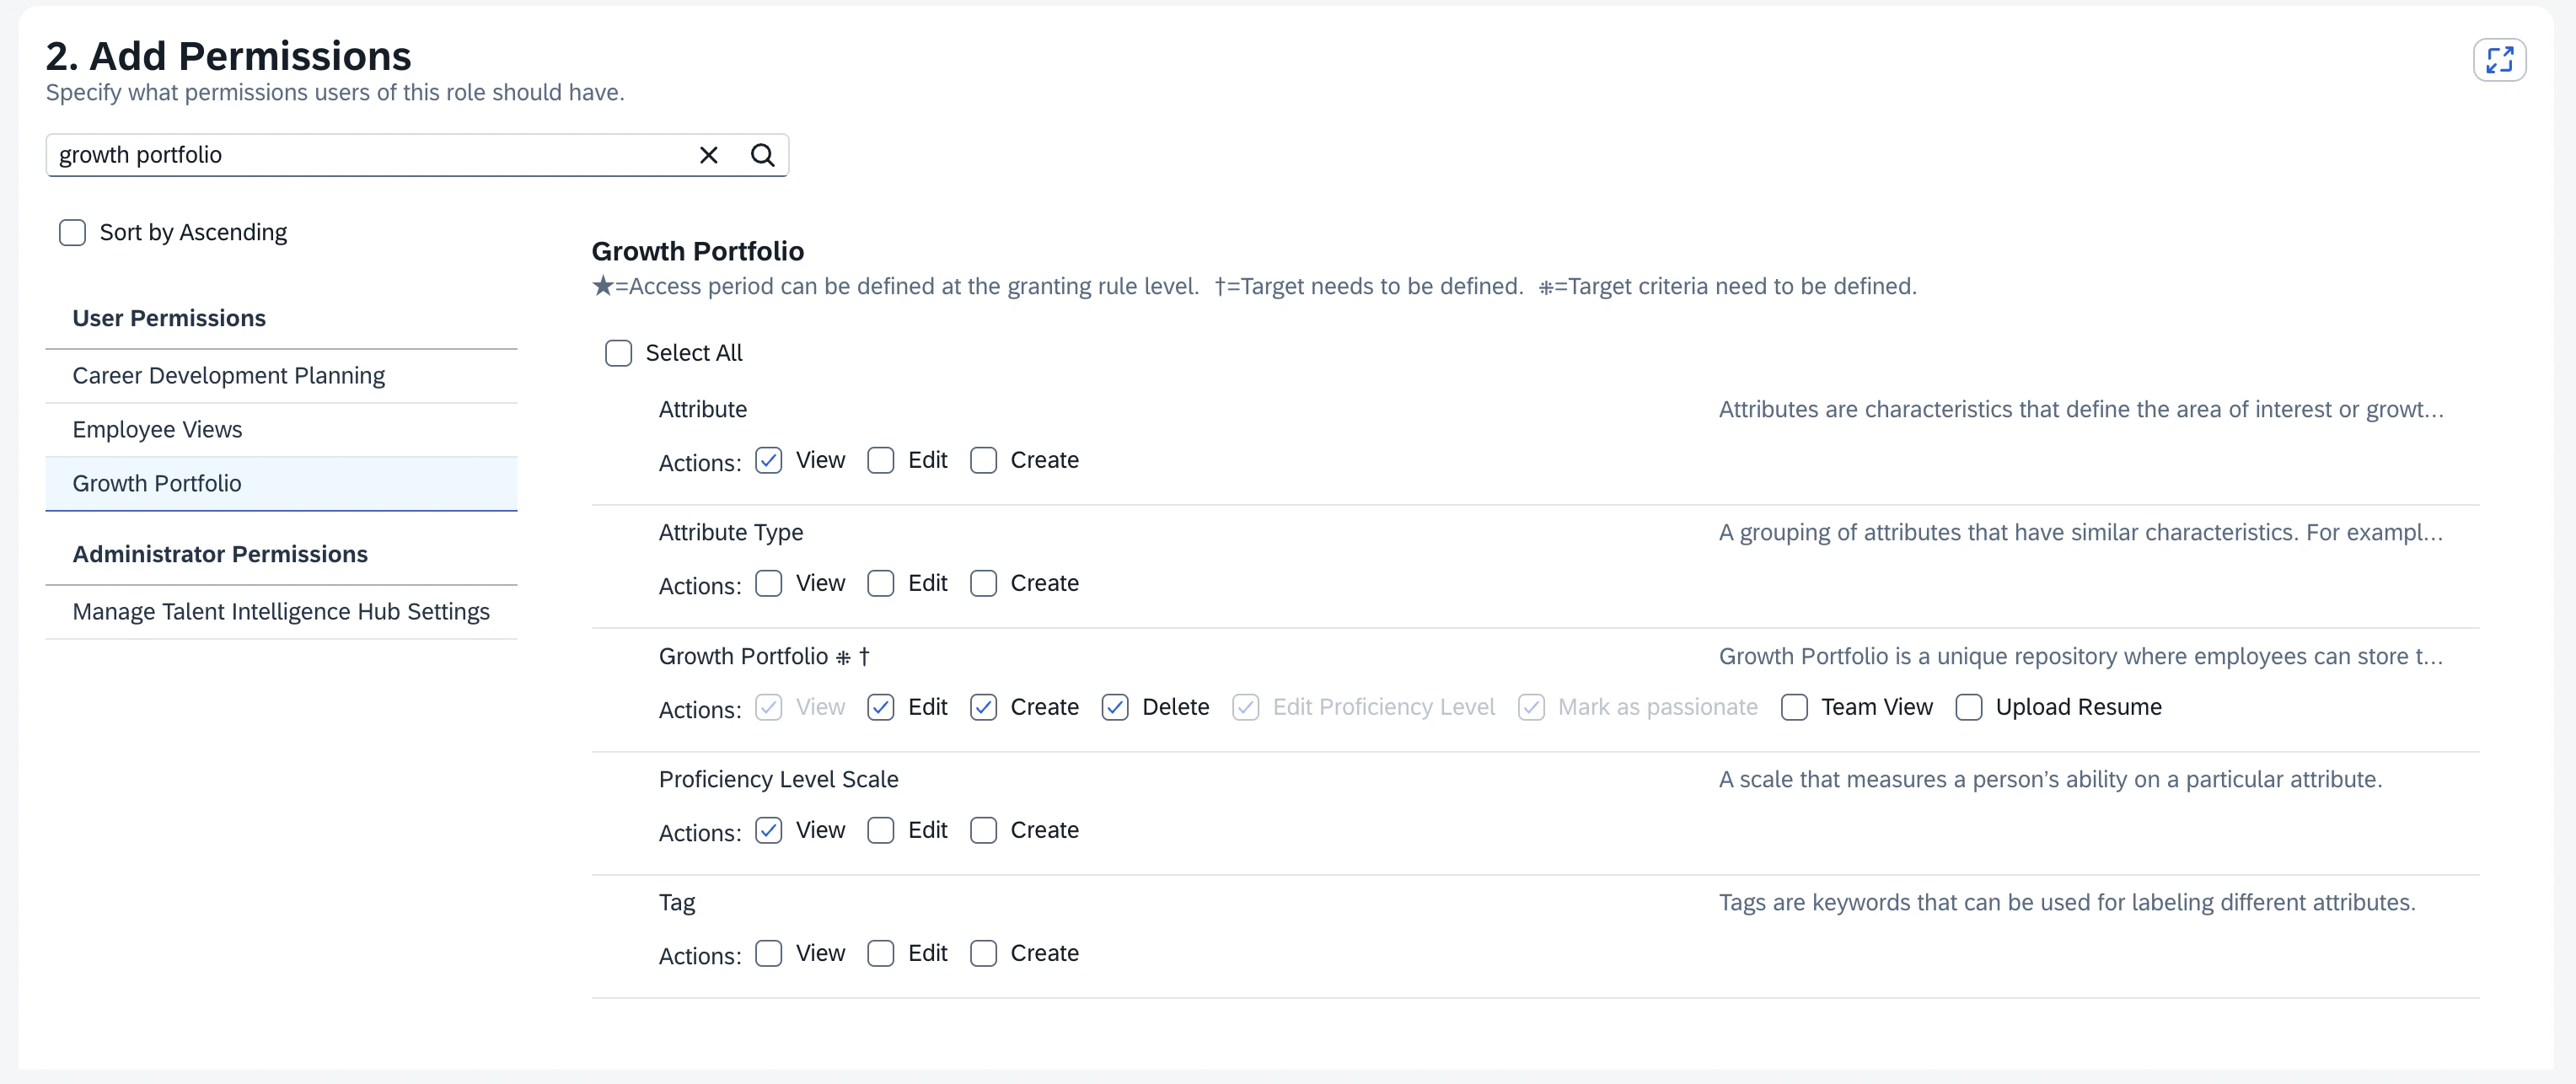
* Under `User Permissions` → `Growth Portfolio`, grant the following:
| Permission | Access |
| ----------------------- | ---------------------------------------------------------------------- |
| Attribute | View |
| Growth Portfolio | View, Edit, Create, Delete, Edit Proficiency Level, Mark as passionate |
| Proficiency Level Scale | View |
* **Create a Permission Role**
* In the search bar at the top, enter `Manage Permission Roles` and open it.
* Create a new Role with user type `Employee`.
* Under `User Permissions` → `Growth Portfolio`, grant the following:
| Permission | Access |
| ----------------------- | ---------------------------------------------------------------------- |
| Attribute | View |
| Growth Portfolio | View, Edit, Create, Delete, Edit Proficiency Level, Mark as passionate |
| Proficiency Level Scale | View |
 * Under `Administrator Permissions` →
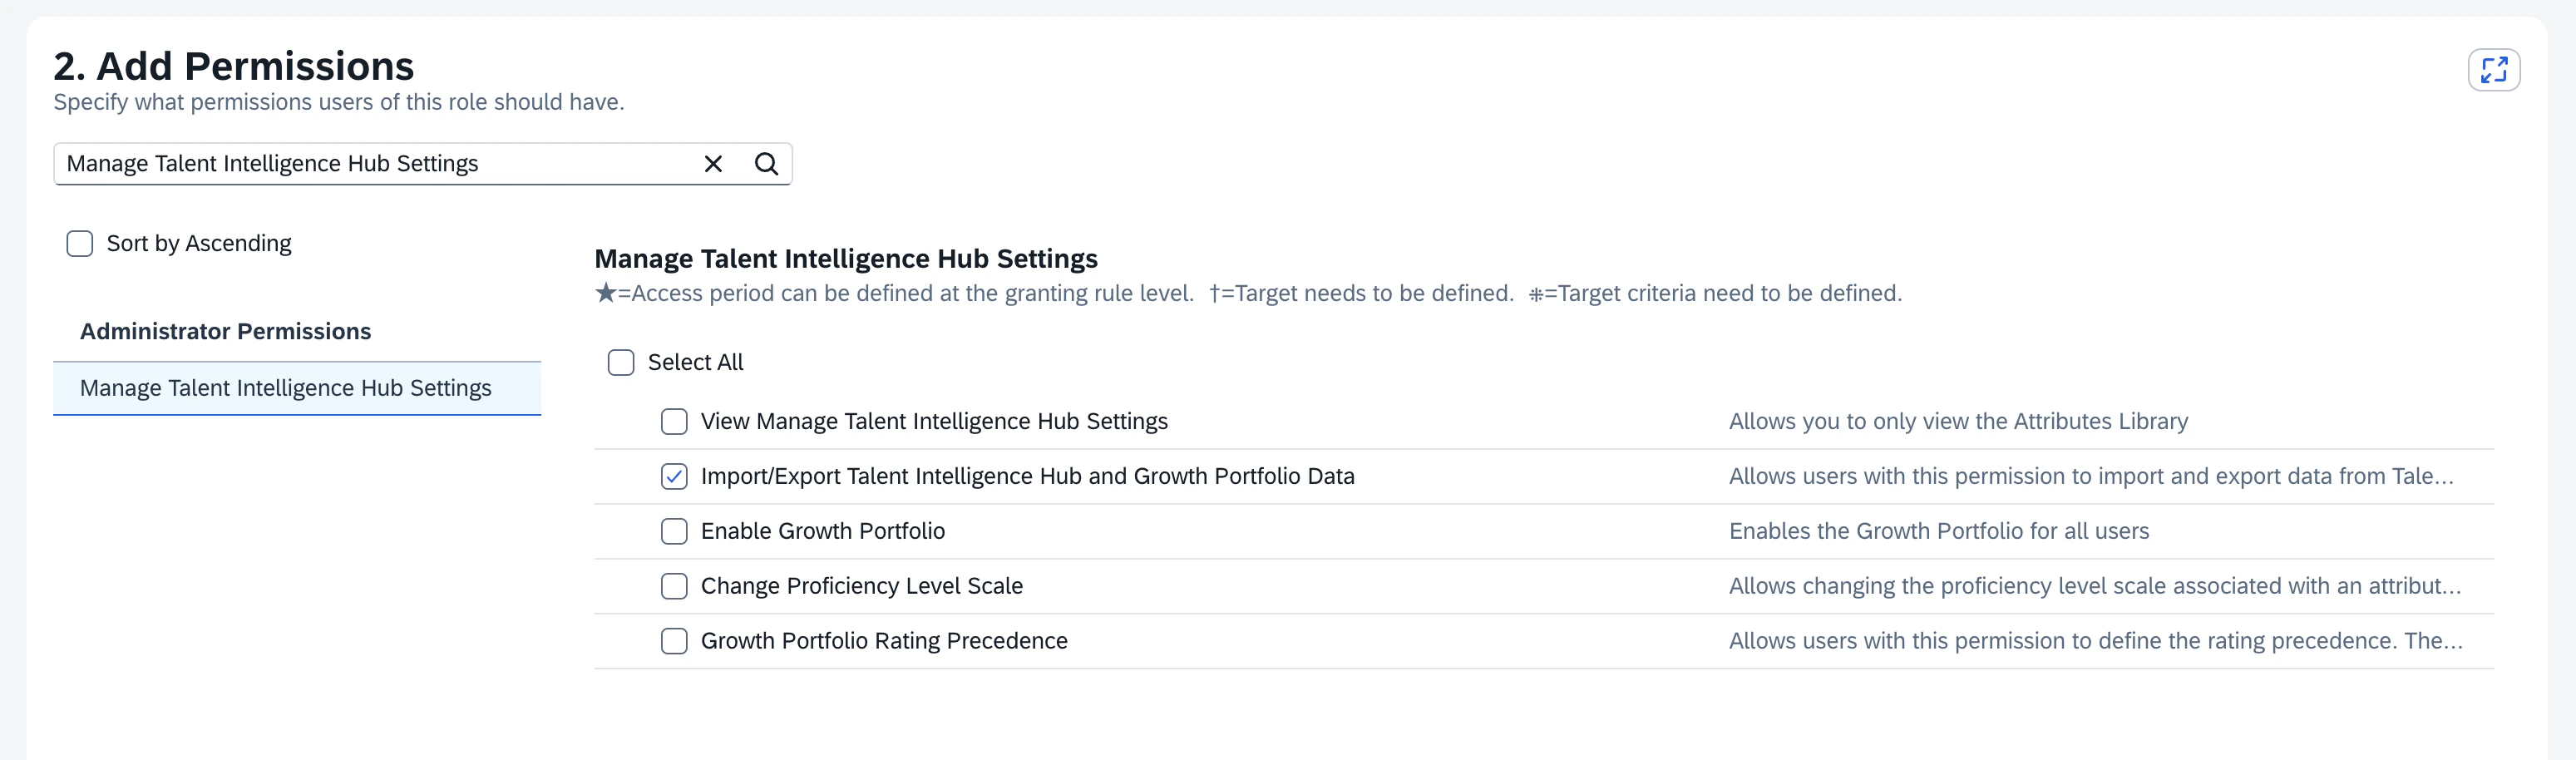
`Manage Talent Intelligence Hub Settings`, grant the following:
| Permission |
| --------------------------------------------------------------- |
| Import/Export Talent Intelligence Hub and Growth Portfolio Data |
* Under `Administrator Permissions` →
`Manage Talent Intelligence Hub Settings`, grant the following:
| Permission |
| --------------------------------------------------------------- |
| Import/Export Talent Intelligence Hub and Growth Portfolio Data |
 * Save the Permission Role.
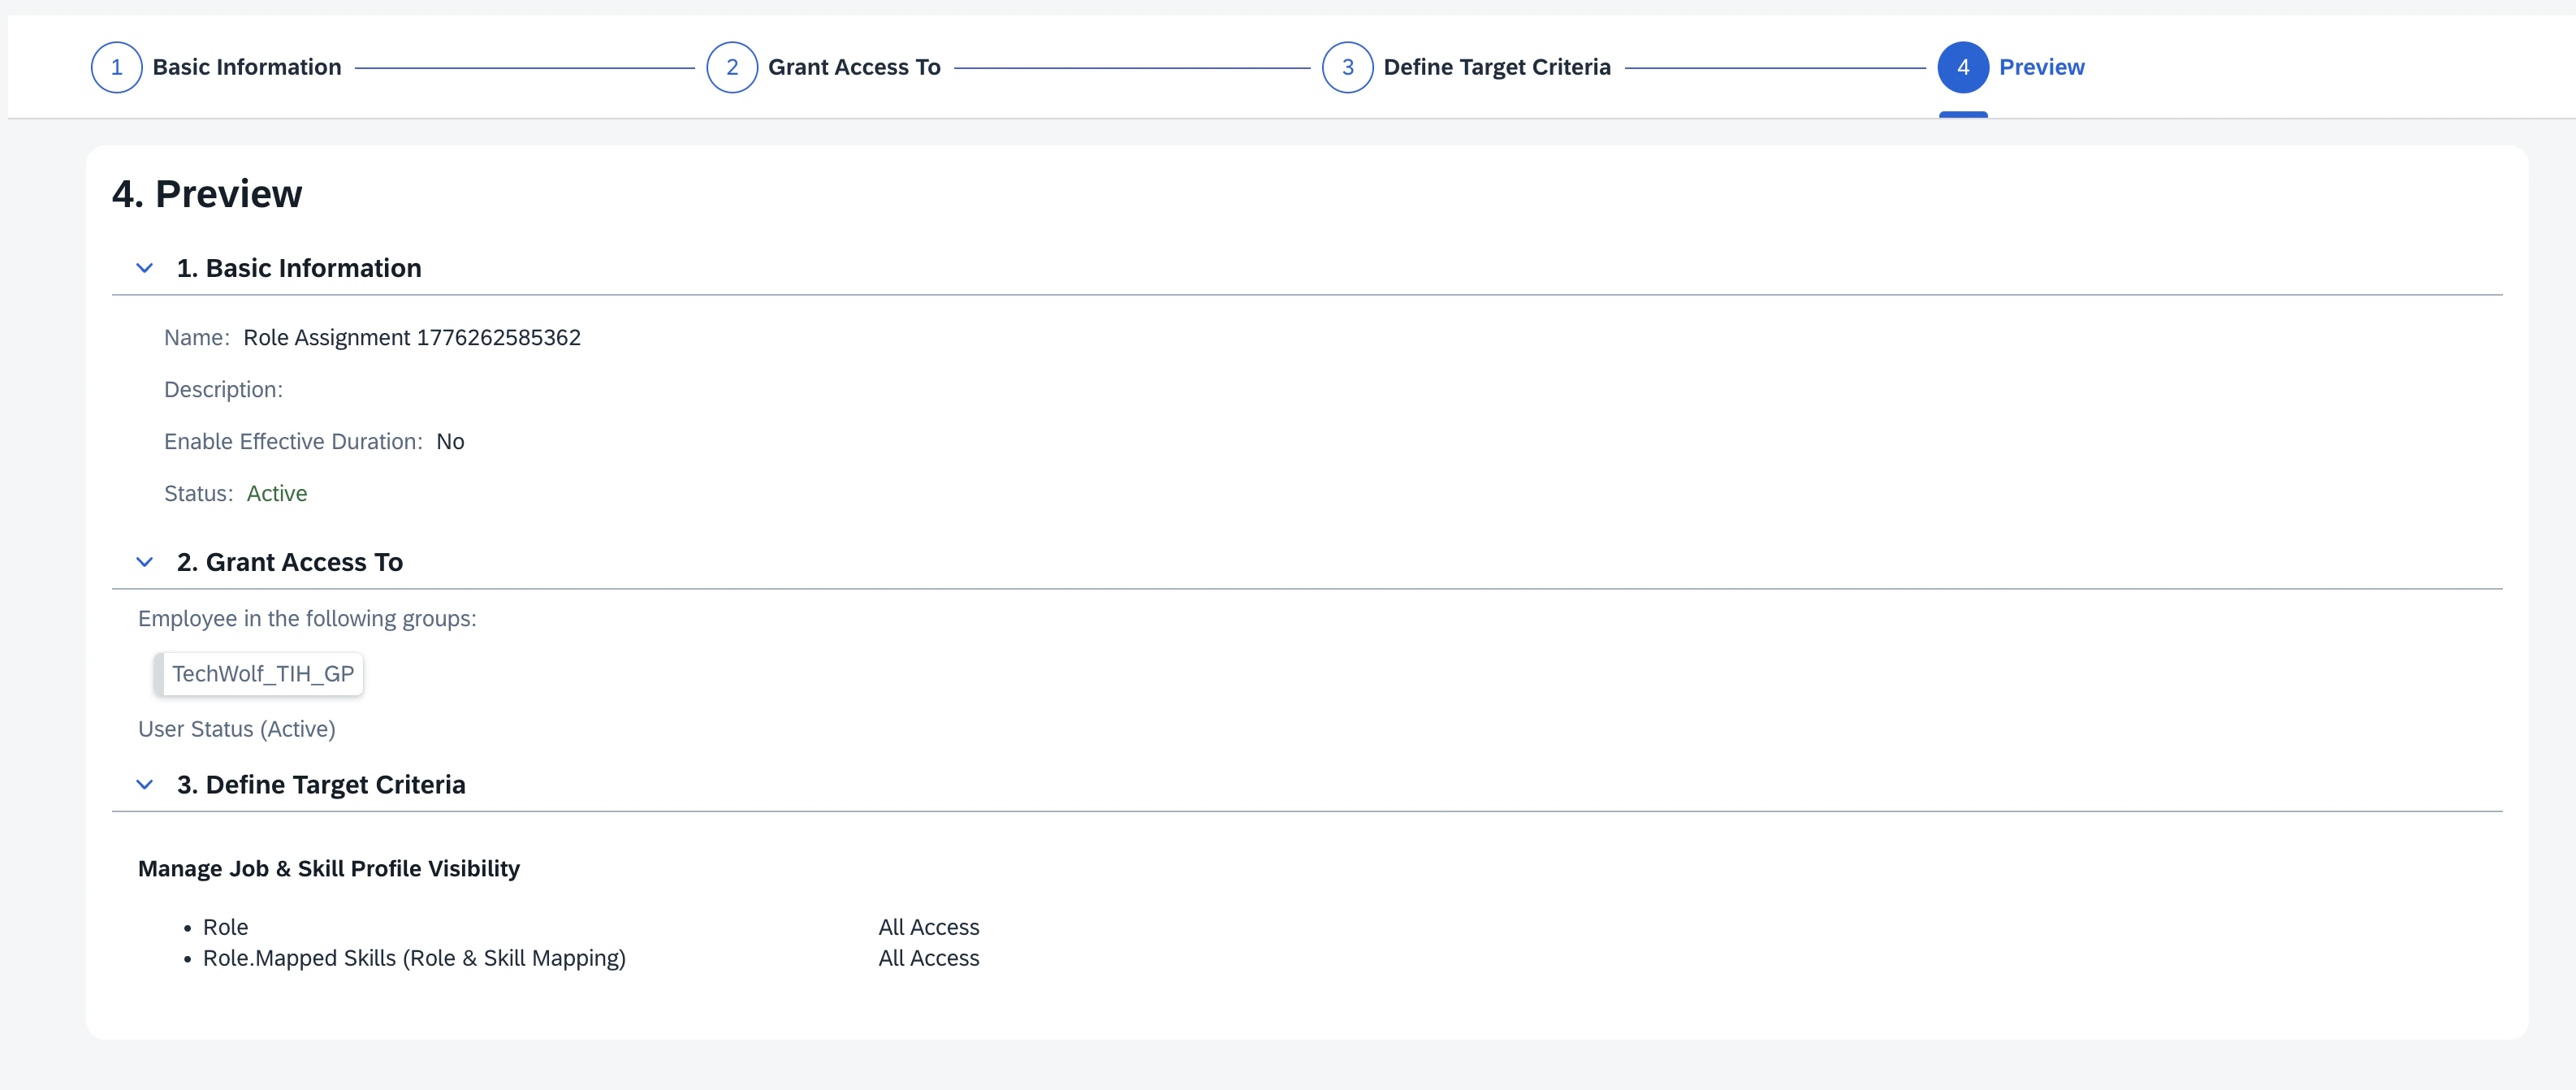
* **Assign the Permission Role to the Permission Group**
* On the saved Permission Role, click `Add Role Assignments`.
* Click `Next`.
* On the `Grant Access To` page, select `From Groups`.
* Click `Select Groups` and pick the `TechWolf_TIH_GP` group created above.
* Click `Next`, then `Next` again, and save the Role Assignment.
* Save the Permission Role.
* **Assign the Permission Role to the Permission Group**
* On the saved Permission Role, click `Add Role Assignments`.
* Click `Next`.
* On the `Grant Access To` page, select `From Groups`.
* Click `Select Groups` and pick the `TechWolf_TIH_GP` group created above.
* Click `Next`, then `Next` again, and save the Role Assignment.
 On recent SAP SuccessFactors releases, the Talent Intelligence Hub adds data
source governance for external skill providers. If your tenant exposes the
**Manage Data Sources** task or a **Manage Skills Governance** section under
**Manage Talent Intelligence Hub**, complete
[How To: Register TechWolf as a Trusted Data Source ](/integrations/sap-btp-skill-sync/how-to-register-data-source)
so Growth Portfolio updates from TechWolf flow through without additional
manual review.
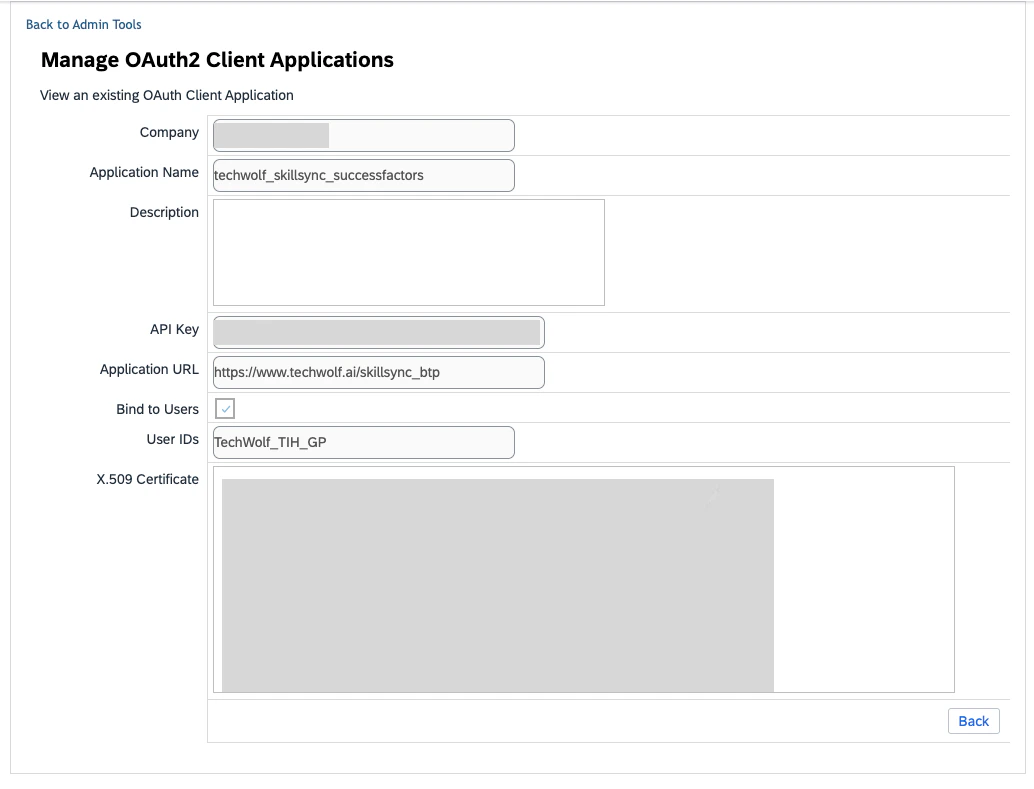
### 4. Set up an OAuth 2 Client Application in SuccessFactors
* In SuccessFactors, in the search bar at the top right, enter
`Manage OAuth 2 Client Applications` and press enter.
* Click **Register Client Application**.
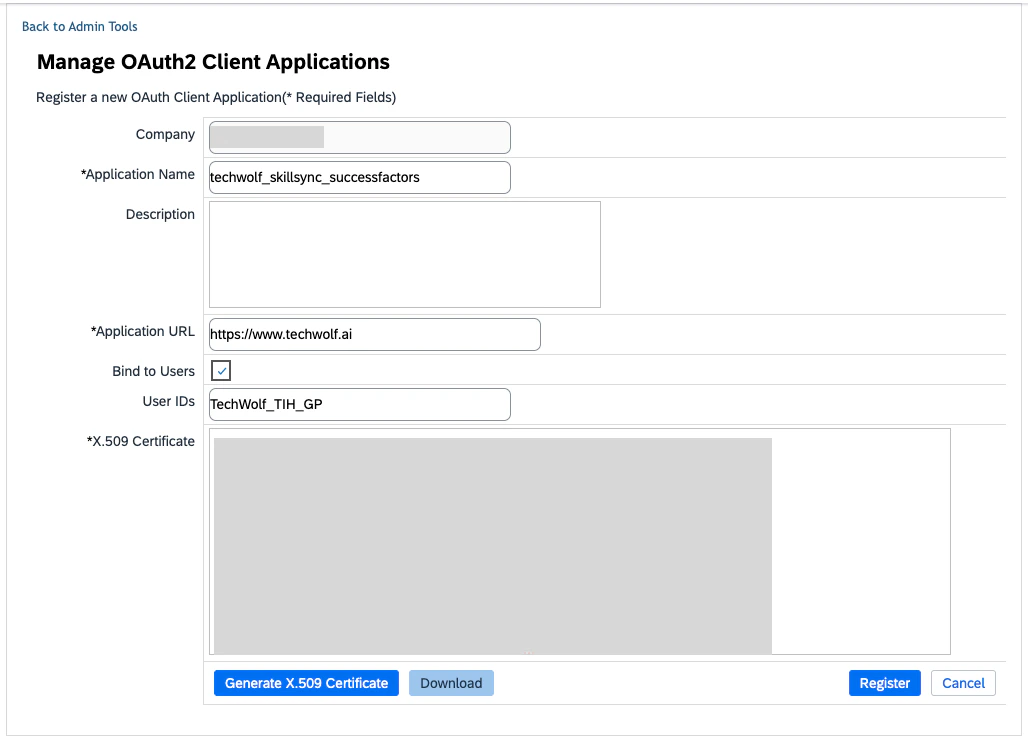
* Fill in the following fields:
* **Application Name**: any value (e.g.
`techwolf_skillsync_successfactors`).
* **Application URL**: any valid URL (e.g. `https://www.techwolf.ai`).
* **Bind to Users**: check the checkbox.
* **User IDs**: `TechWolf_TIH_GP`.
* **X.509 Certificate**: paste the contents of the certificate downloaded in
Step 1. Remove the `-----BEGIN CERTIFICATE-----` and
`-----END CERTIFICATE-----` guards if present, and strip any line breaks
so the value is a single continuous string.
On recent SAP SuccessFactors releases, the Talent Intelligence Hub adds data
source governance for external skill providers. If your tenant exposes the
**Manage Data Sources** task or a **Manage Skills Governance** section under
**Manage Talent Intelligence Hub**, complete
[How To: Register TechWolf as a Trusted Data Source ](/integrations/sap-btp-skill-sync/how-to-register-data-source)
so Growth Portfolio updates from TechWolf flow through without additional
manual review.
### 4. Set up an OAuth 2 Client Application in SuccessFactors
* In SuccessFactors, in the search bar at the top right, enter
`Manage OAuth 2 Client Applications` and press enter.
* Click **Register Client Application**.
* Fill in the following fields:
* **Application Name**: any value (e.g.
`techwolf_skillsync_successfactors`).
* **Application URL**: any valid URL (e.g. `https://www.techwolf.ai`).
* **Bind to Users**: check the checkbox.
* **User IDs**: `TechWolf_TIH_GP`.
* **X.509 Certificate**: paste the contents of the certificate downloaded in
Step 1. Remove the `-----BEGIN CERTIFICATE-----` and
`-----END CERTIFICATE-----` guards if present, and strip any line breaks
so the value is a single continuous string.
 * Click **Register**. The Client Application appears in the overview.
 * Click **View** on the new Client Application and copy the **API Key**. You
will need it in Step 5.
* Click **View** on the new Client Application and copy the **API Key**. You
will need it in Step 5.
 ### 5. Configure the API credentials in SAP Integration Suite
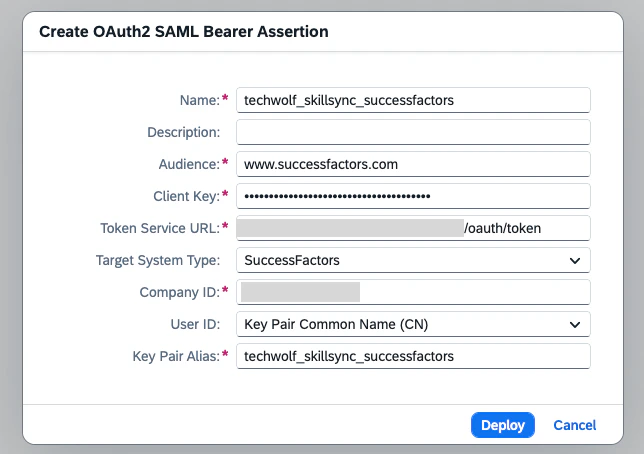
* In SAP Integration Suite, go to **Monitor > Integrations and APIs > Manage
Security > Security Material** and click **Create > OAuth 2 SAML Bearer
Assertion**.
* Set **Name** to a value you will remember for Step 10 (e.g.
`techwolf_skillsync_successfactors`).
* Set **Audience** to `www.successfactors.com`.
* Set **Client Key** to the API Key copied in Step 3.
* Set **Token Service URL** to the base URL of your SuccessFactors tenant,
appended with `oauth/token`. See
[How To: Find the SAP SuccessFactors Company ID and API URL ](/integrations/sap-btp-skill-sync/how-to-find-company-id-and-api-url)
for how to look up the base URL.
* Set **User ID** to **Key pair Common Name (CN)**.
* Set **Key Pair Alias** to the alias of the key pair created in Step 1 (e.g.
`techwolf_skillsync_successfactors`).
### 5. Configure the API credentials in SAP Integration Suite
* In SAP Integration Suite, go to **Monitor > Integrations and APIs > Manage
Security > Security Material** and click **Create > OAuth 2 SAML Bearer
Assertion**.
* Set **Name** to a value you will remember for Step 10 (e.g.
`techwolf_skillsync_successfactors`).
* Set **Audience** to `www.successfactors.com`.
* Set **Client Key** to the API Key copied in Step 3.
* Set **Token Service URL** to the base URL of your SuccessFactors tenant,
appended with `oauth/token`. See
[How To: Find the SAP SuccessFactors Company ID and API URL ](/integrations/sap-btp-skill-sync/how-to-find-company-id-and-api-url)
for how to look up the base URL.
* Set **User ID** to **Key pair Common Name (CN)**.
* Set **Key Pair Alias** to the alias of the key pair created in Step 1 (e.g.
`techwolf_skillsync_successfactors`).
 * Click **Deploy**.
### 6. Create a User Role for the integration
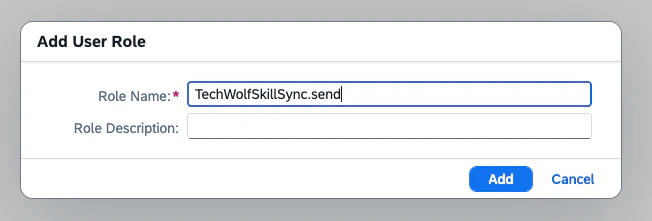
In SAP Integration Suite, go to **Monitor > Integrations and APIs > Manage
Security > User Roles**, then click **Add**. Enter a **Name** that you will
remember for Step 7 and Step 10 (e.g. `TechWolfSkillSync.send`) and click
**Add**.
* Click **Deploy**.
### 6. Create a User Role for the integration
In SAP Integration Suite, go to **Monitor > Integrations and APIs > Manage
Security > User Roles**, then click **Add**. Enter a **Name** that you will
remember for Step 7 and Step 10 (e.g. `TechWolfSkillSync.send`) and click
**Add**.
 ### 7. Create a Process Integration Runtime instance
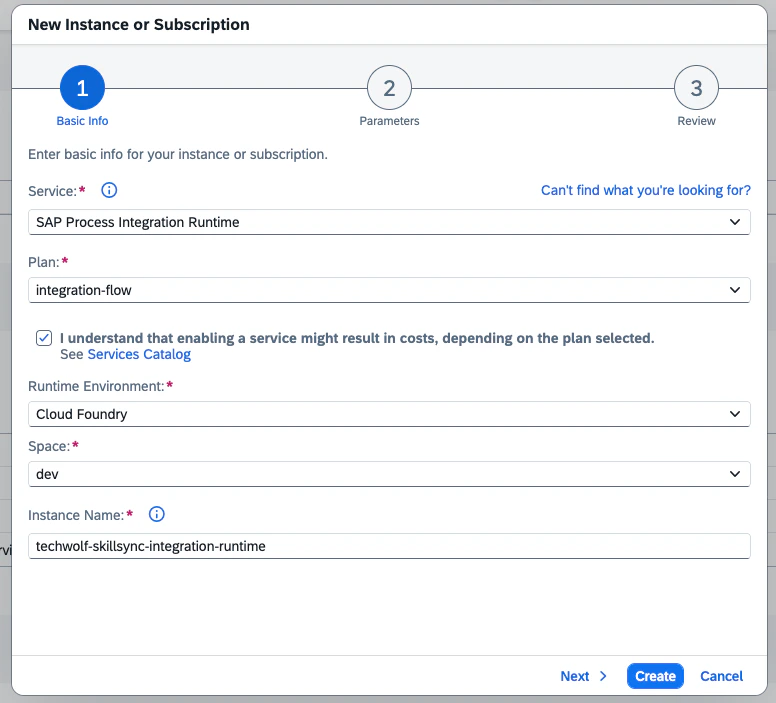
In SAP BTP, create a new instance of the **Process Integration Runtime** service
with the `integration-flow` plan.
* Check *"I understand that enabling a service might result in costs, depending
on the plan selected."*
* **Runtime Environment**: Cloud Foundry.
* **Space**: the Cloud Foundry space you're deploying in.
* **Instance Name**: a CLI-friendly name (e.g.
`techwolf-skillsync-integration-runtime`).
### 7. Create a Process Integration Runtime instance
In SAP BTP, create a new instance of the **Process Integration Runtime** service
with the `integration-flow` plan.
* Check *"I understand that enabling a service might result in costs, depending
on the plan selected."*
* **Runtime Environment**: Cloud Foundry.
* **Space**: the Cloud Foundry space you're deploying in.
* **Instance Name**: a CLI-friendly name (e.g.
`techwolf-skillsync-integration-runtime`).
 * Click **Next** to continue to the Parameters step.
* In **Parameters**, set the role to the one created in Step 6 (e.g.
`TechWolfSkillSync.send`).
* **Grant-types**: `Client Credentials`.
* Leave all other fields on their default values.
* Click **Next** to continue to the Parameters step.
* In **Parameters**, set the role to the one created in Step 6 (e.g.
`TechWolfSkillSync.send`).
* **Grant-types**: `Client Credentials`.
* Leave all other fields on their default values.
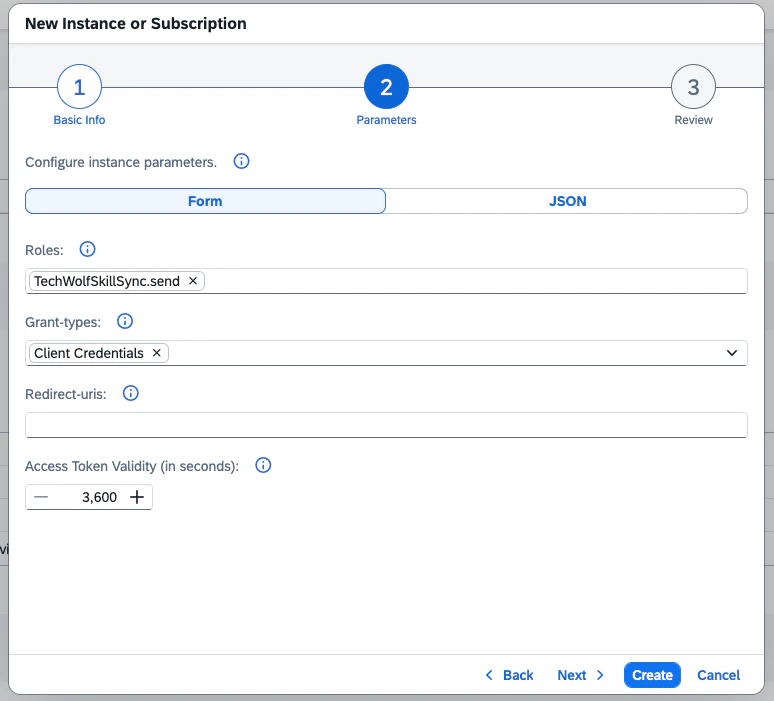 Click **Create**.
### 8. Create a Service Key on the instance
Find the newly created Process Integration Runtime instance. Click the three
dots on the right, then click **Create Service Key**.
* **Service Key Name**: any value (e.g. `TechWolfSkillSync`).
* **Key Type**: `ClientId/Secret`.
* Leave all other fields on their default values.
Click **Create**. On the instance, go to **Service Keys** and wait for the key
to be created.
Click **Create**.
### 8. Create a Service Key on the instance
Find the newly created Process Integration Runtime instance. Click the three
dots on the right, then click **Create Service Key**.
* **Service Key Name**: any value (e.g. `TechWolfSkillSync`).
* **Key Type**: `ClientId/Secret`.
* Leave all other fields on their default values.
Click **Create**. On the instance, go to **Service Keys** and wait for the key
to be created.
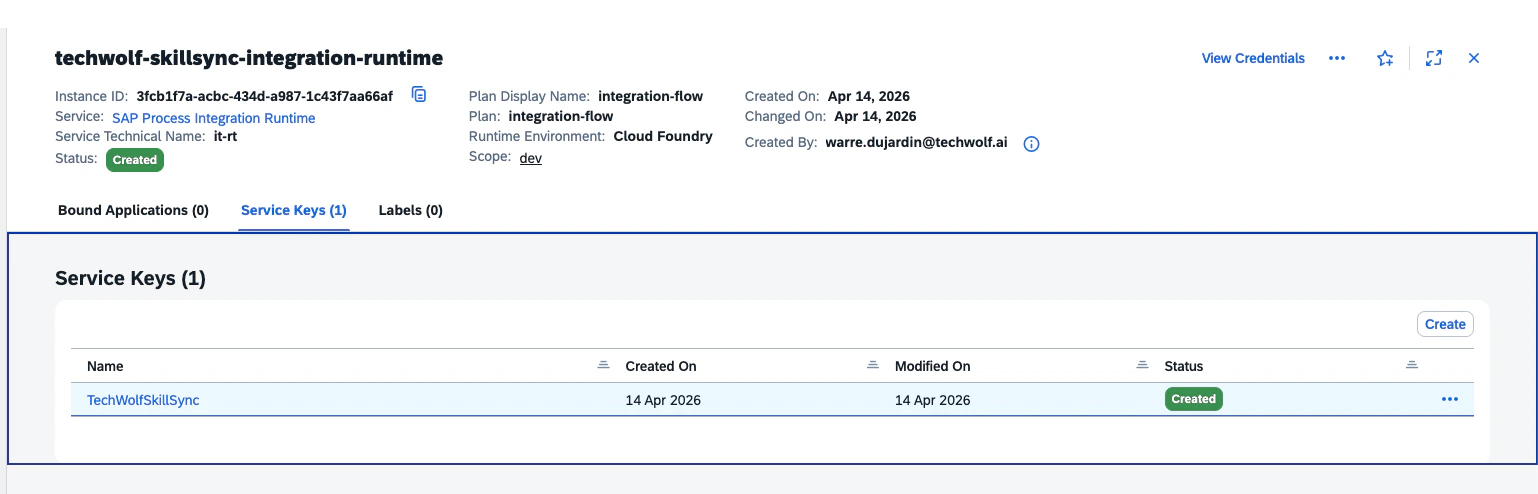 Click the service key, then click **Download**.
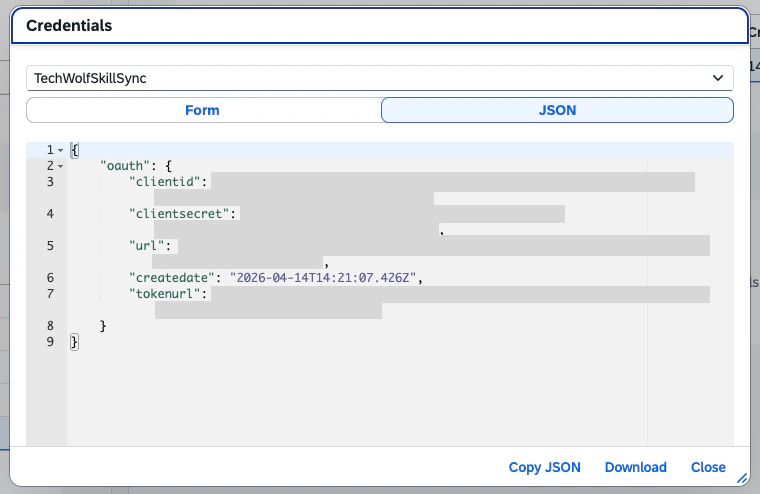 The service key file contains credentials that grant access to invoke your
iFlows. Store it securely and share it with your TechWolf representative via
1Password (or another agreed secure channel). **Never share it over email or
chat.**
### 9. Import the Content Package
In SAP Integration Suite, go to **Design > Integrations and APIs** and click
**Import**.
The service key file contains credentials that grant access to invoke your
iFlows. Store it securely and share it with your TechWolf representative via
1Password (or another agreed secure channel). **Never share it over email or
chat.**
### 9. Import the Content Package
In SAP Integration Suite, go to **Design > Integrations and APIs** and click
**Import**.
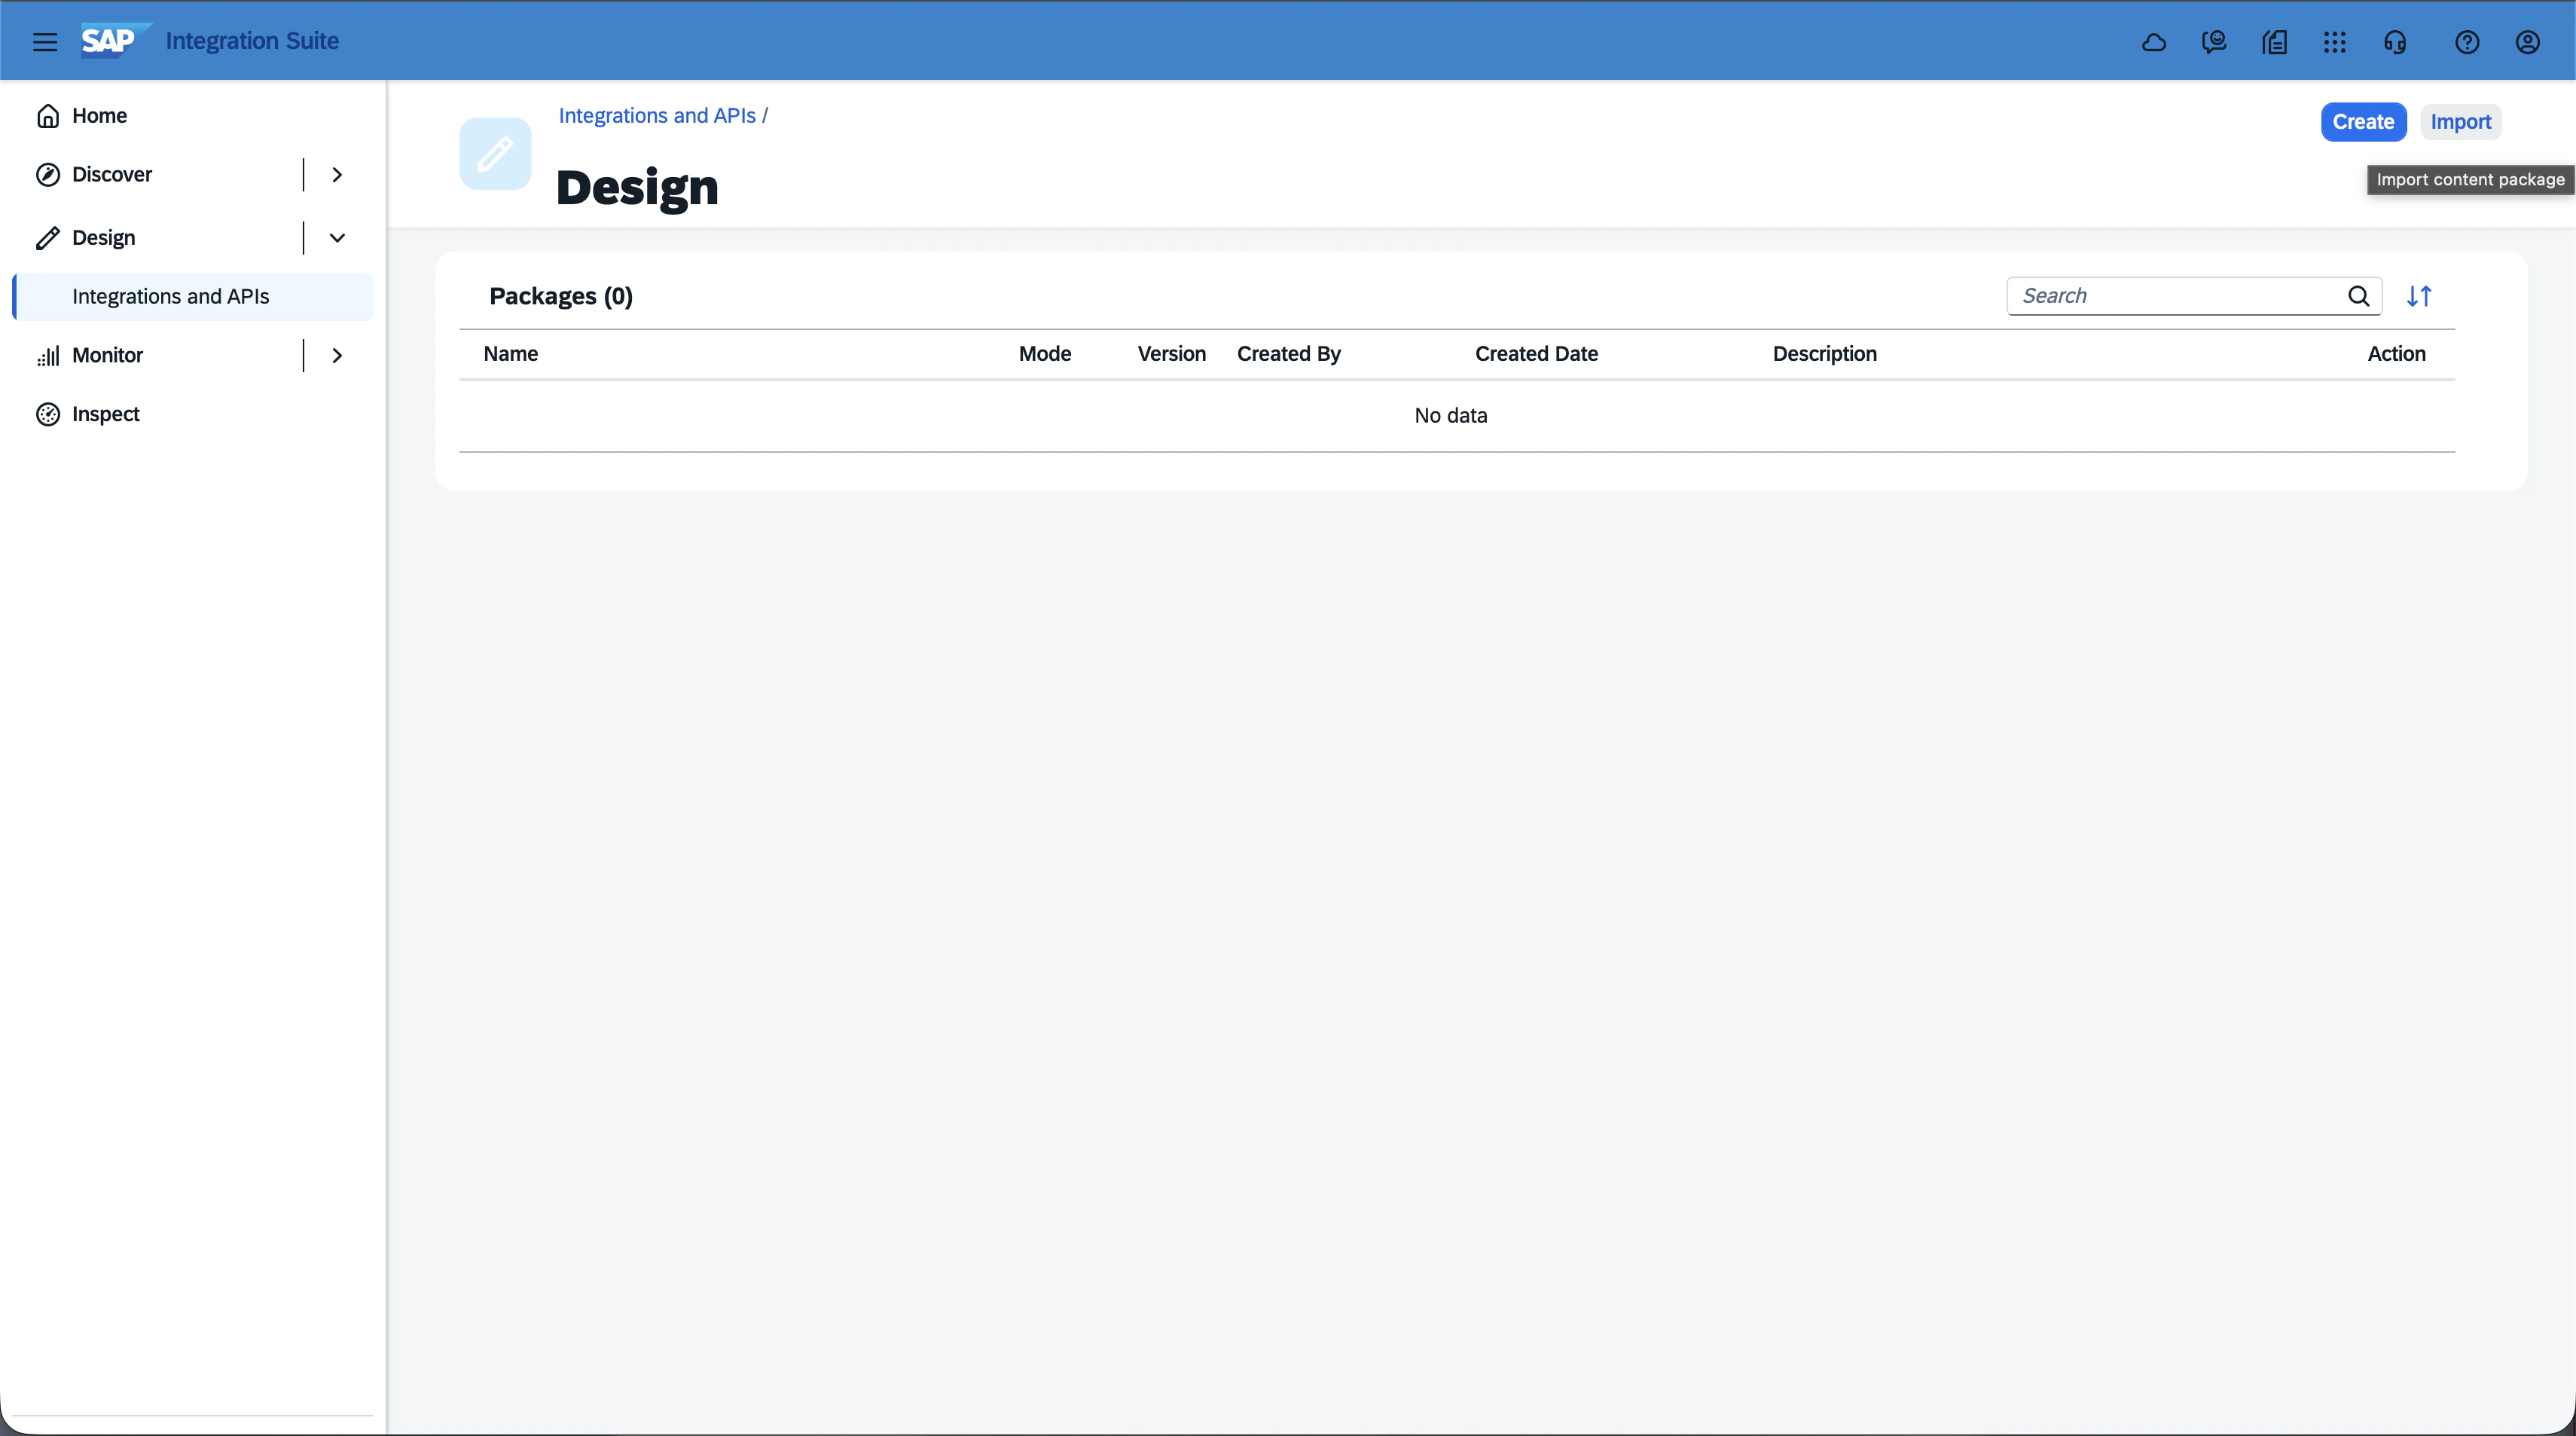 In the file picker, select the Content Package zip file provided by your
TechWolf representative.
### 10. Configure the externalized parameters on the iFlow
Open the imported package and go to **Artifacts**.
In the file picker, select the Content Package zip file provided by your
TechWolf representative.
### 10. Configure the externalized parameters on the iFlow
Open the imported package and go to **Artifacts**.
 For the **Update Employee Growth Portfolio** iFlow, click the three dots on the
right and select **Configure**, then fill in the fields as described below.
**Finding the SuccessFactors datacenter URL**: in the **Address** field,
click **Select** to see the list of valid SAP SuccessFactors data centers
and pick the one matching your tenant (e.g.
`https://apisalesdemo2.successfactors.eu`). See
[How To: Find the SAP SuccessFactors Company ID and API URL ](/integrations/sap-btp-skill-sync/how-to-find-company-id-and-api-url)
for how to look up this URL.
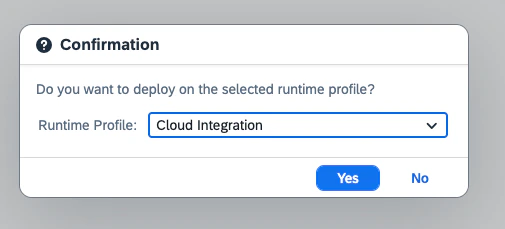
After configuring the iFlow, click **Deploy**, then **Yes**.
For the **Update Employee Growth Portfolio** iFlow, click the three dots on the
right and select **Configure**, then fill in the fields as described below.
**Finding the SuccessFactors datacenter URL**: in the **Address** field,
click **Select** to see the list of valid SAP SuccessFactors data centers
and pick the one matching your tenant (e.g.
`https://apisalesdemo2.successfactors.eu`). See
[How To: Find the SAP SuccessFactors Company ID and API URL ](/integrations/sap-btp-skill-sync/how-to-find-company-id-and-api-url)
for how to look up this URL.
After configuring the iFlow, click **Deploy**, then **Yes**.
 #### Update Employee Growth Portfolio in SAP SuccessFactors
For this iFlow, the **Address** lives in **Tab More** rather than **Tab
Receiver**. This is by design; do not confuse it with the layout of the
iFlows for the Job Skill Sync integration.
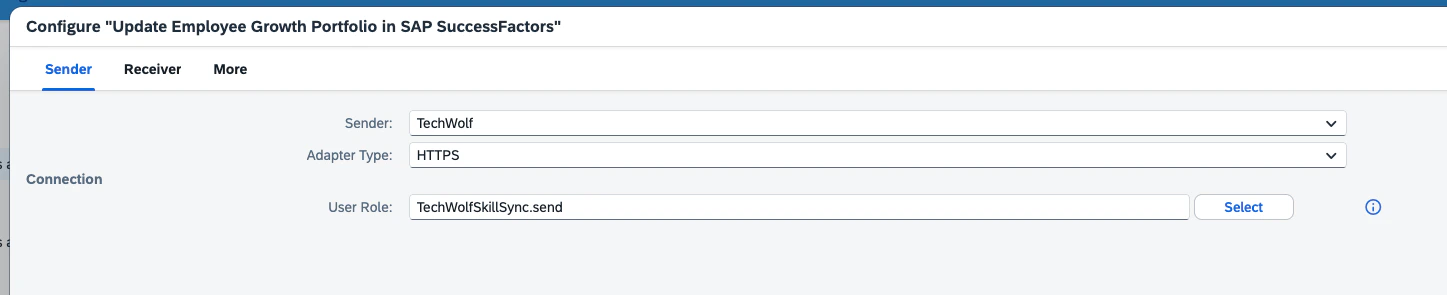
* **Tab Sender**: set **User Role** to the role created in Step 6 (e.g.
`TechWolfSkillSync.send`).
#### Update Employee Growth Portfolio in SAP SuccessFactors
For this iFlow, the **Address** lives in **Tab More** rather than **Tab
Receiver**. This is by design; do not confuse it with the layout of the
iFlows for the Job Skill Sync integration.
* **Tab Sender**: set **User Role** to the role created in Step 6 (e.g.
`TechWolfSkillSync.send`).
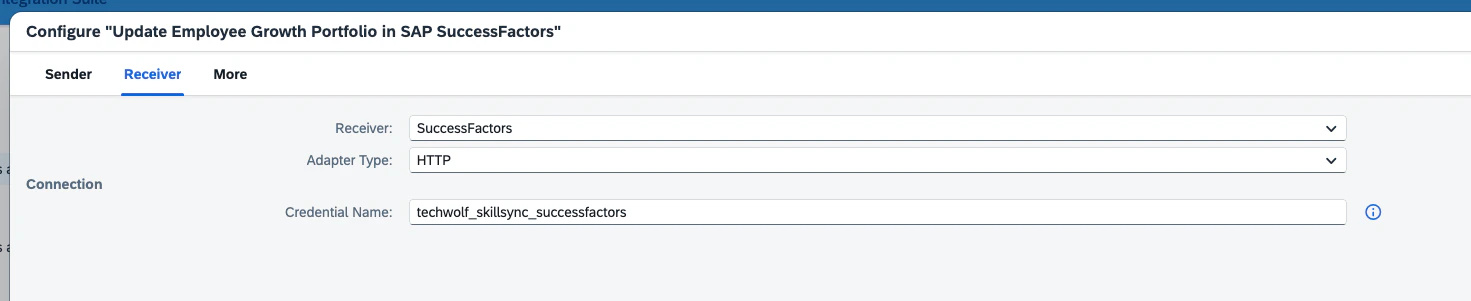
 * **Tab Receiver**: set **Credential Name** to the OAuth 2 SAML Bearer Assertion
created in Step 5.
* **Tab Receiver**: set **Credential Name** to the OAuth 2 SAML Bearer Assertion
created in Step 5.
 * **Tab More**: set **Address** to the URL of your SuccessFactors datacenter,
and **AIR\_key** to the AIR key provided by your TechWolf representative.
* **Tab More**: set **Address** to the URL of your SuccessFactors datacenter,
and **AIR\_key** to the AIR key provided by your TechWolf representative.
 ### 11. Create Employee Growth Portfolio Export Schedule
Follow the steps in
[How To: Load Export Integration Definitions ](/integrations/datasource-integrations/sap-standard-input-integration/how-to-load-export-integration-definitions)
to create a new export integration definition that will create an export of
Employee Growth Portfolios. Use the values from the table below when setting up
the integration definition.
Preferably, the time of day of the `Start Time` of the schedule is set to be
some time (e.g. one hour) after the time of day of the `Start Time` of the
Attribute Import Schedule (Step 1) of the
[Skills Taxonomy Sync ](/integrations/sap-skill-sync-integration/installation-skills-taxonomy).
| **Configuration Item** | **Value** |
| -------------------------- | ---------------------------------------------------------- |
| **Integration Definition** | `techwolf_employee_growth_portfolio_export_definition.icd` |
| **File Name Prefix** | `EmployeeGrowthPortfolioExport` |
| **Date Suffix Format** | `yyMMddHHmmssZ` |
| **File Folder** | `/tih/exports/employee_growth_portfolio` |
**Base ICD**:
[Talent Intelligence Hub Growth Portfolio Export ](https://api.sap.com/package/TalentIntelligenceHubGrowthPortfolioExportTemplate/icd)
The ICDs provided by TechWolf are based on the default integration definitions by SAP, as indicated by the **Base ICD** mentioned.
These have been pre-filled with some necessary values such as the file name prefix for your convenience, to ease the setup process.
TechWolf is committed to keeping these integration definitions up to date with the latest SAP SuccessFactors releases, but cannot guarantee full alignment with the SAP SuccessFactors release schedule.
Should issues arise when using these integration definitions, please contact [support@techwolf.ai](mailto:support@techwolf.ai).
### Verify the deployment
* In SAP Integration Suite, go to **Monitor > Integrations and APIs > Manage
Integration Content** and confirm that all deployed iFlows show the
**Started** status.
* Go to **Monitor > Integrations and APIs > Monitor Message Processing** to
watch messages as TechWolf triggers the iFlows. Failed messages include the
HTTP response from SuccessFactors, which is the fastest way to diagnose
authentication or permission issues (e.g. expired certificate, missing
SuccessFactors permission, incorrect AIR key).
## TechWolf Configuration
The TechWolf tenant will be configured by TechWolf itself. To complete the
setup, share the following values with your TechWolf representative:
* The downloaded **service key file** from Step 8 (via 1Password or another
agreed secure channel).
TechWolf will then link your SAP Integration Suite to your TechWolf tenant,
enable the schedule to consume the SAP SuccessFactors Growth Portfolio export
files from the SFTP server, and start the initial sync.
## Configuration Options
### Sync Direction Settings
The integration supports three sync direction options:
* **Bidirectional** (default): Two-way sync between TechWolf and SAP
SuccessFactors; changes made in TechWolf Employee Skill Profiles are
synchronized to their corresponding SAP SuccessFactors Growth Portfolios, and
vice versa.
* **TechWolf to SAP Only**: Skills flow from TechWolf to SAP SuccessFactors
only; changes made in TechWolf Employee Skill Profiles are copied to their
corresponding SAP SuccessFactors Growth Portfolios, while changes made in SAP
SuccessFactors are discarded and overwritten with the state of the TechWolf
Employee Skill Profiles.
* **SAP to TechWolf Only**: Skills flow from SAP SuccessFactors to TechWolf
only; changes made in SAP SuccessFactors Growth Portfolios are copied to their
corresponding TechWolf Employee Skill Profiles, while changes made in TechWolf
are discarded and overwritten with the state of the SAP SuccessFactors Growth
Portfolios.
### Merge Strategy Options
For the correct functioning of the normal operation of the integration, the
Employee Skill Profiles in both systems should be initially aligned. The
integration will do this initial alignment itself automatically when the
integration is first enabled, or when it is re-enabled after having been paused,
or when it encounters an Employee it had no knowledge about yet.
The initial alignment can happen in different ways; the integration supports
three such merge strategy options:
* **Merge Systems**: Combines Skills from both systems. In case of metadata
conflicts for Skills present in both systems (e.g. conflicting proficiency
levels), the values from TechWolf will be used.
* **Push TechWolf**: Uses the TechWolf Employee Skill Profile as the initial
source of truth, and will align the SAP SuccessFactors Growth Portfolio with
it. Any Skills initially present in the SAP SuccessFactors Growth Portfolio
but not in the TechWolf Employee Skill Profile will be removed from the SAP
SuccessFactors Growth Portfolio.
* **Push SAP**: Uses the SAP SuccessFactors Growth Portfolio as the initial
source of truth, and will align the TechWolf Employee Skill Profile with it.
Any Skills initially present in the TechWolf Employee Skill Profile but not in
the SAP SuccessFactors Growth Portfolio will be removed from the TechWolf
Employee Skill Profile.
## Deployment Tasks & Responsibilities
1. **TechWolf**: Setup Skill Sync environment and tenant requirements.
2. **Customer**: Configure SAP BTP and SAP SuccessFactors as described above.
3. **Customer**: Share the necessary values with TechWolf:
* The service key file from Step 8.
4. **TechWolf**: Validate API access by calling the iFlow end-to-end.
5. **TechWolf**: Enable the schedule to consume the SAP SuccessFactors Growth
Portfolio export files from the SFTP server.
6. **TechWolf**: Run the initial sync of Employee Skill Profiles with the
TechWolf API.
7. **TechWolf**: Setup tenant configuration and start the sync process based on
the configured direction.
8. **Customer**: Check end-user test scenarios.
### 11. Create Employee Growth Portfolio Export Schedule
Follow the steps in
[How To: Load Export Integration Definitions ](/integrations/datasource-integrations/sap-standard-input-integration/how-to-load-export-integration-definitions)
to create a new export integration definition that will create an export of
Employee Growth Portfolios. Use the values from the table below when setting up
the integration definition.
Preferably, the time of day of the `Start Time` of the schedule is set to be
some time (e.g. one hour) after the time of day of the `Start Time` of the
Attribute Import Schedule (Step 1) of the
[Skills Taxonomy Sync ](/integrations/sap-skill-sync-integration/installation-skills-taxonomy).
| **Configuration Item** | **Value** |
| -------------------------- | ---------------------------------------------------------- |
| **Integration Definition** | `techwolf_employee_growth_portfolio_export_definition.icd` |
| **File Name Prefix** | `EmployeeGrowthPortfolioExport` |
| **Date Suffix Format** | `yyMMddHHmmssZ` |
| **File Folder** | `/tih/exports/employee_growth_portfolio` |
**Base ICD**:
[Talent Intelligence Hub Growth Portfolio Export ](https://api.sap.com/package/TalentIntelligenceHubGrowthPortfolioExportTemplate/icd)
The ICDs provided by TechWolf are based on the default integration definitions by SAP, as indicated by the **Base ICD** mentioned.
These have been pre-filled with some necessary values such as the file name prefix for your convenience, to ease the setup process.
TechWolf is committed to keeping these integration definitions up to date with the latest SAP SuccessFactors releases, but cannot guarantee full alignment with the SAP SuccessFactors release schedule.
Should issues arise when using these integration definitions, please contact [support@techwolf.ai](mailto:support@techwolf.ai).
### Verify the deployment
* In SAP Integration Suite, go to **Monitor > Integrations and APIs > Manage
Integration Content** and confirm that all deployed iFlows show the
**Started** status.
* Go to **Monitor > Integrations and APIs > Monitor Message Processing** to
watch messages as TechWolf triggers the iFlows. Failed messages include the
HTTP response from SuccessFactors, which is the fastest way to diagnose
authentication or permission issues (e.g. expired certificate, missing
SuccessFactors permission, incorrect AIR key).
## TechWolf Configuration
The TechWolf tenant will be configured by TechWolf itself. To complete the
setup, share the following values with your TechWolf representative:
* The downloaded **service key file** from Step 8 (via 1Password or another
agreed secure channel).
TechWolf will then link your SAP Integration Suite to your TechWolf tenant,
enable the schedule to consume the SAP SuccessFactors Growth Portfolio export
files from the SFTP server, and start the initial sync.
## Configuration Options
### Sync Direction Settings
The integration supports three sync direction options:
* **Bidirectional** (default): Two-way sync between TechWolf and SAP
SuccessFactors; changes made in TechWolf Employee Skill Profiles are
synchronized to their corresponding SAP SuccessFactors Growth Portfolios, and
vice versa.
* **TechWolf to SAP Only**: Skills flow from TechWolf to SAP SuccessFactors
only; changes made in TechWolf Employee Skill Profiles are copied to their
corresponding SAP SuccessFactors Growth Portfolios, while changes made in SAP
SuccessFactors are discarded and overwritten with the state of the TechWolf
Employee Skill Profiles.
* **SAP to TechWolf Only**: Skills flow from SAP SuccessFactors to TechWolf
only; changes made in SAP SuccessFactors Growth Portfolios are copied to their
corresponding TechWolf Employee Skill Profiles, while changes made in TechWolf
are discarded and overwritten with the state of the SAP SuccessFactors Growth
Portfolios.
### Merge Strategy Options
For the correct functioning of the normal operation of the integration, the
Employee Skill Profiles in both systems should be initially aligned. The
integration will do this initial alignment itself automatically when the
integration is first enabled, or when it is re-enabled after having been paused,
or when it encounters an Employee it had no knowledge about yet.
The initial alignment can happen in different ways; the integration supports
three such merge strategy options:
* **Merge Systems**: Combines Skills from both systems. In case of metadata
conflicts for Skills present in both systems (e.g. conflicting proficiency
levels), the values from TechWolf will be used.
* **Push TechWolf**: Uses the TechWolf Employee Skill Profile as the initial
source of truth, and will align the SAP SuccessFactors Growth Portfolio with
it. Any Skills initially present in the SAP SuccessFactors Growth Portfolio
but not in the TechWolf Employee Skill Profile will be removed from the SAP
SuccessFactors Growth Portfolio.
* **Push SAP**: Uses the SAP SuccessFactors Growth Portfolio as the initial
source of truth, and will align the TechWolf Employee Skill Profile with it.
Any Skills initially present in the TechWolf Employee Skill Profile but not in
the SAP SuccessFactors Growth Portfolio will be removed from the TechWolf
Employee Skill Profile.
## Deployment Tasks & Responsibilities
1. **TechWolf**: Setup Skill Sync environment and tenant requirements.
2. **Customer**: Configure SAP BTP and SAP SuccessFactors as described above.
3. **Customer**: Share the necessary values with TechWolf:
* The service key file from Step 8.
4. **TechWolf**: Validate API access by calling the iFlow end-to-end.
5. **TechWolf**: Enable the schedule to consume the SAP SuccessFactors Growth
Portfolio export files from the SFTP server.
6. **TechWolf**: Run the initial sync of Employee Skill Profiles with the
TechWolf API.
7. **TechWolf**: Setup tenant configuration and start the sync process based on
the configured direction.
8. **Customer**: Check end-user test scenarios.