> ## Documentation Index
> Fetch the complete documentation index at: https://developers.techwolf.ai/llms.txt
> Use this file to discover all available pages before exploring further.
# How to set up an integration
> Quick reference and step-by-step guide to set up a Data Integrator integration.
## Quick reference
In the Console sidebar, navigate to **Integrations** → **File-based**.
This page is only visible if you have the `write:integrations_manager`
permission.
-
Integration Name: Name for the integration.
Make it unique to this integration.
-
Integration Type: Determines the endpoints that
will be used to ingest data. It maps directly to the SkillEngine
API endpoints.
- Click the node to open the detail view.
-
There is one
primary input set up. Uploading files
for this configuration will trigger the integration if enabled.
-
Set up the other fields for the file or connection.
-
Optionally, configure extra sources. Click{" "}
Add Source, choose a sensible alias, indicating
what the source is about.
Drag edges from one input down to another on the left side of the input
node. Join arrows can only go downwards. This links inputs together.
- Click the node to open the detail view.
-
Set the
Delivery Type to whichever is applicable.
-
For certain delivery types, choose to{" "}
Auto-generate External IDs.
- Right-click to add operations.
-
Connect handles to make the data flow from one operation to
another.
- Save your integration.
## Setting up an integration
A new integration is defined by a set of data inputs (files, connectors) that
together form a datasource to be loaded into the SkillEngine API. An integration
can be "recurring", each new file upload or connector trigger being an updated
version of the same source.
One of the inputs is the `primary`, the driver of the integration. When that
input is triggered with new data (a new file arrives, a connector is triggered),
the integration is considered out of date, and will try to update the
SkillEngine API with the new data.
An example is a Learning Skill Event integration. At the customer's side,
there is a learning system, which can export a CSV file with the learner's
`ID`, `Name`, `Email`, `Learning Title`, and `Learning Description`. The
`ID` does not directly map to an Employee in the SkillEngine API, but we do
have an export from our identity provider that contains that mapping.
Together, the `learning_events_20260101.csv` and
`identity_provider_mapping_20260101.csv` form a datasource to be loaded
into the SkillEngine API.
The `learning_events_20260101.csv` file is the primary file, and the
`identity_provider_mapping_20260101.csv` file is an extra file. The
integration will be run on the `learning_events_20260101.csv` file, and
will use the latest version of the
`identity_provider_mapping_.csv` file to map the learner's
`ID` to an Employee in the SkillEngine API.
When an integration triggers on new data (a file upload or connector), or is manually invoked, a `run` is
created for that integration. A `run` is defined as a single execution of an
attempt to reconcile new or specified input data with the SkillEngine API.
### Step 1: Creating a new integration
Integrations are created in the Data Integrator UI, in the Console. Navigate to
**Integrations** → **File-based** in the sidebar. If you have the
`write:integrations_manager` scope on the Console, you will see a
`+ Create Integration` button.
This will open a modal that first asks more details about what type of
integration you want to create, after which it will drop you in the Integration
Editor.
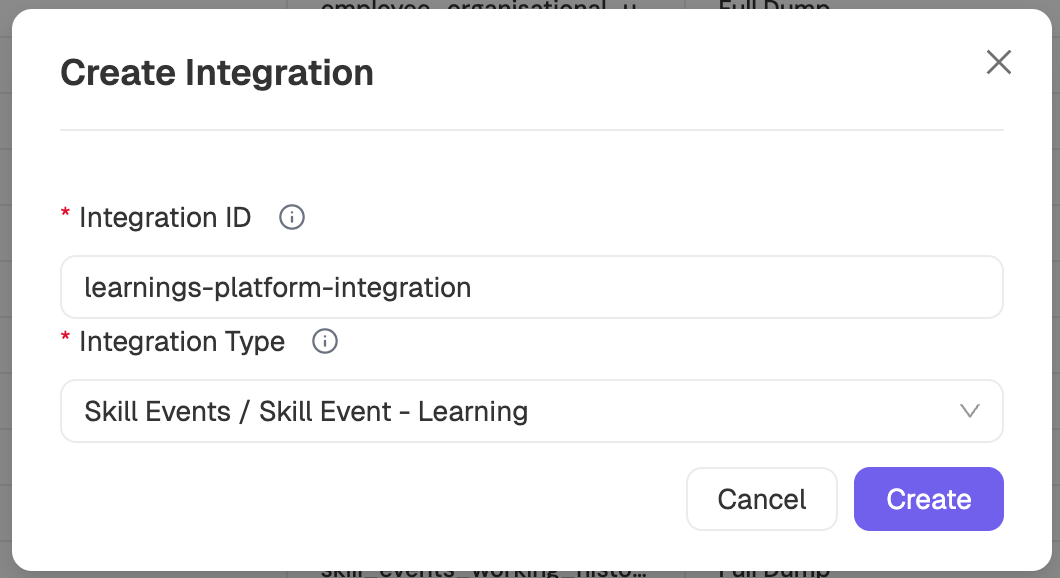 For the `Integration Name`, make it unique to this integration. This is used to
identify the integration.
For the `Integration Type`, select the type of integration you want to create.
These map directly to the SkillEngine API endpoints.
Click `Create` to navigate to the integration editor.
At this point, the integration does not exist yet, it needs a valid
configuration.
For the `Integration Name`, make it unique to this integration. This is used to
identify the integration.
For the `Integration Type`, select the type of integration you want to create.
These map directly to the SkillEngine API endpoints.
Click `Create` to navigate to the integration editor.
At this point, the integration does not exist yet, it needs a valid
configuration.
 ### Step 2: Configuring the input node
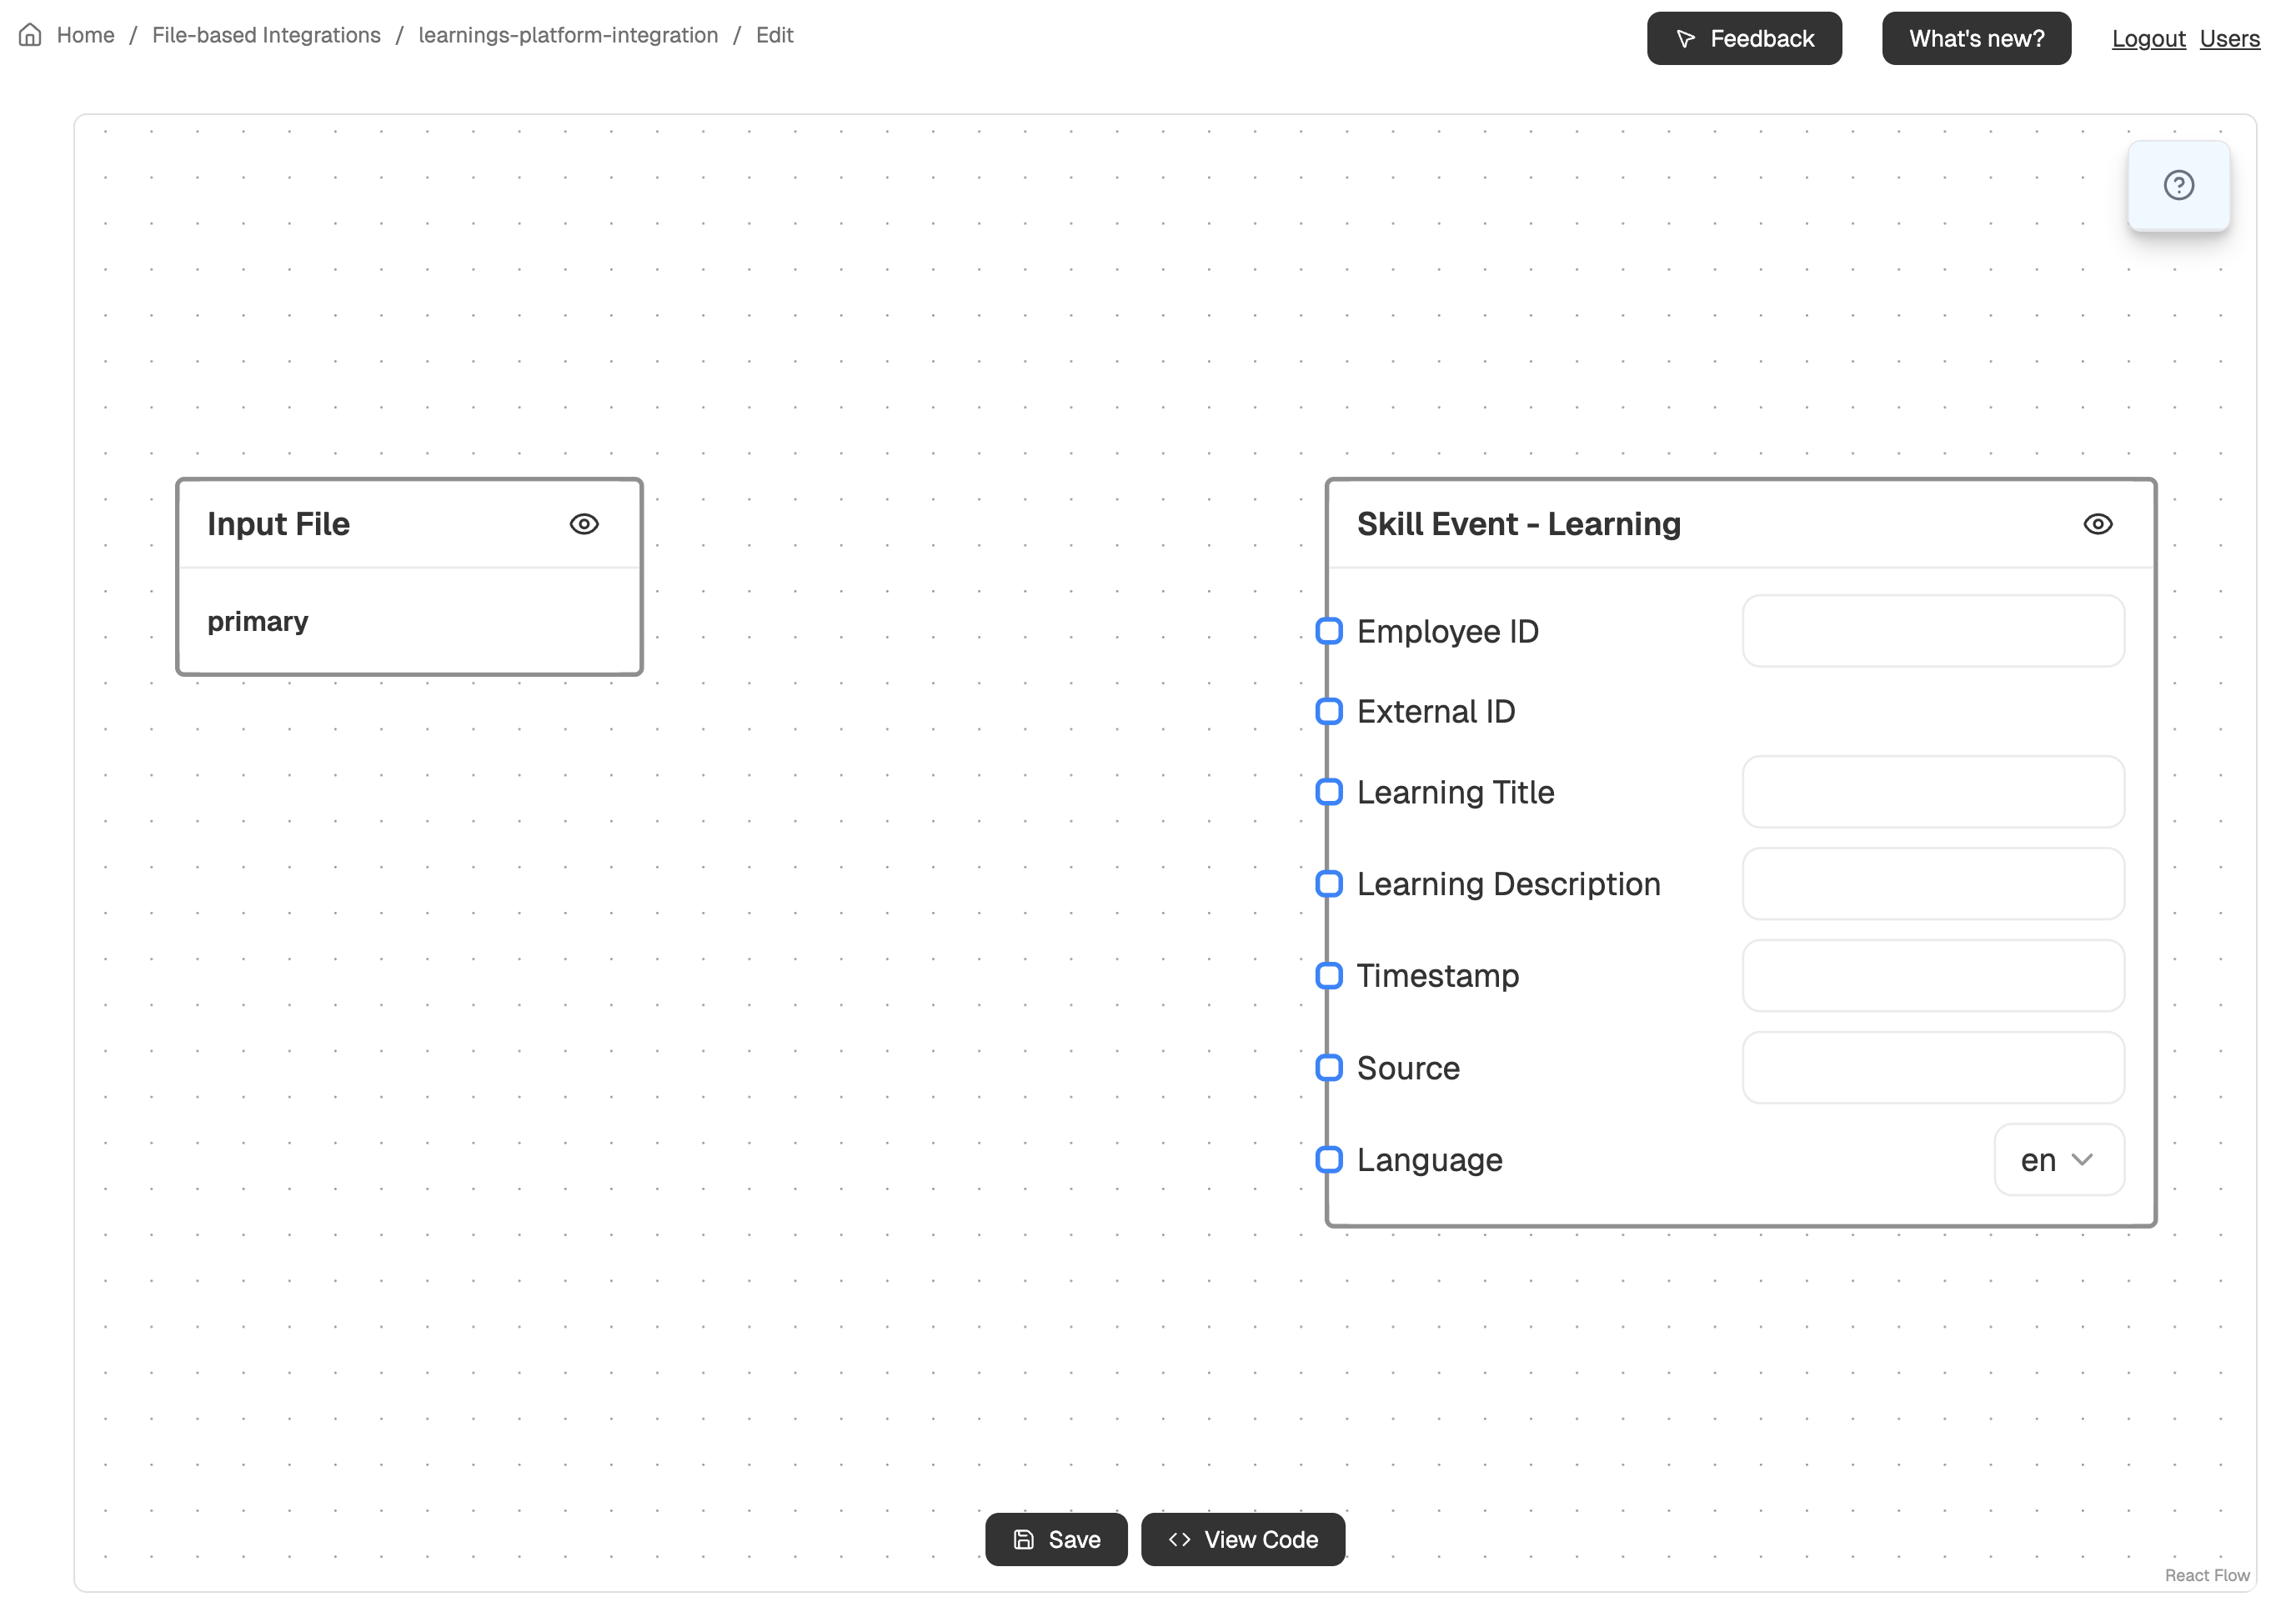
The input node is the first node in the integration. It is used to configure the
input data for the integration, which includes all inputs (files or connections)
needed to load the datasource into the SkillEngine API.
At first, the input node will be empty, only showing a `primary` tag. That bold
tag indicates the "alias" of the input. It is intended to help you differentiate
between the different inputs you have configured.
### Step 2: Configuring the input node
The input node is the first node in the integration. It is used to configure the
input data for the integration, which includes all inputs (files or connections)
needed to load the datasource into the SkillEngine API.
At first, the input node will be empty, only showing a `primary` tag. That bold
tag indicates the "alias" of the input. It is intended to help you differentiate
between the different inputs you have configured.
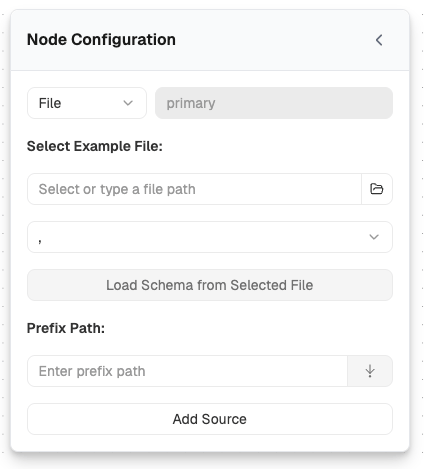 The input node is configured by clicking on the node to open the detail view.
This opens a configuration panel on the left side of the editor.
#### Configuring the primary input
The primary input is pre-created with the alias `primary`. This alias is just a
label to help you tell inputs apart — it does not affect the data source.
There are multiple possible source configurations:
* Setting up files as a source:
* **Example file**: Select an example file from S3 using the file picker.
This helps the Data Integrator understand the column structure of your data.
It is also used for previewing data later.
* **Load Schema from Selected File**: After selecting an example file, click
this button. The Data Integrator reads the column headers and populates the
input node with output handles — one per column. These handles are what you
connect to operations and the output node later.
* **Prefix**: Configure the prefix that identifies which uploaded files belong
to this input configuration. When a file is uploaded to S3, the Data Integrator
matches it to an integration based on this prefix (the first part of the file
name). For example, a prefix of `learning_events` would match
`learning_events_20260101.csv`.
* **Separator**: Choose the CSV separator — either `,` (comma) or `;`
(semicolon). This must match the actual delimiter used in your data.
The input node is configured by clicking on the node to open the detail view.
This opens a configuration panel on the left side of the editor.
#### Configuring the primary input
The primary input is pre-created with the alias `primary`. This alias is just a
label to help you tell inputs apart — it does not affect the data source.
There are multiple possible source configurations:
* Setting up files as a source:
* **Example file**: Select an example file from S3 using the file picker.
This helps the Data Integrator understand the column structure of your data.
It is also used for previewing data later.
* **Load Schema from Selected File**: After selecting an example file, click
this button. The Data Integrator reads the column headers and populates the
input node with output handles — one per column. These handles are what you
connect to operations and the output node later.
* **Prefix**: Configure the prefix that identifies which uploaded files belong
to this input configuration. When a file is uploaded to S3, the Data Integrator
matches it to an integration based on this prefix (the first part of the file
name). For example, a prefix of `learning_events` would match
`learning_events_20260101.csv`.
* **Separator**: Choose the CSV separator — either `,` (comma) or `;`
(semicolon). This must match the actual delimiter used in your data.
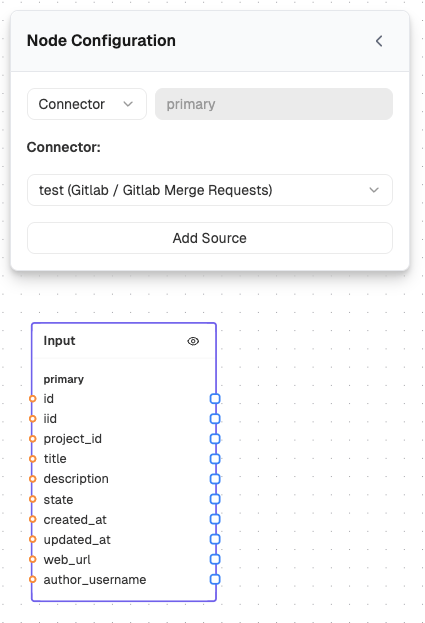
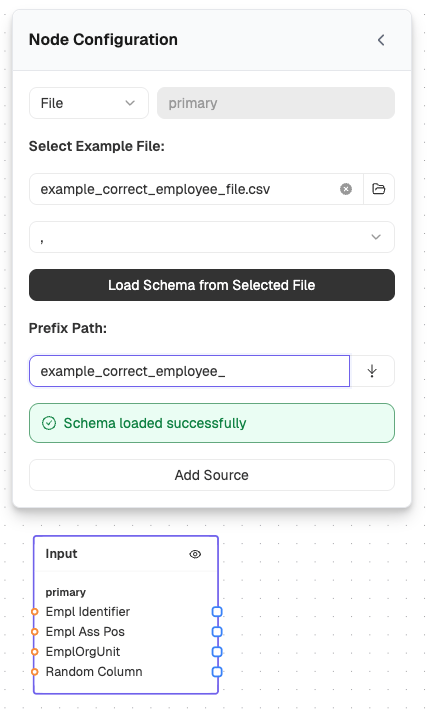 * Setting up a connector as a source:
* **Connector**: Select a connector or create a new one.
* **Load Schema**: This happens automatically when you select a connector.
* Note that preview is not yet possible for connectors.
* Setting up a connector as a source:
* **Connector**: Select a connector or create a new one.
* **Load Schema**: This happens automatically when you select a connector.
* Note that preview is not yet possible for connectors.
 #### Adding extra sources (optional)
If your integration needs data from multiple sources (e.g., a mapping file in
addition to the main data source):
* Click **Add Source** at the bottom of the input node detail panel.
* Choose a sensible **alias** for the new source (e.g., `identity_mapping`),
indicating what it contains.
* Configure the new source the same way as the primary input: select an example
file, load the schema, set the prefix and separator.
* The primary input is special: uploading a file that matches the primary prefix
triggers the integration (if enabled). Extra inputs do not trigger runs — the
integration always uses the latest version of each extra input.
### Step 3: Joining configured inputs
If you added extra sources in the previous step, you need to define how they
join to the primary input (or to each other).
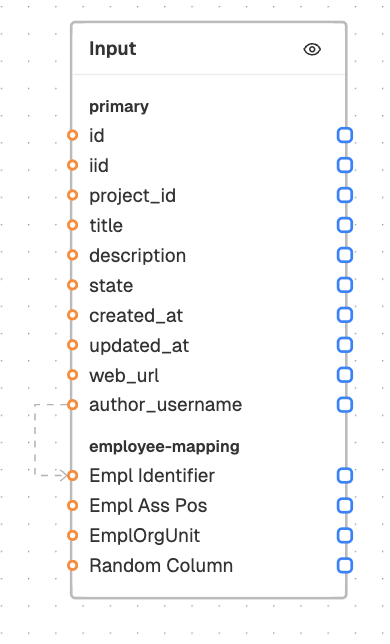
* On the **left side** of the input node, each input's columns appear as
connection handles.
* **Drag an edge** from a column in one input to a column in another input to
define a join key. For example, drag from `primary.employee_id` to
`identity_mapping.source_id`.
* Join arrows can **only go downwards** (from an input listed higher to an input
listed lower). The primary input is always at the top.
* All joins are **left outer joins** — rows from the upper input are preserved
even if there is no match in the lower input.
* You can join on multiple columns between the same two inputs by adding multiple
join edges.
Join edges appear as **dotted lines** on the canvas to distinguish them from
regular data flow edges.
#### Adding extra sources (optional)
If your integration needs data from multiple sources (e.g., a mapping file in
addition to the main data source):
* Click **Add Source** at the bottom of the input node detail panel.
* Choose a sensible **alias** for the new source (e.g., `identity_mapping`),
indicating what it contains.
* Configure the new source the same way as the primary input: select an example
file, load the schema, set the prefix and separator.
* The primary input is special: uploading a file that matches the primary prefix
triggers the integration (if enabled). Extra inputs do not trigger runs — the
integration always uses the latest version of each extra input.
### Step 3: Joining configured inputs
If you added extra sources in the previous step, you need to define how they
join to the primary input (or to each other).
* On the **left side** of the input node, each input's columns appear as
connection handles.
* **Drag an edge** from a column in one input to a column in another input to
define a join key. For example, drag from `primary.employee_id` to
`identity_mapping.source_id`.
* Join arrows can **only go downwards** (from an input listed higher to an input
listed lower). The primary input is always at the top.
* All joins are **left outer joins** — rows from the upper input are preserved
even if there is no match in the lower input.
* You can join on multiple columns between the same two inputs by adding multiple
join edges.
Join edges appear as **dotted lines** on the canvas to distinguish them from
regular data flow edges.
 ### Step 4: Configuring the output node
The output node defines how the transformed data maps to the SkillEngine API.
Click the output node to open its detail panel.
### Step 4: Configuring the output node
The output node defines how the transformed data maps to the SkillEngine API.
Click the output node to open its detail panel.
 #### Delivery Type
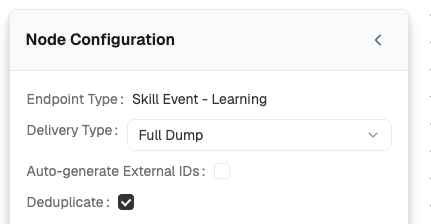
* **Full Dump**: Every run replaces the entire dataset. The Data Integrator
compares the new data with the current API state and creates, updates, or
deletes entities as needed to make the API match the data.
* **Delta** (diff): The integration tracks changes incrementally. Useful when
your source data contains explicit create/update/delete indicators or when
your dataset is large.
#### Auto-generate External IDs
* For certain Entity Types, you can toggle **Auto-generate External IDs**. When
enabled, the Data Integrator generates a unique identifier by hashing the
values of the fields you connect to the output node. This is useful when your
source data does not have a natural unique key.
Auto-generate External IDs is a **last resort** for when your source data does
not provide any stable, unique identifier for each record. It is often possible
to combine fields into a unique identifier, or revisit the input data to
provide a stable identifier. If not, the input data could be fully reloaded at
any time.
### Step 5: Adding operations to transform data
Operations are intermediate nodes that transform data between the input and
output nodes. They are added via the **right-click context menu** on the canvas.
Right-click on an empty area of the canvas to see the list of available
operations. Each operation is a self-contained transformation with its own
input(s) and output(s).
#### Available operations
Maps source values to target values. Useful for converting codes or categories
from the source system to values expected by the SkillEngine API.
* **Input**: A single field (connected from the input node or another
operation).
* **Output**: The mapped value.
* Configure key-value pairs in the detail panel: each row maps a source value
(left) to a target value (right).
* Optionally set a **default value** — used when the source value does not match
any of the configured mappings. If no default is set, unmatched values pass
through as-is.
Parses date strings from the source data into a standardised format.
* **Input**: A single date field.
* **Output**: The parsed date in ISO format.
* Configure the **date format** using
[strftime directives](https://docs.python.org/3/library/datetime.html#strftime-and-strptime-format-codes)
(e.g., `%Y-%m-%d` for `2026-01-15`, `%d/%m/%Y` for `15/01/2026`).
Concatenates multiple input fields into a single output string.
* **Inputs**: Two or more fields, can be a literal value (by leaving it
unconnected).
* **Output**: The concatenated string.
* Configure a **separator** (e.g., `-`, `, `, ` `). The separator is placed
between each value.
* Null values are ignored during concatenation. `a` and `null` will become
`a`; `a` and `b` will become `a-b`. The separator is ommitted on null values.
Converts text to a URL-safe slug format (lowercase, special characters replaced
with hyphens).
* **Input**: A single text field.
* **Output**: The slugified text.
Filters rows based on one or more conditions. Rows that do not match are
excluded from further processing.
* **Input**: A single field to evaluate.
* **Output**: The same field, but only for rows that pass the filter.
* Add one or more **conditions** in the detail panel:
* **Comparison**: `equals` (`=`) or `not equals` (`!=`).
* **Value**: The value to compare against.
* **Logical operator**: Combine multiple conditions with `AND` or `OR`.
Operations get added in order of appearance. So, `filter_1`, `OR`
`filter_2`, `AND` `filter_3` will be evaluated as
`(((filter_1) OR filter_2) AND filter_3)`.
Returns the first non-null/non-empty value from multiple inputs. Useful
when a value could come from different source columns and you want to pick the
first available one, e.g. dates.
* **Inputs**: Fields in order of fallback.
* **Output**: The first non-null value from the inputs, evaluated in order of
appearance.
A specialised output node variant for mapping data to Custom Properties on the
SkillEngine API. Use this instead of the regular output node when your
integration needs to set Custom Properties.
* Maps input fields to Custom Property names.
* Produces a JSON-encoded structure for each Custom Property.
There is a list variant of Custom Properties Output, which is used to
set list\[text] Custom Properties. This node aggregates multiple rows of your
data into a single list value. You need exactly one Custom Property List
integration per list\[text] custom property.
### Step 6: Connecting nodes
Edges are the lines that carry data from one node to another. They define the
data flow of your integration.
#### How to connect nodes
* Each node has **handles**: small connection points on its edges.
* **Right-side handles** (source/output): Data flows *out* of the node.
* **Left-side handles** (target/input): Data flows *into* the node.
* **Drag from a right-side handle to a left-side handle** on another node to
create an edge.
* Handles are labelled with the field name (e.g., `primary.email`,
`mapped_value`, `external_id`).
* You can connect input node columns directly to output node fields (for
pass-through mapping) or route them through one or more operations first.
#### Tips
* You can **multi-select** nodes by holding `Shift` and clicking.
* **Copy/paste** nodes with `Ctrl+C` / `Ctrl+V` (or `Cmd` on macOS).
* Use the **Preview** button (eye icon) on a node to see a sample of its output
data before saving.
### Step 7: Previewing and saving
#### Preview
* Click the **Preview** button (eye icon) on a node to see a sample of its output
data before saving.
* This is a dry run of the first 50 rows of the integration, it does not actually
send any data to the SkillEngine API.
* Connector outputs and some nodes do not support preview.
#### Save
* Click the **Save** button at the bottom of the editor to persist your
integration configuration.
* If this is a new integration, saving creates the integration for the first
time. It does not exist until you save.
* The integration is saved but **not automatically enabled**. You need to enable
it separately (see below).
If you navigate away from the editor without saving, your changes will be
lost.
### Step 8: Enabling the integration
After saving, navigate to the integration details page.
* The details page shows metadata about the integration: Integration Name, Entity
Type, Delivery Type, and Enabled status.
* Use the **toggle switch** to enable or disable the integration.
* When enabled, uploading a file matching the primary input's prefix will
automatically trigger a run, or on a schedule for a connector primary input.
## What's next?
Once your integration is set up and enabled, see
[How to run an integration](/integrations/datasource-integrations/data-integrator/how-to-run-integration)
for details on triggering runs, monitoring progress, and reviewing results.
## FAQ
Auto-generate External IDs is a **last resort** for when your source data does
not provide any stable, unique identifier for each record.
**Why you should avoid it when possible:**
External IDs are generated by hashing a combination of fields from the input
data — typically all fields except highly variable ones like timestamps. This
means:
* If **any** of the hashed fields change (e.g., a company name is corrected),
the generated ID changes. The Data Integrator cannot tell whether this is an
update to an existing record or a brand new record.
* This leads to **duplicate data** in the API, **missed deletes**, or
**unexpected overwrites**.
For example, imagine a working history event with fields for title, description,
start date, end date, and company. All of these are included in the hash. If the
company name changes from "Acme Corp" to "Acme Corporation", the generated
external ID changes — and the Data Integrator treats it as an entirely new event
rather than an update.
**When it is acceptable:**
* Legacy systems that genuinely have no reference ID for records.
* Text-based data sources with no natural key.
The Deduplication option removes duplicate rows from your input data before it
is loaded into the API. When enabled, it keeps only the **first row** in a set
of rows that share the same external ID.
We recommend enabling deduplication for all integrations. It is enabled by
default.
Choose **Delta** delivery when your source system cannot or should not export
all data every time. This is common for:
* **Large datasets** like learning histories, where re-exporting everything on
each run is impractical.
* **Systems that only track changes** — the source only knows about new,
changed, or removed records since the last export.
With Delta delivery, your configuration must include an **operation** column.
Connect this column to the `operation` field on the output node. The operation
value for each row is either:
* `update` — creates the entity if it does not exist, or updates it if it does.
* `delete` — removes the entity from the API.
A common pattern is to do an initial **Full Dump** to load all existing data,
then switch the integration's delivery type to **Delta** for all subsequent runs
with incremental changes.
Choose **Full Dump** when your source can export a complete snapshot every time.
This is simpler and less error-prone, because the data itself is the single
source of truth — anything not in the data will be deleted from the API.
If the content stays the same (still the same entity type) but the column
structure changes — for example, columns are renamed, added, or removed — you
need to update your integration configuration:
1. Open the integration in the editor.
2. On the input node, select a new example file that reflects the updated
format.
3. Click **Load Schema from Selected File** to update the column handles.
4. Reconnect any broken or new edges between the input node and your operations
or output node.
5. Save the integration.
The prefix can remain the same as long as the files still represent the same
data. The Data Integrator will use the updated configuration for all future
runs.
If the prefix itself changes, update it on the input node as well.
This documentation is built and hosted on [Mintlify](https://mintlify.com), a developer documentation platform.
#### Delivery Type
* **Full Dump**: Every run replaces the entire dataset. The Data Integrator
compares the new data with the current API state and creates, updates, or
deletes entities as needed to make the API match the data.
* **Delta** (diff): The integration tracks changes incrementally. Useful when
your source data contains explicit create/update/delete indicators or when
your dataset is large.
#### Auto-generate External IDs
* For certain Entity Types, you can toggle **Auto-generate External IDs**. When
enabled, the Data Integrator generates a unique identifier by hashing the
values of the fields you connect to the output node. This is useful when your
source data does not have a natural unique key.
Auto-generate External IDs is a **last resort** for when your source data does
not provide any stable, unique identifier for each record. It is often possible
to combine fields into a unique identifier, or revisit the input data to
provide a stable identifier. If not, the input data could be fully reloaded at
any time.
### Step 5: Adding operations to transform data
Operations are intermediate nodes that transform data between the input and
output nodes. They are added via the **right-click context menu** on the canvas.
Right-click on an empty area of the canvas to see the list of available
operations. Each operation is a self-contained transformation with its own
input(s) and output(s).
#### Available operations
Maps source values to target values. Useful for converting codes or categories
from the source system to values expected by the SkillEngine API.
* **Input**: A single field (connected from the input node or another
operation).
* **Output**: The mapped value.
* Configure key-value pairs in the detail panel: each row maps a source value
(left) to a target value (right).
* Optionally set a **default value** — used when the source value does not match
any of the configured mappings. If no default is set, unmatched values pass
through as-is.
Parses date strings from the source data into a standardised format.
* **Input**: A single date field.
* **Output**: The parsed date in ISO format.
* Configure the **date format** using
[strftime directives](https://docs.python.org/3/library/datetime.html#strftime-and-strptime-format-codes)
(e.g., `%Y-%m-%d` for `2026-01-15`, `%d/%m/%Y` for `15/01/2026`).
Concatenates multiple input fields into a single output string.
* **Inputs**: Two or more fields, can be a literal value (by leaving it
unconnected).
* **Output**: The concatenated string.
* Configure a **separator** (e.g., `-`, `, `, ` `). The separator is placed
between each value.
* Null values are ignored during concatenation. `a` and `null` will become
`a`; `a` and `b` will become `a-b`. The separator is ommitted on null values.
Converts text to a URL-safe slug format (lowercase, special characters replaced
with hyphens).
* **Input**: A single text field.
* **Output**: The slugified text.
Filters rows based on one or more conditions. Rows that do not match are
excluded from further processing.
* **Input**: A single field to evaluate.
* **Output**: The same field, but only for rows that pass the filter.
* Add one or more **conditions** in the detail panel:
* **Comparison**: `equals` (`=`) or `not equals` (`!=`).
* **Value**: The value to compare against.
* **Logical operator**: Combine multiple conditions with `AND` or `OR`.
Operations get added in order of appearance. So, `filter_1`, `OR`
`filter_2`, `AND` `filter_3` will be evaluated as
`(((filter_1) OR filter_2) AND filter_3)`.
Returns the first non-null/non-empty value from multiple inputs. Useful
when a value could come from different source columns and you want to pick the
first available one, e.g. dates.
* **Inputs**: Fields in order of fallback.
* **Output**: The first non-null value from the inputs, evaluated in order of
appearance.
A specialised output node variant for mapping data to Custom Properties on the
SkillEngine API. Use this instead of the regular output node when your
integration needs to set Custom Properties.
* Maps input fields to Custom Property names.
* Produces a JSON-encoded structure for each Custom Property.
There is a list variant of Custom Properties Output, which is used to
set list\[text] Custom Properties. This node aggregates multiple rows of your
data into a single list value. You need exactly one Custom Property List
integration per list\[text] custom property.
### Step 6: Connecting nodes
Edges are the lines that carry data from one node to another. They define the
data flow of your integration.
#### How to connect nodes
* Each node has **handles**: small connection points on its edges.
* **Right-side handles** (source/output): Data flows *out* of the node.
* **Left-side handles** (target/input): Data flows *into* the node.
* **Drag from a right-side handle to a left-side handle** on another node to
create an edge.
* Handles are labelled with the field name (e.g., `primary.email`,
`mapped_value`, `external_id`).
* You can connect input node columns directly to output node fields (for
pass-through mapping) or route them through one or more operations first.
#### Tips
* You can **multi-select** nodes by holding `Shift` and clicking.
* **Copy/paste** nodes with `Ctrl+C` / `Ctrl+V` (or `Cmd` on macOS).
* Use the **Preview** button (eye icon) on a node to see a sample of its output
data before saving.
### Step 7: Previewing and saving
#### Preview
* Click the **Preview** button (eye icon) on a node to see a sample of its output
data before saving.
* This is a dry run of the first 50 rows of the integration, it does not actually
send any data to the SkillEngine API.
* Connector outputs and some nodes do not support preview.
#### Save
* Click the **Save** button at the bottom of the editor to persist your
integration configuration.
* If this is a new integration, saving creates the integration for the first
time. It does not exist until you save.
* The integration is saved but **not automatically enabled**. You need to enable
it separately (see below).
If you navigate away from the editor without saving, your changes will be
lost.
### Step 8: Enabling the integration
After saving, navigate to the integration details page.
* The details page shows metadata about the integration: Integration Name, Entity
Type, Delivery Type, and Enabled status.
* Use the **toggle switch** to enable or disable the integration.
* When enabled, uploading a file matching the primary input's prefix will
automatically trigger a run, or on a schedule for a connector primary input.
## What's next?
Once your integration is set up and enabled, see
[How to run an integration](/integrations/datasource-integrations/data-integrator/how-to-run-integration)
for details on triggering runs, monitoring progress, and reviewing results.
## FAQ
Auto-generate External IDs is a **last resort** for when your source data does
not provide any stable, unique identifier for each record.
**Why you should avoid it when possible:**
External IDs are generated by hashing a combination of fields from the input
data — typically all fields except highly variable ones like timestamps. This
means:
* If **any** of the hashed fields change (e.g., a company name is corrected),
the generated ID changes. The Data Integrator cannot tell whether this is an
update to an existing record or a brand new record.
* This leads to **duplicate data** in the API, **missed deletes**, or
**unexpected overwrites**.
For example, imagine a working history event with fields for title, description,
start date, end date, and company. All of these are included in the hash. If the
company name changes from "Acme Corp" to "Acme Corporation", the generated
external ID changes — and the Data Integrator treats it as an entirely new event
rather than an update.
**When it is acceptable:**
* Legacy systems that genuinely have no reference ID for records.
* Text-based data sources with no natural key.
The Deduplication option removes duplicate rows from your input data before it
is loaded into the API. When enabled, it keeps only the **first row** in a set
of rows that share the same external ID.
We recommend enabling deduplication for all integrations. It is enabled by
default.
Choose **Delta** delivery when your source system cannot or should not export
all data every time. This is common for:
* **Large datasets** like learning histories, where re-exporting everything on
each run is impractical.
* **Systems that only track changes** — the source only knows about new,
changed, or removed records since the last export.
With Delta delivery, your configuration must include an **operation** column.
Connect this column to the `operation` field on the output node. The operation
value for each row is either:
* `update` — creates the entity if it does not exist, or updates it if it does.
* `delete` — removes the entity from the API.
A common pattern is to do an initial **Full Dump** to load all existing data,
then switch the integration's delivery type to **Delta** for all subsequent runs
with incremental changes.
Choose **Full Dump** when your source can export a complete snapshot every time.
This is simpler and less error-prone, because the data itself is the single
source of truth — anything not in the data will be deleted from the API.
If the content stays the same (still the same entity type) but the column
structure changes — for example, columns are renamed, added, or removed — you
need to update your integration configuration:
1. Open the integration in the editor.
2. On the input node, select a new example file that reflects the updated
format.
3. Click **Load Schema from Selected File** to update the column handles.
4. Reconnect any broken or new edges between the input node and your operations
or output node.
5. Save the integration.
The prefix can remain the same as long as the files still represent the same
data. The Data Integrator will use the updated configuration for all future
runs.
If the prefix itself changes, update it on the input node as well.
This documentation is built and hosted on [Mintlify](https://mintlify.com), a developer documentation platform.